Friday, November 25, 2011

fun with baking (wedding cookies, c. 2003)

In June of 2003, I married my awesome husband at a mostly-handmade wedding a few miles from our home. Friends and family filled first a quonset hut for the ceremony, then the field and wooded area just outside. A couple of years ago, the quonset hut in question was torn down (we happened to be there one day, and salvaged one of the original nails), replaced by a beautiful wedding and reception hall.

But, though buildings come and go, the leftover cookies I made (with help) remained . . . in my freezer . . . for the last eight+ years.


Okay, cards on the table: the leftover cookies actually moved with us from our old house to our current house about six years ago. Yes, it's true; I moved stale, leftover wedding cookies from one house to another.


They held up remarkably well in appearance, but the flavor and texture were horrible. (What, you mean you wouldn't taste eight-year-old wedding cookies from your freezer?)


I snapped these photos before tossing them.


At the time of our wedding, they were delicious; I followed a Martha Stewart recipe for citrus sugar cookies, similar to the one linked here. They're decorated with a royal icing like in that recipe, too. Time consuming, but they looked really nice on the dessert table next to the wedding cake and the groom's cake! These photos show them on a wooden cutting board gifted to us by a co-worker. On the big day, they were arranged on a silver-plated serving tray, one of seven I collected at thrift stores and consignment shops in the months leading up to the wedding.


Now that it's Christmas time and I have an eager baking (tasting) assistant (21 months old), I'm thinking about making up a new batch, but with reindeer and trees instead of wedding cakes, flowers, and moons. Hopefully, there'll be no leftovers this time. My freezer is completely full.


(p.s. you can make these photos bigger by clicking on them . . . but you probably knew that!)


Pin It

Tuesday, November 15, 2011

sweater better


I've had this cute sweater in my closet for awhile; I picked it up at a thrift store and wore it once or twice, but it was a little short on me and never fit right across the chest (a constant issue with me and clothes).

Last week, I noticed this tutorial over at the I am Momma Hear Me Roar blog and pulled the sweater out of the closet for a quick re-make into a cardigan.


Success!


Now I can wear it way more often. Gonna keep on the look-out for other spare sweaters to make better, too! Awesome project tutorial, Delia. Thanks so much for the inspiration!


(p.s. you can make these photos bigger by clicking on them . . . but you probably knew that!)


Pin It

Saturday, November 12, 2011

leftovers

Whenever I finish a project, there are usually leftovers of one kind or another. In the past, I have just boxed things up and stashed them away, but the recent clean-out of the spare room may just have cured me from that habit. New habit I'm trying to form: using the leftovers to make another fun project right away.

Saving things for later seems like the right thing to do, but when you have as many different kinds of hobbies as I have, and when you tend to forget down the road where the leftovers are or whether you have them at all, you end up buying new stuff each time anyway. Wasteful. Makes storage areas messy, too, and then when you're pulling stuff out to donate, you start adding up in your head the money you spent . . .

The Halloween costume project this year meant leftovers of several kinds: felt and fake fur, most obviously. With Christmas coming up, I thought I'd take some of the stuff and make something cute with it for my kiddo.


Voila! Monster pillows!

To start, I cut the largest rectangle I could from the leftovers of a remnant of faux fur used for the tail of my son's Halloween costume. The pillow pictured is made with a piece that measured about 13 x 25 inches. (Folded in half and stitched, it made a nearly-square pillow approximately 12 x 12 inches.)

Next, I planned the face, and cut face parts out of leftover red, orange, ivory, and charcoal gray felt. I stitched the layers together, then planned where they should go on the pillow (not too close to the edges, and not to close to where the fold would go at the top of the pillow). You can pin your pieces in place; I just free-handed, because I wasn't too picky about having the face end up perfectly placed. I think it looks a little sillier slightly off-kilter.

Using my machine, I stitched around the face pieces close to the edges, attaching them to the fur.

Then, I clipped my threads, made my fold so that the furry sides were together, and stitched around all of the open edges, leaving a space open to turn the pillow right-side out and stuff it. I stuffed it full of fluff, then hand-stitched the opening closed.


I may have a hard time keeping this guy (and his soon-to-be siblings!) out of sight until Christmas. He already looks quite at home in the nursery chair.


(p.s. you can make these photos bigger by clicking on them . . . but you probably knew that!)


Pin It

Thursday, November 10, 2011

once upon a time . . .

. . . I ran a bookstore. And I used to make elaborate displays with box cardboard and packing paper, and signs on chalkboards. I found these photos the other day, and wanted to share. These are all free-hand and took between one and three hours each.


From the last book of a Series of Unfortunate Events by Lemony Snicket:


From a display of new summer books:


To advertise a book club discussion of Suite Francaise:


From the side of a magazine rack near the children's section:


To advertise pre-orders for the final Harry Potter book:


From an appearance by PETA founder Ingrid Newkirk, to advertise her book Let's Have a Dog Party:


To celebrate our second anniversary at the store:


To advertise a shelf of books by our favorite publisher of quirky books:


To advertise our book club meeting for Neil Gaiman's Anansi Boys:


To announce the party celebrating our store's closure after three years:


To make the chalk boards, I used a quart of chalkboard paint, painted over foam core board (in the large frame) and on repurposed bare wood shelving for the smaller board. In three years, it never chipped or flaked; good useful stuff! I'm hoping to use it again soon to put some chalkboards on the bebe's bedroom door.

Have you used chalkboard paint in any unusual applications? Share links in the comments section below.


(p.s. you can make these photos bigger by clicking on them . . . but you probably knew that!)


Pin It

Monday, November 7, 2011

felt circle curtain


I haven't decided yet if this is permanent, but at least it offers semi-privacy to the bathroom window since I took down the paper roller shade that got ruined (Ahem. Cats.).

It's made from circles of felt leftover from this year's Halloween costumes, via this recent Pin from Pinterest:


It took a little under an hour this morning, partly because I'm pretty certain my circles are larger than the ones in the original tutorial. Whatcha think?

(Former Pinterest inspiration posts: here, here, and here!)


(p.s. you can make these photos bigger by clicking on them . . . but you probably knew that!)


Pin It

Thursday, November 3, 2011

pinterest challenge — max + wild thing costumes!

Pinterest Challenge time, sponsored by the Young House Love blog and the Bower Power blog, joined this month by Ana White and Erin!

When it was time to get started on a Halloween costume for my kiddo this year, I started searching Pinterest and the web-at-large for a pattern or tutorial to make a copy of Max's wolf suit from the book Where the Wild Things Are. My search turned up this:
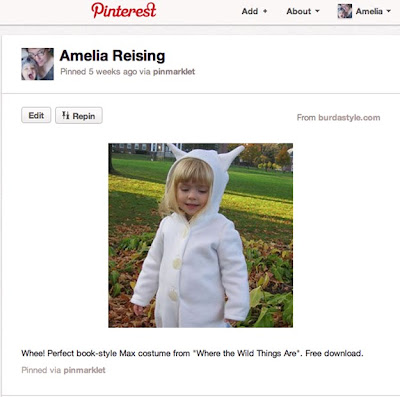


a free, downloadable BurdaStyle pattern in exactly the right size—2T. Thanks, SuzeB! I'm almost certain that the poor rating on this pattern isn't a reflection of the pattern itself (it all fit together just fine), but the result of dim bulbs like me trying to click on the bubbles to see other people's ratings, and thereby giving it a poor rating accidentally. The pattern is great. Here's my kiddo wearing it now, up to mischief of one kind and another, as the story goes.


I started with an ivory-colored, slightly stretchy, minky-feeling, polyester faux fur instead of the recommended polar fleece, because I don't really dig the way polar fleece pills after washing—even the "no-pill" kind. The lovely, bushy, furry tail is made from a quarter-yard remnant from JoAnn Fabrics.

Other alterations to the pattern: I made the hood very slightly deeper and made the front closure a velcro closure so that the sewn-on buttons are purely decorative (I like a quick-release one-piece costume for diaper emergencies). No need to get too in-depth on the alterations; SuzeB provides a nice tutorial on how to put the suit together. I just left off the front facings and folded over a narrow hem on the front edge, then stitched in the velcro. Easy peasy.


That's them at the library, right before Halloween story time. Which brings me to the other part of this costume: my husband's Wild Thing. Not something I'd planned on originally, but then I came across this:


while looking for a "quick" way to make a Wild Thing costume head. Hah!

The directions Seamster provides with his Instructable remind me of the way I crochet: intuitively. You see what you want the end result to look like, you get out some materials and a basic set of directions, and you interpret and innovate where necessary. Voila!

A couple of weeks later, you have this guy.


Now, a couple of people on the Instructable commented that they started this project mere days or hours before Halloween, and finished in plenty of time. I guess I forget sometimes how quickly things can get done when a person has all their evening hours free! For me, working a couple of hours a day a few times a week, it took a little longer than anticipated, which is how I ended up at the mall on Halloween in my Where the Wild Things Are t-shirt (or, as my husband called it, my "cloak of invisibility") instead of a matching costume. Never mind. The boys were instant celebrities.

We were sitting at the table, just like this


eating dinner in the food court and cooling off, and still had people coming up to compliment the costumes and take photos. While we were eating. Back off, paparazzi! I'm trying to eat my enchilada!

As for alterations to the Seamster's Instructable, I started with felt instead of polar fleece, this time for cost concerns as well as to make the Wild Thing have more of a Muppet-like appearance. The base is made as described here, except I enlisted my husband to cut it in a 18-inch diameter circle since his head is larger than a child's head.

I used 4 mm newsboard for the base, then, for the step in which I built up the hat base, I used cheaper, more flexible kraft board attached with tape and hot glue.

In the next step, in which I sewed the dome out of felt and attached it to the base, I followed the advice on measuring and cutting the fabric (felt, in my case), but the part about using trial and error stood out to me as being time-consuming . . . so I did this instead:


After stuffing the bubble with polyester fluff, I folded over the saggy parts and used a whipstitch to hold them down. I made sure to keep the whipstitching where I knew it would be out of sight under the Wild Thing's fur. It made a nice, relatively smooth dome shape, without having to rip the thing apart and re-machine sew + stuff a half-dozen times.

Since the whole thing is made out of felt, I also left off the step about stitching together a facade of felt for where the cheek lines would be, and used an alcohol-based marker to sketch those lines in instead.


I followed the instructions for shaping the nose and eyes from newspaper and masking tape (!) which are not materials I would ever have thought of using for this . . . kind of like dry paper mache. Once covered in felt, I was really impressed by how nice and smooth + solid the pieces turned out. I attached them as directed, accented around the eyes with the alcohol marker, then sewed the horns out of the same felt and stitched them on before beginning to hot glue the fur in place.

Next alteration? Instead of gluing down the teeth on top of the red mouth felt, I cut slits through the felt as I was attaching it so that I could poke the teeth up through the felt, concealing the little tabs. Because I have just a touch of the crafting OCD.


I finished the lower jaw mostly as directed, but I used a piece of foam pipe insulation instead of a 2-inch x 3/4-inch piece of foam. The curve presented some challenges, but in the end it looked pretty good, I think!


Here's one more of the boys in the wild (the kiddo's crown is something I sewed out of wool felt and dyed golden yellow):


Materials list:

Max's Wolf Suit
1 yard of 72-inch wide furry stuff (from JoAnn's with coupon)—$7.49
3 large plastic buttons (on-hand from Grandma's button box)—free
1 package bargain velcro (from JoAnn's)—99 cents
1/4-yard faux fur remnant (from JoAnn's)—$1.30

Wild Thing Head-Piece
1 30x48" sheet of 4 mm newsboard (from Oregon Art Supply)—$5.50 (with enough left over for a couple of other projects)
1 24x36" sheet of kraft brown tag board (from Paper Plus)—45 cents
1 9x12" yellow eco-felt rectangle (from JoAnn's, on sale)—25 cents
1 9x12" orange eco-felt rectangle (from JoAnn's, on sale)—25 cents
1 9x12" dark grey eco-felt rectangle (from JoAnn's, on sale)—25 cents (or use a scrap of something you have on-hand)
1/4-yard red 72-inch wide eco-felt (from JoAnn's, on sale)—75 cents
1 yard antique white 72-inch wide eco-felt (from JoAnn's, on sale)—$2.99
1/2-yard "Grizzly" black fur (from JoAnn's, on sale)—$5.10
elastic (on-hand)—free
masking tape (from Jerry's hardware store)—$2.29
20 extra-strength long glue gun sticks (from Jerry's hardware store)—$4.99
1 32-oz. bag polyester Fiber-Fill (from JoAnn's, with coupon)—$5.00
alcohol-based marker (on-hand)—free

Wild Thing Costume
1 heathered-red long-sleeved t-shirt (from Target, on sale)—$6.00
2 yards beige flannel (JoAnn's, on sale)—$4.78
acrylic paint (on-hand)—free
alcohol-based marker (on-hand)—free

(Other Pinterest inspiration posts: here, here, and here!)


(p.s. you can make these photos bigger by clicking on them . . . but you probably knew that!)


Pin It


Tuesday, October 18, 2011

wonderland part 8 — summer 2010

In which the blogger adds a glut of photos never-before-shared from the Roving Park Players production of Alice in Wonderland, summer 2010.

I wish I had taken more photos of a bunch of this stuff; in the time crunch leading up to the production, I didn't pause often enough to take photos of completed projects. I'm regretting it now, because some of the props and costumes really did turn out beautifully. Also, it's my policy not to publish photos of other people's children to the blog without permission, and since most of the cast was under age 18, I can't currently show many photos of finished costumes. Here's a link, though, to the Roving Park Players website, where you can see a few more photos of some of the costumes and props we all made, including a turtle shell from a garbage can lid, several nifty pairs of animal ears, the Queen of Hearts' laboriously constructed beauty of a dress, and Alice's dress, stitched from a button down shirt and some white muslin by Stacie W (who actually did a whole lot of really nice sewing on several of the kids' costumes).

Here we have wo different horse heads I made of foam, spray paint, faux fur and plastic animal eyes. These were worn on top of the girls' heads like hats. The foam, purchased in sheet form, has one side with a smooth "skin" on it, which is the side I spray painted.


This next set are images of the Queen of Hearts' deck of cards tabbards. I cut a large stencil from waterproof poster board for the card backs, based on a drawing of the red queen from the original publication of Alice. I applied the stencil to some plain painters' canvas (drop cloths = cheap!) using red spray paint. The fronts are hand-appliqued felt that Lisa S-B painstakingly stitched onto separate sheets of canvas.


The tree in the garden was portrayed by an actor in brown clothing. His canopy is something I made from an old umbrella. Using several shades and coats of spray, I stenciled several different kinds of real leaves onto the umbrella to make an easy-to-transport tree canopy.


These next shots show two pocket watches (one for the Mad Hatter, and one for the White Rabbit) in the early stages. These are Trader Joe's chocolate tins with little plastic windows (still taped off, in these photos). I drilled holes and attached hook-eyes for chain attachment, then spray painted the tins using a hammered metal and antique bronze spray. You can see what a nice texture the hammered metal gives the watches, while nicely hiding text, scratches, and dents. I later filled the tins with all sorts of gears and watch hands and charms, and attached them with some simple hardware chain.


You can see here, across the Mad Hatter's vest near the bottom, the chain of his watch. The coat is the same one I made for Captain Hook in the previous season's production of Peter Pan (and it was used this past summer as the Wizard's coat in The Wizard of Oz. I can't wait to see where it turns up next!).


This is a first sketch of Frog's outfit. The pants ended up being made from a striped thrift store sheet, and the actress portraying the frog stitched up her own vest from some other sheet fabric leftover from the Caterpillar's coat. Oh Rosalie! I wish I had a photo of you in your wonderful costume!


Caterpillar's fez, made of a buckram base I stitched together, then handed off to Lisa S-B, who did an amazing job covering it in felt and trim.


Caterpillar's coat, which the actor really liked. The volunteer who stitched this together for him, Miss Phoebe, hadn't previously tackled such a complicated pattern. I was SO PROUD though, of the way she stuck with it and eventually finished it. It turned out so beautifully, and really does credit to the character of the Caterpillar.


The actress to the left there is not Phoebe; it's actually the beautiful and talented Misty, trying on her costume for the Red Queen. Here's a better shot of her costume during a performance. The dress is one I thrifted, with a skirt I altered to Misty's preference. I also added a sash at the waist and a scarf/capelet thing to the back. Her felt hat was commissioned by the director from an artist whose name I'm afraid I don't know.


Here we have the wire frame for the Queen of Hearts' crown. I made it from twisted floral wire . . .


. . . then covered the wire with one layer of white, then several layers of red and yellow tissue paper soaked in Elmer's glue.


The result is an inexpensive (under $2) lightweight crown that catches light beautifully, though it may be considered a bit fragile for normal wear-and-tear. I admit I was led more by aesthetic and budget than practicality on this project; though it lasted the length of the show's run, the heart ornaments at the top required careful handling. Overworked wire has a tendency to break.


I think I might have shown these before; Phoebe made several pairs of ears for this production from a tutorial over at Threadbanger, and some furry felt (awesomely useful stuff we also used for the animal mitts and various other projects) These ears belonged to the March Hare.


And one of the Tweedle's hats, hand appliqued by Lisa. I loved the way these looked with the boys' striped shirts onstage.


Again, I'm so wishing I had better photographs! Though I'm currently retired from the theater, if I were ever to work another show I'd certainly take more photographs of everything.

Thanks again to the Volunteer Fabrication Department who helped put together a bunch of props and costumes. If you're the parent of one of the child actors from Alice and you'd be okay with me publishing a few photos from the production, please get in touch! And if you're a costumer or props person who'd like a little more info on how we fabricated some of this delightful stuff, I'd be more than happy to give you some info. Shoot me an e-mail or leave a comment below!


(p.s. you can make these photos bigger by clicking on them . . . but you probably knew that!)


Pin It