Tuesday, October 30, 2012

calaveras de azucar : perler sugar skulls for dia de los muertos

This is a little story about how I sometimes start out making one project, and end up making something completely different. It always reminds me of the artist who spent an afternoon with my second grade class (shout out to Ms. Champion, second grade teacher extraordinaire!) teaching us an art project. I kid you not; to this day, whenever I make a mistake in a project, I think about that guest artist's advice to turn "happy accidents" into even better art. It's rarely led me astray.

I pinned this awhile back because it seemed like a really nice, fast way to use up some Perler beads I picked up along the way. 


Alas, it didn't work out for me. The beads started to smell pretty early into the process, and I had severe second thought about having my kiddo in the house with me while plastic fumes were filling the air. After half an hour in the oven at the suggested temperature, all I had were some hot beads and nasty air quality, so I nixed the plan. Now, possibly, because the site isn't from the U.S., the temperature mentioned is a celsius temperature instead of a farenheit temperature, but I didn't really feel like risking it. I think melting beads in the oven is just not a good fit for our family. 

Then, when I was trying to pull together a project for the YHL/BP Pinterest Challenge, I was browsing my boards and found this lovely pin of some calaveras de azucar flower pots. And just in time for Dia de los Muertos! I'd actually pinned it close to three months ago thinking I'd find time to make some before the holiday, but I started working part time again, and a lot of projects have been put on the back burner.


As it happens, I was making some Perler bead robot magnets for the kiddo the other night. One of them started to look a little like a Day of the Dead sugar skull, so I abandoned my robot project three robots in, and instead made a fun little trio of sugar skulls. My once-upon-a-project turned into something completely different.


I used this large peg board from Ikea (where they cost $2 for a set instead of $6 for two), but the pattern is small enough that you could make a skull on one of the smaller Perler boards they include with the bead sets.


And here's the pattern you can use to make your own! As you saw in the above photos, I made three different color variations. All you need to do is replace the white beads with turquoise beads, etc. and you can make any color combination you want. Iron the beads onto your board according to package instructions.


Ours are going to be refrigerator magnets, but you can use your calaveras de azucar for ornaments, window hangers, coasters, etc. 

You can also use this pattern for crochet, cross stitch, etc. Just don't sell, it, mmmkay?

 Thanks for stopping in and reading, and thank you to Sherry, Katie, Carmel and Sarah for hosting this season's Pinterest Challenge!

p.s. you can make these pictures larger just by clicking on them, but you probably already knew that!

crimes of crafting: doll faced pillow

Welcome to a new feature: Crimes of Crafting. In Crimes of Crafting, I'll share some of the ferociously strange craft projects I find abandoned at thrift stores, or in craft books from decades ago.

Like this haunted doll face pillow.


I can't imagine someone thinking that a doll face crocheted into a massive pink ruffle would be beautiful (especially when that doll face is creepy and the eyes are all iris, no white), but I can't take issue with the craftsmanship. The crochet is flawless.


 Some little girl with a ruffly pink 1970s bedroom probably got this from her sweet grandma. Likely it was inadvertently the source of many odd nightmares. 

I spotted this at the Village a couple of weeks ago, priced at $4.99. It wasn't with the Halloween stuff, either, but over in the normal housewares section, in case you're looking to coordinate with your coffin coffee table.

Friday, October 26, 2012

hi ho, kermit the frog here!

Did I not promise you eyeball-melting cuteness? Bam!


Before starting, I tried valiantly to find the original source of this pin. I couldn't find it anywhere. But this is the image that started it all. From this, I interpreted, built, and eventually found a way to make a similar—but plusher—Kermie head. UPDATE: a commenter during the lead-up to Halloween 2014 found a link! http://www.pinterest.com/pin/190558627954115163/


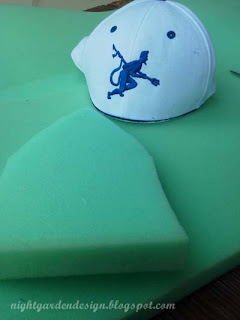
Last year, when I made the Wild Thing head, it was big and round, and, to hear the mister tell it, uncomfortable to wear for very long. This year, I planned to make Kermit the Frog for the kiddo and Fozzie Bear for the mister. I didn't want them as large and unwieldy as the Wild Thing, but still cartoonishly large. I started with a wool baseball cap (brand new, found at Goodwill for 49 cents) and a sheet of 1-inch polyurethane foam from JoAnn Fabrics. 

(Aside: having since read up on polyurethane foam, I would recommend instead using the polyester crib pads found in the section where the batting is kept. I'll write about my experience using those in a future post.)

I removed the brim from the cap, after first checking that the cap fit my kiddo, with only a little give.


Using the cap as a pattern, I cut six sections from the foam: three matched the measurements of the hat sections (with about an extra half inch all around) and three with an extra four-inches on the bottom. 


Two short sections at the front. Two long sections in the back. The third short and long sections I cut vertically down the center, and together they form the sides (you can kind of see what I mean in the photo below). 


Everything is just whipstitched together; construction stitches don't have to be pretty since they'll be covered up later, luckily! The big running stitches along the bottom connect the foam to the hat base.


Two angled pieces make up the jaw; basically, two long rectangles with one end cut at a sharper angle. I attached this with pins while I test-fit everything. 


Then I whip-stitched and test-fit again. He was ready to call it "done" at this point, but I didn't think it looked enough like Kermit. Or really, anything like Kermit. He thought he looked like a robot.


Clearly unnimpressed with my plans.


Non-pill fleece in Kermit green, cut to fit. Ish.


I machine-stitched it inside-out, then stretched it over the foam head.


I pinned along all the seams to get a better, tighter fit and to match the fleece seams to the foam seams so there'd be a single edge. Then I pulled the pinned fleece off the  foam and stitched in on the machine.


Here it is, back on, right side out with the seams trimmed to avoid lumpiness.


The fleece was cut long enough to pull over the edge and attach to the cap on the inside.


I used a hidden stitch to attach the fleece to the cap. I know it doesn't look hidden here . . .


. . . but then I pulled it tight and the stitches pretty much disappeared. Voila!


Same deal for the jaw; I left one end of the jaw piece loose for velcro, so I cut the fabric a little longer to make a tab on that side.


I found a handball to use for the eyes. I used a kitchen knife to cut it in half along the seam.


I painted them white, too, then held them up to the head and realized they were way too small. Kermit needed bigger eyes.


I found a sack of foam baseballs at Goodwill and when cut in half, they made perfectly sized Kermie eyes.


I tried wrapping with felt and hot glue, but I didn't like the bunched up felt on the back, and the edges didn't come out smooth enough.


So I cut the felt smaller and stretched and pulled and ironed with a hot iron till I got nice, tight wrap, then hot glued in place. I ended up doing two layers per ball to cover bumps. 


Ba-bam!


With felt pupils attached with craft glue.


The stressful part: planning proper placement, then actually cutting into that fleece. Once you commit, you commit. I used washable Crayola markers to mark the placement so that I wouldn't have pen marks all over my finished piece.


Then I just tucked the eyes inside and attached them to the foam with hot glue. Completed head!


I used this photo of Kermit as a  guide along the way, including counting the points on his collar before cutting them out of felt and making a collar.


It's just a long, thin rectangle of felt cut to measure my kiddo's neck, plus an inch for the velcro tab. I cut out the triangles, then sandwiched them between the folded-over rectangle.


I wanted to go simple for the suit, so I picked up one size 6-8 t-shirt and one size 16-18 t-shirt from the boy's department at Target.


The larger shirt was used to make the pants. I used another of my kiddo's pairs of pants as a pattern.


Then I cut the pant legs from the large shirt's sleeves. Here's one tutorial on an easy way to do this, if you've never heard of it before. 


And if I wasn't such a perfectionist,  I would have been done. In fact, he wore his Kermie clothes and non-matching Kermie head to a birthday party, and it was just fine.


But since I'd bought the extra fleece anyway, and since it gets cold here around Halloween time, and (ahem) since it would match better, I sewed him a little fleece suit to go over his t-shirt outfit. Perfect match!


To quote Miss Piggy, "Oh Kermie! Mwahh, mwahh, mwahh!" (those are kiss noises).


We taught him to say, "Hi ho! Kermit the Frog here!" like in the old Sesame Street News Flashes. So cute.

What have you been working on this Halloween?

Fozzie bear post coming soon, but in the meantime, thanks for reading!

p.s. you can make these photos larger just by clicking on them, but you probably already knew that.


Linking up to:

Visit thecsiproject.com


Tuesday, October 23, 2012

ultimate robot party etsy treasury

I'd been planning a tiki pirate party for the kiddo's next birthday; I like to start planning early so I can collect seasonal things that might not be available later (like the spider cupcake holders I picked up on clearance after Halloween last year, and later used for the Tektite cupcakes for our Zelda party, or the silicone tiki ice trays I picked up at the end-of-summer clearance, both at Target).

Well, I'll save all the pirate and tiki party goods for another year, because toddler interests are fluid things. He's really into robots right now, and it was getting to a point where I just couldn't ignore the little voice in my head telling me that the pirate / tiki thing (which seemed so perfect a few months ago) was not where his heart was anymore.

So okay. I start over at the beginning. And it's okay, really, because I hadn't gotten down to the hand-making yet, so the only energy spent has been spent shopping.

I started a shopping cart on Etsy last night that quickly spiraled out of budgetary control, so I thought I'd make a treasury list out of the items instead. I also added in a couple of things to the list specifically because it's a party treasury (like invitations and cake toppers) that I wouldn't personally buy because I'll be making those things myself, but I thought fellow robot party planners might find them perfect for their own parties.

Anyway, here it is. Click here to visit my treasury page!


Thanks for reading!


Tuesday, October 16, 2012

thrift store finds: piano

I've mentioned before that I was in love with the idea of an antique piano, but couldn't figure out how to get one home. Even though the last one I found and wanted (badly) was only three blocks away from my house, I figured moving it would be dangerous to attempt alone (even with a team and a truck) and getting someone to move it would be too expensive, so I let that one get away.

Who knew that antique pianos were something that people donated literally all the time? When I saw this one, I had a feeling about it. The mister did not. So we hemmed and hawed for a couple of days. I may have pouted about it a bit; my memory on that subject is a bit hazy.


But you know how this story turns out. In the end, he said if it was important to me, I could bring it home. He's a really good guy and trusted that I'd find a way to make it fit in. And as I mentioned in a previous post, I followed through on that trust, moving furniture, getting rid of a ton of stuff, and basically making a nice new home for my heaviest and most gigantic thrift store find ever.


As a bonus, the mister and the kiddo are both pretty taken with it. It's hard to ignore a thousand pound piano in a room, so I hear them playing it at random times. 


Now, the reasons people donate antique pianos to thrift stores are many and varied. Generally, I think the cost of tuning, repair, and moving probably outweigh the worth of most old pianos. This one was has a serial number in it that indicates it was made in 1906. 1906! Imagine the changes the world has undergone in 106 years. It predates two world wars, women's suffrage, Mt. Rushmore, and Glacier National Park, and was built the same year Teddy Roosevelt became president. Doing pretty well for an old lady. The one chipped key in the photo there is the only dead key (though several need new key tops). It's even mostly in tune.


It was priced at $100, but I had a 20% off coupon, so I paid $80 . . . and then a ridiculous $120 to have it moved three blocks in the back of the piano guy's beat up Datsun pick-up truck. He and a buddy managed to alienate the store staff by showing up an hour before we'd agreed to meet there (me, with purchase receipt in hand) and giving them a hard time until they relented and let him load it up. 

It arrived in mostly decent condition (there's a chip on the back corner, but I couldn't swear that it wasn't there when I bought it). The piano guy even told me it had been a really high-end piano in its day (though of course, the value has almost all disappeared except as raw materials), made of solid mahogany (he thinks) and hand-carved art nouveau details.


There is some major crazing to the finish, but no moth damage to the wool felt on the hammers.


And of course, a large and very heavy amount of solid brass inside. The front flips up to expose the interior, where the cast brass informs you that "Walters pianos are built to last a life time and are unequalled in tone and construction. They have reached the highest pinnacle of perfection and are masterpieces of piano building." This one, clearly, lasted longer than a life time. 


Originally manufactured for and sold by Macy's department stores, this turn-of-the-century piano has been accessorized with a Judy teaching clock from the 1970s, an Ikea dining chair, my Cathrineholm bowl, my old manual camera (purchased in 1994), an old mason jar, Hardy Boys novels, and three yellow lotus bowls, all of which (coincidentally) are thrift store finds. 


Okay. So what's your largest-ever thrift store find? Or your most musical? Or when have you hired a "professional" to do a job, and had that person not seem super-professional after all? Share in the comments section below; I love reading your comments and visiting your blogs.

Thanks for reading!


Linking up to:


Simple Design


p.s. you can make these photos larger just by clicking on them, but you probably already knew that.