Showing posts with label backyard. Show all posts

Monday, June 30, 2014

backyard sink!

I've been thinking for awhile that it might be nice to have a spot to wash hands and clean sandy toys and shoes in the backyard, aside from the hose. After pinning a few backyard sinks on Pinterest, I brainstormed what I might build as a sink support structure. We have a scrap pile, of course, that I regularly dip into for building projects. I considered building a counter top on legs (with a bucket underneath to capture what drains out of the sink). I considered attaching a shelf to the house with a sink imbedded. And then I thought about how already full of stuff our yard is, and where I'd put whatever contraption I came up with.

It made sense, really, to use something we already had back there, and this hardwood outdoor bar was a logical choice. We've had it for about seven years now; we use it occasionally for backyard barbecues, but not much else. I talked it over with the Mr., deciding finally that adding a sink wouldn't ruin the bar's usefulness, but add to it.


After measuring the bar to determine sink size, the next step was to scavenge for a sink. Bring Recycling was my first stop; they have dozens of sinks over there, and the kiddo and I considered several hefty porcelain-coated cast iron antiques before finally choosing a simple stainless steel bowl sink for its light weight. We picked a faucet, too, then headed over to the hardware store for various connectors, a length of hose, and some plumber's putty.


It had been suggested to simply cap off one of the brass water supply hoses to avoid the added plumbing work required for two; it was a suggestion that made sense, since we wouldn't be running hot water to the backyard anyway.


Capping it off is pretty easy. We found the right size threaded cap at the hardware store, put a little plumber's putty on the threaded brass water supply line, then screwed the cap on. Easy peasy.


The hose coupler is equally simple. It has two female ends, one that fits over the other brass water supply, and the other, larger end to fit over the hose. We eventually used plumber's putty on this area as well.


I cleaned the wood with a scrub brush, water, and some spray cleaner, then I used the sink turned upside down to trace the hole we'd have to cut.


To support the lip of the sink bowl, I traced a second line about 3/4 inch inside the first. This was our cut line.


I wasn't too worried about perfection; as long as the lip of the sink bowl covers the hole and is well-supported, I'm happy.


I'm not too fond of the reciprocating saw as there's a bit too much motor movement to use a blade that big with a kid running around in the yard with me. I waited until the weekend and the Mr. ended up cutting it out for me. And it looked awesome, set in place, like it was meant for this bar.


After testing for fit, I popped the sink back out and stained the top, since the weather had really worn down the previous finish. Then I put the sink back in place so we could get the faucet lined up right.


The yellow paper is one of the paper templates that I made up for each of three faucets to test for fit, and to help drill the holes in the right places. The original faucet I'd picked out had been too wide at the base, and the faucet was a little on the short side (sad trombone).


We tried out a couple more, finally settling on a faucet that fits pretty well. It doesn't have the two-handles I'd prefer, but the base is a tiny bit narrower and the faucet is a bit longer, so it works out pretty well.


This is what it looks like underneath. The hose lead connects to a y-splitter at the house (so we can still use another hose to water the garden). The black drain pipe drains into a bucket for the time being, to be used for watering plants, etc. The Mr. has some big ideas about adding more plumbing under there and a run-off hose, but I'm happy with this set up for now.


I caulked around the sink and faucet, and also some of the crevices along the surface. It's clear caulk, but it hasn't fully cured yet. I'll try to get an update shot in here once it's fully cured, but in the meantime, here it is, all finished and useful.


Thanks for reading!

Linking up to:
My Repurposed Life 
Lou Lou Girls

Wednesday, May 8, 2013

pinterest challenge: a backyard arbor

At last, it's time to show you a little more about this teaser photo I showed at the end of my last post:


Of the many pins on my Curb Appeal Pinterest board, most are variations on the pergola/arbor/garden arch theme. I've been collecting ideas for nearly two years now. 


In front of my house, I have two random metal garden arches (in different styles) that came to me on sale from a couple of different places. In the backyard, the "arch" in front of the studio building (which is now mostly sided! Hooray!) looked like this:


Urgh. The green metal arch (can you even see it?) is a leftover craft store "wedding arch" from our wedding ten years ago. It was clearly not meant for heavy labor.

I had it pretty neatly disguised for awhile with twigs and branches woven in. A windstorm collapsed the whole thing last year. 

I then had it supported by the side supports of a pergola that had also collapsed in the windstorm . . . total eyesore. That part had been removed by the time I thought to take this photo, along with a lot of the sticks and weeds.


Yes, I'm embarrassed that things got to this neglected, overgrown state. That's life in a fixer-upper, folks. Some things get fixed-up faster than others.

Which explains all of those arbor pins on my pin board, and my burning desire to take care of the issue.

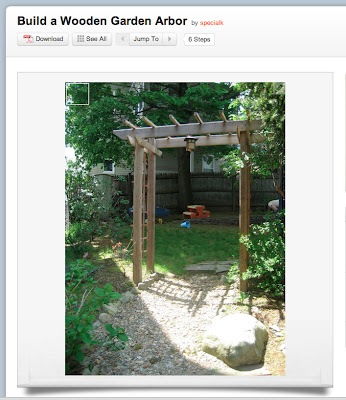
This project was uploaded to Instructables by someone calling himself/herself SpecialK, who deserves the credit for this photo. And it's the project I decided I could take on, by myself, before my husband came home from work one day last week.


So, that didn't exactly work out. I did have it about 90% built by the time the mister rolled up that evening (just needed cross bars and lattice on top and sides), but in my eagerness to get to building, I built it out of place. This presents some challenges I hadn't properly anticipated, like, say, assembling the thing with only one adult present, and moving it, and keeping things square and level. But let's set that aside, and assume that you'll do things the EASIER way: holes first, arbor built in place.


I finished it up the next afternoon (with some help from my kiddo and his toy drill) and started measuring for and digging the holes for the legs.


After the mister helped me finish digging with the post hole digger (approximately 15 inches deep), I put some pea gravel in the bottom of each hole (approximately 3 inches worth) and we finagled the arch into place, working until it was in-line with the roofline of the studio.


The bottoms of the legs are coated with spray-on rubber sealant about 18-inches along the bottom and sides. They are made of Douglas Fir, which needs a little insect and rot resistance. The gravel is for drainage as well as anchoring. I filled around the legs with some more pea gravel, and finally some larger river rocks near the top to disguise the sealant and to keep dirt away.


I also trimmed back the rose and grape vines a ton, which hurt to do. The rose will grow back quickly, but that grape vine takes awhile, and it really only started producing mass amounts of grapes last year. Fingers crossed that it snaps back. 

The next step was to paint. I had some oil-based primer left from ye olden days (maybe we used it on the pickets in the front yard?). Had I used all cedar or all pressure-treated wood, I would have kept it wood-colored, but I used a variety of woods and thought a little paint protection would go a long way.


The original project parameters call for pressure treated wood and store-bought lattice, and estimate the cost at about $100. I have three of these to build (this is the first) so I wanted to bring in my practice arch at closer to $50.

Here in Oregon, 8-foot 4x4 Douglas Fir posts are about $7 apiece. I used a mix of recycled shipping timbers (79 cents) and utility grade 1x2s ($1.50 for an 8-foot length) for the side supports, horizontal lattice,  and crosspieces on the top. The long skinny pieces on the side lattice are 6-foot long cedar garden stakes I already had on-hand.


The front and back pieces at the top are made from 1x6x6 clear grade cedar fence boards for $3 each.


I came in under my $50 target thanks to the river rocks, screws, and paint I already had on hand, as well as using utility grade lumber and a few on-hand and recycled bits. I'm sure that (free) pallet wood could stand in for most of the pieces here, too, so it's entirely possible to build one for even less (in fact, over on my Curb Appeal Pinterest board, there's a link to a plan for a pallet wood arch that's kid-sized).

I'll have more for you later, as the path gets re-done and the garden beds get rebuilt (I'm thinking cement retaining wall blocks this time around), so check back later in the summer!

In the meantime, thanks for reading the latest in my series of posts for the Young House Love / Bower Power Pinterest Challenge! Head on over and link up if you've finished a project inspired by Pinterest, too.

Linking up to:


Saturday, May 5, 2012

how does your garden grow?

Back when I published this post about our backyard patio project last summer, I mentioned the new garden bed. We built the bed by piling up the dirt excavated from the patio area, and outlining the area with cement landscaping blocks.


I hadn't taken any photos of the area because I considered it to be unfinished; luckily, the mister decided to take some photos of his own, because in retrospect, the new garden beds are pretty attractive, I think. Even unfinished. (All of these photos are from last summer.)


Of course, now they could use a good weeding, but last year's plants are coming back, which makes me incredibly happy. I bought most of them as end-of-summer clearance last September. Cannas, dahlias, foxgloves, heather, etc. . . . I don't think I paid more than six bucks for any of them. And I'm pretty sure the three heather plants cost under a dollar each. (I wish I could remember the name of the bright red stems there . . . )


The chair is part of a matching set of cedar Adirondack chairs I painted pool blue last summer. The birdhouses (also cedar) were painted to match. Black Russian tomatoes fill that pot in the foreground. This summer, it'll be garlic and beans instead.


So that's the beginning! There are about $150 worth of cement landscape blocks in this project, another $100 in plants. The little path was made using pavers from the old patio, so those were free this time around, as was what mulch you can see in the photos (branches and clippings chopped up in a wood chipper). Not a bad deal for something so transformative.


I'll post some more photos this spring and summer as things progress; a major weeding is in order, and some mulch for sure, but I'll wait and see whether any plants need to be added, moved, or replaced. So . . . what's going on in your yard this spring?


(p.s. you can make these photos bigger by clicking on them . . . but you probably knew that!)

Tuesday, August 16, 2011

legen - patio - dary

Call me crazy, but the Petersiks from the Young House Love blog made their paver patio look so easy that when it came time to make a little spot for the bebe's pirate sandboat to moor, I thought, "I can do that!" (Note: it's hard to tell how hard a project is by looking at photos on a blog.)

Initially, we'd planned to add just a little 5x8' paver patio addition, kind of off to the side of the cast concrete patio we put in about five years ago. After a little more thought about the logistics of digging it all up, compacting everything, and getting the new segment to line up seamlessly with the eventual total patio re-do (not to mention considering the possibility of renting a compacter and a paver saw multiple times), we decided to just do the whole thing all at once.

Sadly, my camera went missing for awhile, so I have no photographs of the prep work. You'll have to trust me that it was EPIC.

PREP STEPS:
* Pulling out the old cast concrete patio
* Piecing the old cast concrete bits together to widen the pathway from the backdoor to the patio
* Tearing up the sod
* Digging everything down to a depth of approximately 6 inches
* Trying to level the dug-out space (a fool's errand in a backyard that isn't level to begin with)
* Laying down weed barrier
* Shoveling, spreading, and compacting gravel
* Shoveling, spreading, and leveling sand

This list took the better part of two weeks during the bebe's nap time and in spare minutes when he felt like playing in his sandbox while his dad and I worked nearby.

I did get this photo of all of the rusty nails and screws I found while I was digging up the sod. These had likely been down there since the house was built in 1961.


This next photo is what you get when a paver company accidentally sells your special order of pavers to another customer from Jerry's hardware store (mistaking the other customer for you), but promises that when a new pallet arrives, it won't happen again because your name is on the new pallet.

That's right. Instead of hubby's name, they wrote "Jerry's Customer" on the new pallet of pavers. (*Sigh*)


Now, this is where we veered sharply off course from the Young House Love blog. We started by laying a circle.


We made it bigger and bigger.


The "soldier row" was added around the perimeter of the full patio.


We nailed in the Snap-Tight border. A second circle was added, and all of the "pattern" bricks that didn't require cuts were laid in around the circles.


I measured and marked, and hubby made more than a hundred cuts on the paver saw in the course of one afternoon. I can't express enough how glad I am that we rented the paver saw. The rental cost $50, but the alternatives (chiseling them apart or using the tile saw to make shallow cuts on both side, then breaking) would have been really time consuming, and the edges would not have been so clean.


We compacted the pavers with a rented gasoline-powered plate compacter (another time-saving tool I wouldn't have wanted to tackle this project without, though we did make sure to use an old piece of carpet to keep the compacter from chipping the pavers), and added layers of polymeric sand (compacting between each layer), then misted, and voila!

Here are some close-ups of the finished pattern of pavers. As you might be able to tell, the sanding is a really important step. It disguises all the gaps and helps the patio look uniform and cohesive.


We're still working on adding a garden bed and making the path meet the edge of the patio, so there'll be a few more photos between now and "DONE"; in the meantime, here's a photo of me putting in the original cast concrete patio way back in 2006.


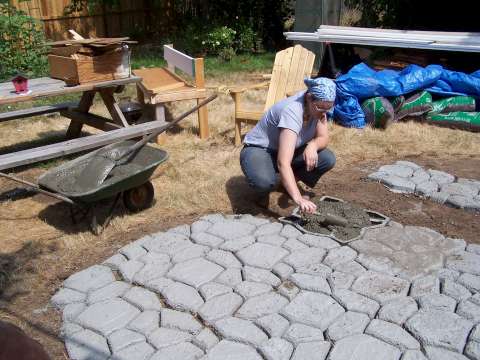
I'm determined to make this the last patio I put in for quite awhile, but as I remember, I swore the same oath the last time, and we all know how that turned out.


Pin It