

Showing posts with label upcycled. Show all posts
Showing posts with label upcycled. Show all posts
Wednesday, July 15, 2015
carle museum of picture book art -- bugs in trees project
The Carle Museum of Picture Book Art hosted an open call for handmade bugs to hang from trees in the orchard. We sent these.


Friday, February 20, 2015
packaged airplane crayon party favors


Thursday, September 12, 2013
succulents in vintage glassware
A simple project for centerpieces, gifts, or window gardening.


Vintage highball glasses, punch cups, and candle bowls are filled with pebbles (for drainage), potting soil, and a little hens-and-chicks succulent varietal each.

They need to be kept out of all-day sunlight and watered once in awhile, but succulents aren't too hard to keep alive.

These look awesome clustered as wedding centerpieces, and equally nice in a kitchen window. Which makes them perfect (upcycled, green) wedding favors, if you think about it.
Thanks for reading!
Linking up to:
Wednesday, August 14, 2013
another industrial pendant to complete the set
One of the first art lessons I still remember is the one in which we were introduced to the fact that in nature, things often occur in odd numbers (plant leafs, flower petals, etc.). It was an introduction to the Rule of Odds, which is used often in art and design to keep your brain interested and engaged, and you can find it in art from ancient Japan through the Renaissance all the way up through current day.
At the end of a previous lighting post, I mentioned that the idea for a certain spot in our house was to eventually have three hanging pendants for balance. That's the Rule of Odds at play in our living room.
Light number 1 was a five-cent frosted pendant.

Light number 2 was a metal cage light made with salvaged parts. (I've switched out the light kit since the original tutorial to accommodate a standard-sized Edison-style lightbulb.)

And this, the third, is was originally a plastic cage light, like this one, purchased used for 50 cents at Bring (but I've seen them similarly priced at the Habitat ReStore).


At the end of a previous lighting post, I mentioned that the idea for a certain spot in our house was to eventually have three hanging pendants for balance. That's the Rule of Odds at play in our living room.
Light number 1 was a five-cent frosted pendant.

Light number 2 was a metal cage light made with salvaged parts. (I've switched out the light kit since the original tutorial to accommodate a standard-sized Edison-style lightbulb.)

And this, the third, is was originally a plastic cage light, like this one, purchased used for 50 cents at Bring (but I've seen them similarly priced at the Habitat ReStore).

I hung it from a coat hanger in the yard and sprayed with gentle layers of primer, aluminum finish, and flat black spray paint to give it the look of aged metal.
Here are all three together at last:


I have them all hung by hooks from the ceiling.

My original hope was to hard wire them all together, but since I lack the practical expertise for that, the cords run bundled down the edge of the window frame and are turned on and off via a power strip. I hope to get the curtains rehung to hide them a little better soon.
I've seen a few lighting solutions lately that involve swooping black cable and exposed bulbs and while I love the look in a loft space (like the one Brooks designed on DesignStar), it's not practical with 8-foot ceilings. I'd likely accidentally hang myself.
Okay, now you know what you need to know to diy three pendant lighting fixtures on a teeny tiny budget. Of course, if you have a bit more money you want to spend, you can buy industrial metal light cages:
And if the price isn't much of an issue:
But in my house, I'm likely to spend the $1000 per fixture on that last link towards the mortgage or something else really practical, and hang up the diy version instead. How about you?
Thanks for reading!
Linking up to:
Wednesday, May 8, 2013
pinterest challenge: a backyard arbor
At last, it's time to show you a little more about this teaser photo I showed at the end of my last post:

Of the many pins on my Curb Appeal Pinterest board, most are variations on the pergola/arbor/garden arch theme. I've been collecting ideas for nearly two years now.

In front of my house, I have two random metal garden arches (in different styles) that came to me on sale from a couple of different places. In the backyard, the "arch" in front of the studio building (which is now mostly sided! Hooray!) looked like this:

Urgh. The green metal arch (can you even see it?) is a leftover craft store "wedding arch" from our wedding ten years ago. It was clearly not meant for heavy labor.
I had it pretty neatly disguised for awhile with twigs and branches woven in. A windstorm collapsed the whole thing last year.
I then had it supported by the side supports of a pergola that had also collapsed in the windstorm . . . total eyesore. That part had been removed by the time I thought to take this photo, along with a lot of the sticks and weeds.

Yes, I'm embarrassed that things got to this neglected, overgrown state. That's life in a fixer-upper, folks. Some things get fixed-up faster than others.
Which explains all of those arbor pins on my pin board, and my burning desire to take care of the issue.
This project was uploaded to Instructables by someone calling himself/herself SpecialK, who deserves the credit for this photo. And it's the project I decided I could take on, by myself, before my husband came home from work one day last week.
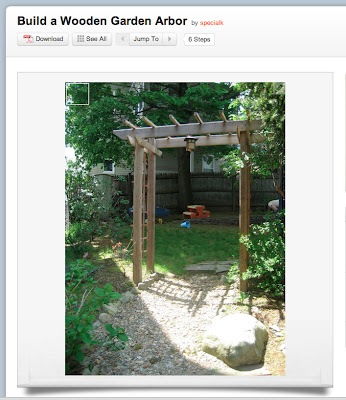
So, that didn't exactly work out. I did have it about 90% built by the time the mister rolled up that evening (just needed cross bars and lattice on top and sides), but in my eagerness to get to building, I built it out of place. This presents some challenges I hadn't properly anticipated, like, say, assembling the thing with only one adult present, and moving it, and keeping things square and level. But let's set that aside, and assume that you'll do things the EASIER way: holes first, arbor built in place.


I finished it up the next afternoon (with some help from my kiddo and his toy drill) and started measuring for and digging the holes for the legs.

After the mister helped me finish digging with the post hole digger (approximately 15 inches deep), I put some pea gravel in the bottom of each hole (approximately 3 inches worth) and we finagled the arch into place, working until it was in-line with the roofline of the studio.

The bottoms of the legs are coated with spray-on rubber sealant about 18-inches along the bottom and sides. They are made of Douglas Fir, which needs a little insect and rot resistance. The gravel is for drainage as well as anchoring. I filled around the legs with some more pea gravel, and finally some larger river rocks near the top to disguise the sealant and to keep dirt away.


I also trimmed back the rose and grape vines a ton, which hurt to do. The rose will grow back quickly, but that grape vine takes awhile, and it really only started producing mass amounts of grapes last year. Fingers crossed that it snaps back.
The next step was to paint. I had some oil-based primer left from ye olden days (maybe we used it on the pickets in the front yard?). Had I used all cedar or all pressure-treated wood, I would have kept it wood-colored, but I used a variety of woods and thought a little paint protection would go a long way.

The original project parameters call for pressure treated wood and store-bought lattice, and estimate the cost at about $100. I have three of these to build (this is the first) so I wanted to bring in my practice arch at closer to $50.
Here in Oregon, 8-foot 4x4 Douglas Fir posts are about $7 apiece. I used a mix of recycled shipping timbers (79 cents) and utility grade 1x2s ($1.50 for an 8-foot length) for the side supports, horizontal lattice, and crosspieces on the top. The long skinny pieces on the side lattice are 6-foot long cedar garden stakes I already had on-hand.

The front and back pieces at the top are made from 1x6x6 clear grade cedar fence boards for $3 each.


I came in under my $50 target thanks to the river rocks, screws, and paint I already had on hand, as well as using utility grade lumber and a few on-hand and recycled bits. I'm sure that (free) pallet wood could stand in for most of the pieces here, too, so it's entirely possible to build one for even less (in fact, over on my Curb Appeal Pinterest board, there's a link to a plan for a pallet wood arch that's kid-sized).
I'll have more for you later, as the path gets re-done and the garden beds get rebuilt (I'm thinking cement retaining wall blocks this time around), so check back later in the summer!
In the meantime, thanks for reading the latest in my series of posts for the Young House Love / Bower Power Pinterest Challenge! Head on over and link up if you've finished a project inspired by Pinterest, too.
Linking up to:
Monday, February 4, 2013
card catalog coffee table tutorial
I know, I know . . . this is totally out of order. This project did well over at So You Think You're Crafty this week, so I was asked to write up a full tutorial and I'm posting it here. You can check it out over there, too!

Materials you'll need for this project:
one row of card catalog drawers (call your local library if they've recently switched over to a computerized system, or stalk a thrift store or rebuilding store like Habitat for Humanity's ReStore or Bring. The set I used for this project came from Goodwill, and cost $10.)
four vintage wooden mill bobbins (mine came from the Pendleton Woolen Mills store outside of Portland; call them if you don't live nearby, and see if they'll ship to you)

four metal leg attachment plates/corner braces (I found mine at Bring for 50 cents to $1 apiece, and all four match--amazing luck--but you can probably hunt some down at your local hardware store)

one scrap of 3/16 or thicker plexiglass, at least the size of your card catalog (mine was a scrap I used to use for displays at my bookstore a million years ago, but you can buy this new or used at dozens of places)
vintage or new wooden printing blocks (aka moveable wooden type) (I've been a collector for a few years; you can find blocks for sale on eBay or Etsy, or substitute with another type of collection)
thin wood trim (from the ReStore; 25 cents for 3 feet. Unbelievable deal.)
sketch paper (for labels)
piece of heavy tag board or thin wood paneling the same size as your inset space (you probably have something around the house)
flat game pieces like checkers or scrabble tiles
wood screws and nails
Tee Juice dye pen or wood stain
sticky-back felt furniture pads
Tools you'll need
drill
drill bit for metal, just a little wider than your screws
hammer
X-acto knife
ruler
masking tape
typewriter (lacking this, you can also use a typewriter typeface on your computer)
How to Build It
Your bobbins should all be as close to the same length as possible. Drill three holes through each of your metal plates that align with the solid wood edge of your bobbins, and attach with screws.

Turn your drawers upside down and screw the bobbin legs onto the bottom. Add furniture pads to the feet.

Flip your table upright.
My card catalog drawers didn't have a top panel, so there was a built-in inset space once I cut a piece of heavy tag board to sit atop the drawer supports. If your drawers do have a top, you can call your table "done", or you can follow along and add a plexiglass top for a flat collection (see asterisk * below).

Measure twice, cut once. In fact, rather than measuring, you can lay your plexiglass right on top of your table and mark it in place. I marked mine with both tape and permanent marker. That way I could make sure that when I took it to the hardware store to have it cut, it would be as perfect a cut as possible.
You can try to cut the plexi yourself, of course, but it's messy and noisy and sometimes it cracks or splits. Know your strengths.
Fill the inset with wooden type. You can spell words or names or just randomly assemble your collage. I worked the word "Upcycle" into mine to showcase the week's theme.

I used game pieces (and/or old brass house numbers) around the edge to help support the plexiglass. You can use pretty much anything flat and non-perishable that will help the clear top sit and be supported level with your wooden type.

After the plexi was in place, I hunted down the thin, plain wood trim pieces and cut them to size with my X-acto knife. Drill a small finger hold at the back if you want to lift the glass out later to remove the top.
You could use fancier trim, if you wanted to; I kept my trim (and my cuts) simple, and attached the pieces to the card catalog with small wire nails.

To finish, stain to the color of your choice using a Tee Juice dye pen or some wood stain, and print up some paper labels for your drawers.

*If you do have a flat top on your card catalog drawers, you can still add the plexi top and either build up a frame to create an inset, or you can display print ephemera (labels, a poster, library book check-out slips, etc.) under the top for a cool effect.
Thanks a bunch for your votes, everyone! Send photos if you make your own table using these instructions; I'd adore seeing photos.

Linking up to:
Junkin Joe Vintage and Thrifty Finds
The CSI Project

Materials you'll need for this project:
one row of card catalog drawers (call your local library if they've recently switched over to a computerized system, or stalk a thrift store or rebuilding store like Habitat for Humanity's ReStore or Bring. The set I used for this project came from Goodwill, and cost $10.)
four vintage wooden mill bobbins (mine came from the Pendleton Woolen Mills store outside of Portland; call them if you don't live nearby, and see if they'll ship to you)

four metal leg attachment plates/corner braces (I found mine at Bring for 50 cents to $1 apiece, and all four match--amazing luck--but you can probably hunt some down at your local hardware store)

one scrap of 3/16 or thicker plexiglass, at least the size of your card catalog (mine was a scrap I used to use for displays at my bookstore a million years ago, but you can buy this new or used at dozens of places)
vintage or new wooden printing blocks (aka moveable wooden type) (I've been a collector for a few years; you can find blocks for sale on eBay or Etsy, or substitute with another type of collection)
thin wood trim (from the ReStore; 25 cents for 3 feet. Unbelievable deal.)
sketch paper (for labels)
piece of heavy tag board or thin wood paneling the same size as your inset space (you probably have something around the house)
flat game pieces like checkers or scrabble tiles
wood screws and nails
Tee Juice dye pen or wood stain
sticky-back felt furniture pads
Tools you'll need
drill
drill bit for metal, just a little wider than your screws
hammer
X-acto knife
ruler
masking tape
typewriter (lacking this, you can also use a typewriter typeface on your computer)
How to Build It
Your bobbins should all be as close to the same length as possible. Drill three holes through each of your metal plates that align with the solid wood edge of your bobbins, and attach with screws.

Turn your drawers upside down and screw the bobbin legs onto the bottom. Add furniture pads to the feet.

Flip your table upright.
My card catalog drawers didn't have a top panel, so there was a built-in inset space once I cut a piece of heavy tag board to sit atop the drawer supports. If your drawers do have a top, you can call your table "done", or you can follow along and add a plexiglass top for a flat collection (see asterisk * below).

Measure twice, cut once. In fact, rather than measuring, you can lay your plexiglass right on top of your table and mark it in place. I marked mine with both tape and permanent marker. That way I could make sure that when I took it to the hardware store to have it cut, it would be as perfect a cut as possible.
You can try to cut the plexi yourself, of course, but it's messy and noisy and sometimes it cracks or splits. Know your strengths.
Fill the inset with wooden type. You can spell words or names or just randomly assemble your collage. I worked the word "Upcycle" into mine to showcase the week's theme.

I used game pieces (and/or old brass house numbers) around the edge to help support the plexiglass. You can use pretty much anything flat and non-perishable that will help the clear top sit and be supported level with your wooden type.

After the plexi was in place, I hunted down the thin, plain wood trim pieces and cut them to size with my X-acto knife. Drill a small finger hold at the back if you want to lift the glass out later to remove the top.
You could use fancier trim, if you wanted to; I kept my trim (and my cuts) simple, and attached the pieces to the card catalog with small wire nails.

To finish, stain to the color of your choice using a Tee Juice dye pen or some wood stain, and print up some paper labels for your drawers.

*If you do have a flat top on your card catalog drawers, you can still add the plexi top and either build up a frame to create an inset, or you can display print ephemera (labels, a poster, library book check-out slips, etc.) under the top for a cool effect.
Thanks a bunch for your votes, everyone! Send photos if you make your own table using these instructions; I'd adore seeing photos.

Linking up to:
Junkin Joe Vintage and Thrifty Finds
The CSI Project
Thursday, January 31, 2013
recycled paper chains
Phew! It's been quiet around here lately, hmmmm? The So You Think You're Crafty competition has been keeping me busy during the hours I'm not hanging out with my kid, or designing book covers, or making robot party stuff, or, you know, sleeping.
It's Upcycling theme week over at So You Think You're Crafty, and I'll get to post my project here tomorrow since voting ends tonight; I think you'll like it.
In the meantime, here's an easy little project you can use to recycle (or, more properly, reuse or upcycle) some envelope liners, paper sacks, and wrapping paper into decorative paper chains.

Using scissors or a paper cutter, cut your envelope liners and wrapping paper into strips. I used strips about 3/4 inches wide and 9 inches long for these Christmas chains, but if you want to use wider strips, just try to keep them under a couple of inches wide so you won't have any trouble linking.

After you've made one circle (using glue dots or double-sided tape to connect the ends), just loop the next strip of paper through the circle and start making your chain, just like you did with construction paper back in grade school!

Keep going until you have plenty of length. Like with most party or holiday decorations, multiples look better than singles, so go all out. Spend a couple of afternoons and you'll be able to make a few 25-foot lengths. When the party's over, you can save your chains for next time or put them in the recycle bin.

The chains in these photos were some we made at Christmas, but you can make them for any holiday or for party decorations. If you have a specific party theme or color you're aiming for, you can accent with some rings made of construction paper or scrap-booking paper, while still keeping most of the rings recycled. It makes for a really cool look that's easy enough for even really little kids to help make.
Thanks for reading!
It's Upcycling theme week over at So You Think You're Crafty, and I'll get to post my project here tomorrow since voting ends tonight; I think you'll like it.
In the meantime, here's an easy little project you can use to recycle (or, more properly, reuse or upcycle) some envelope liners, paper sacks, and wrapping paper into decorative paper chains.

Using scissors or a paper cutter, cut your envelope liners and wrapping paper into strips. I used strips about 3/4 inches wide and 9 inches long for these Christmas chains, but if you want to use wider strips, just try to keep them under a couple of inches wide so you won't have any trouble linking.

After you've made one circle (using glue dots or double-sided tape to connect the ends), just loop the next strip of paper through the circle and start making your chain, just like you did with construction paper back in grade school!

Keep going until you have plenty of length. Like with most party or holiday decorations, multiples look better than singles, so go all out. Spend a couple of afternoons and you'll be able to make a few 25-foot lengths. When the party's over, you can save your chains for next time or put them in the recycle bin.

The chains in these photos were some we made at Christmas, but you can make them for any holiday or for party decorations. If you have a specific party theme or color you're aiming for, you can accent with some rings made of construction paper or scrap-booking paper, while still keeping most of the rings recycled. It makes for a really cool look that's easy enough for even really little kids to help make.
Thanks for reading!
Monday, January 14, 2013
deer hart: a recycled "vegan" deer trophy
Update: voting for "So You Think You're Crafty" completed on Friday, and my Deer Hart faux deer head taxidermy made it through to the next round!
Voting is live once again for this week's theme, "For the Boys". Again, voting is anonymous, but I have faith in your good taste to lead you to my project, readers. ;)
Here is my entry from last week, which would have gotten me through to this round even if someone hadn't dropped out early.
Week one! I'm so excited for the weeks ahead. I've had a ton of projects on the back burner, so I'm glad to be able to pull out the supplies I've been collecting and get to crafting!
This project (a faux deer head trophy made mostly from recycled scraps) competed for my attention with another project I've been longing to get around to, but I ended up picking it because it's a low cost project that's on-trend and can be made with materials that are really easy to find. Even non-hunters can play along!

Using materials from the Habitat for Humanity ReStore and Bring, recycled cardboard, a thrift store map and some tape, the cost of this project's materials comes in at under $10. The blog tutorial I'll post after voting ends will include a template for the basic structure and detailed instructions, so you can make one yourself!

The name for this project (and the inscription on the little metal plaque) comes from my love of puns and old Grimm brothers fairy tales, which often mention a "hart" running through the woods (and led to a bit of dictionary research when I was eight). One of the lovey nicknames I call my kiddo is "dear heart", so the pun fits well for something that might hang in his room later. It's etched on the backing of an old drawer pull using a simple awl. I also used a vintage German map for the decoupage, since the Grimms were from Germany.

To finish it off, I distressed the edges lightly and added a little yellow chalk line detail. A big project, but I'm so excited by the results. I hope you like it, too!
I'll be back to post a full tutorial later this week, including a template for the cardboard pieces you'll need for the basic structure. Until then, start gathering your supplies and tools!
*one old board or cupboard door, preferably with a beveled edge (mine cost $2 from the ReStore)
*some pieces of scrap wood (free)
*heavy cardboard (I like the double-walled kind you can find fruit or wine shipped in; free from Costco)
*a small metal plaque (mine cost 25 cents from Bring, and was originally the plate behind a drawer pull)
*two 1/2 inch screws (free, with the cupboard door)
*thrift store map (another 25 cents from St. VIncent dePaul)
*masking tape (I used Greener Masking tape {30% recycled} from 3M)
*duct tape
*glue gun + glue gun sticks
*four 1-inch screws
*four washers
*Mod Podge or suitable decoupage medium
*leftover paint or paint sample
Optional materials:
*wood filler
*sandpaper
*chalk
(p.s. you can make these photos larger just by clicking on them, but you're probably so clever that you already knew that.)
Monday, December 31, 2012
thrift store finds: vintage intercom speaker
I found this $2 intercom speaker box at Bring a few weeks back while the kiddo and I were hunting down parts for an upcoming project.

I challenged the Mister to find some way to turn it into an iPod speaker for the sake of our project, because though I knew I could probably muddle through and scare up some on-line diagrams and eventually research it into completion, he has years of practice building and repairing computers and I figured he could skip the research phase.
An hour later (maybe less?) he had removed the old guts, hunted down a scrap cord, and finished off the inside of the box so that my iPod wouldn't get scratched up. After that, it works like any other iPod speaker; just plug it in and turn on the music!
("Science is Real" by They Might Be Giants available for purchase on iTunes.)
I love that it sounds like an old a.m. transistor radio; just what I was hoping for. The iPod tucks up inside the back, the plate slips on to conceal it, and all done! I regret I don't have a step-by-step diy for you; the Mister was responsible for all but the idea, so I don't have any in-process photos.
Basically, he removed everything from the inside of the intercom box except for the speaker parts and the wires that attached them. Then he connected the ends of those wires to the wires + micro plug from a dead set of earbuds. After that, it's just a matter of plugging the iPod in to the speaker and turning it on! I tried to find a similar project on-line to link to, but this is the closest I came: an Instructable on making an iPod speaker from earbuds and some old computer speakers. Anything with a speaker in it probably works in a similar way. But admittedly, that assumption may be way off base.
Also: the knob and dial still turn, but they don't actually control anything. For the sake of our project, though, they'll lend that extra bit of detail that'll make it shine. Stay "tuned"! There'll be more about this in a couple of weeks. Until then, it's a total cliff-hanger. Bwa-ha-ha!
Linking Up to:
Creative Things Thursday
Junkin' Joe Fabulous Finds
Linking Up to:
Creative Things Thursday
Junkin' Joe Fabulous Finds
Tuesday, November 27, 2012
coffee sack tree skirt
Hey, here's a project you can make with all those pretty coffee sacks over in my Etsy "supplies" shop (you can also check out a past project here).
A reversible coffee bean sack Christmas tree skirt! It's not too tough, just a little cut and sew.

I started with a vintage sheet with a vaguely woodgrain-ish pattern for the flip side. A twin size will do.

You'll need two standard coffee sacks for this project. When you get them, take out the stitching to make two large panels.

I used a permanent marker tied to a two-foot length of string as a compass to trace semi-circles on each panel. You'll want to zig-zag or serge the edge of each panel.

You'll probably find you're happier if you treat the sheet the same way, cutting two semi-circles instead of one big circle. It's easier to handle the compass when you're not trying for an entire circle, and it leaves you the right amount of seam allowance at the slit.
Cut out the centers and zig-zag the new edge.
After stitching the two burlap halves together on one center seam only, do the same for the backing.

(Please excuse the lack of photographs for this next part; it's exactly like sewing a pillow case.) With right sides together, stitch the burlap and sheeting together around all edges with a 1/4-inch seam allowance, leaving an eight-to-twelve-inch space to turn it all inside out.
Turn it inside out, pin and press flat, and reinforce by stitching all edges.

Depending on the sheet you use for the flip side, you can get really Christmas-y, or leave it more neutral so that BOTH sides can be used with any color scheme.

You could dress this project up with rickrack, ribbon, or trim. I'll leave that to you. This one, I kept simple.

Of course, if you'd rather buy than make this close to Christmas, you can always jump over to my Etsy shop and snap this one up! Or start collecting supplies now; this project is pretty quick (maybe three hours, total) so you totally have time to order your coffee sacks and still get it stitched up weeks before Christmas. Use the code "CAFECHRISTMAS" at checkout to get a 25% discount on all coffee sacks in my supplies shop between now and December 25th.

But enough about me; what are you working on for the holidays? Any big projects you're trying to tackle?
Thanks for reading!
p.s. you can make these photos larger just by clicking on them, but you probably already knew that.
Linking up to:

 Petite Hermine
A reversible coffee bean sack Christmas tree skirt! It's not too tough, just a little cut and sew.

I started with a vintage sheet with a vaguely woodgrain-ish pattern for the flip side. A twin size will do.

You'll need two standard coffee sacks for this project. When you get them, take out the stitching to make two large panels.

I used a permanent marker tied to a two-foot length of string as a compass to trace semi-circles on each panel. You'll want to zig-zag or serge the edge of each panel.

You'll probably find you're happier if you treat the sheet the same way, cutting two semi-circles instead of one big circle. It's easier to handle the compass when you're not trying for an entire circle, and it leaves you the right amount of seam allowance at the slit.
Cut out the centers and zig-zag the new edge.
After stitching the two burlap halves together on one center seam only, do the same for the backing.

(Please excuse the lack of photographs for this next part; it's exactly like sewing a pillow case.) With right sides together, stitch the burlap and sheeting together around all edges with a 1/4-inch seam allowance, leaving an eight-to-twelve-inch space to turn it all inside out.
Turn it inside out, pin and press flat, and reinforce by stitching all edges.

Depending on the sheet you use for the flip side, you can get really Christmas-y, or leave it more neutral so that BOTH sides can be used with any color scheme.

You could dress this project up with rickrack, ribbon, or trim. I'll leave that to you. This one, I kept simple.

Of course, if you'd rather buy than make this close to Christmas, you can always jump over to my Etsy shop and snap this one up! Or start collecting supplies now; this project is pretty quick (maybe three hours, total) so you totally have time to order your coffee sacks and still get it stitched up weeks before Christmas. Use the code "CAFECHRISTMAS" at checkout to get a 25% discount on all coffee sacks in my supplies shop between now and December 25th.

But enough about me; what are you working on for the holidays? Any big projects you're trying to tackle?
Thanks for reading!
p.s. you can make these photos larger just by clicking on them, but you probably already knew that.
Linking up to:
Petite Hermine
Subscribe to:
Posts (Atom)