Showing posts with label instructables. Show all posts

Wednesday, May 8, 2013

pinterest challenge: a backyard arbor

At last, it's time to show you a little more about this teaser photo I showed at the end of my last post:


Of the many pins on my Curb Appeal Pinterest board, most are variations on the pergola/arbor/garden arch theme. I've been collecting ideas for nearly two years now. 


In front of my house, I have two random metal garden arches (in different styles) that came to me on sale from a couple of different places. In the backyard, the "arch" in front of the studio building (which is now mostly sided! Hooray!) looked like this:


Urgh. The green metal arch (can you even see it?) is a leftover craft store "wedding arch" from our wedding ten years ago. It was clearly not meant for heavy labor.

I had it pretty neatly disguised for awhile with twigs and branches woven in. A windstorm collapsed the whole thing last year. 

I then had it supported by the side supports of a pergola that had also collapsed in the windstorm . . . total eyesore. That part had been removed by the time I thought to take this photo, along with a lot of the sticks and weeds.


Yes, I'm embarrassed that things got to this neglected, overgrown state. That's life in a fixer-upper, folks. Some things get fixed-up faster than others.

Which explains all of those arbor pins on my pin board, and my burning desire to take care of the issue.

This project was uploaded to Instructables by someone calling himself/herself SpecialK, who deserves the credit for this photo. And it's the project I decided I could take on, by myself, before my husband came home from work one day last week.
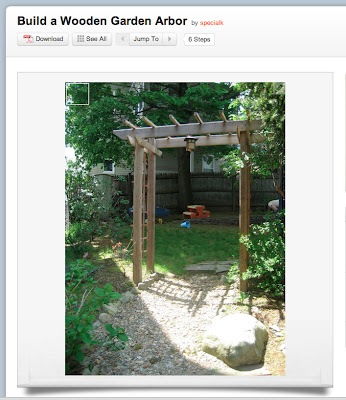


So, that didn't exactly work out. I did have it about 90% built by the time the mister rolled up that evening (just needed cross bars and lattice on top and sides), but in my eagerness to get to building, I built it out of place. This presents some challenges I hadn't properly anticipated, like, say, assembling the thing with only one adult present, and moving it, and keeping things square and level. But let's set that aside, and assume that you'll do things the EASIER way: holes first, arbor built in place.


I finished it up the next afternoon (with some help from my kiddo and his toy drill) and started measuring for and digging the holes for the legs.


After the mister helped me finish digging with the post hole digger (approximately 15 inches deep), I put some pea gravel in the bottom of each hole (approximately 3 inches worth) and we finagled the arch into place, working until it was in-line with the roofline of the studio.


The bottoms of the legs are coated with spray-on rubber sealant about 18-inches along the bottom and sides. They are made of Douglas Fir, which needs a little insect and rot resistance. The gravel is for drainage as well as anchoring. I filled around the legs with some more pea gravel, and finally some larger river rocks near the top to disguise the sealant and to keep dirt away.


I also trimmed back the rose and grape vines a ton, which hurt to do. The rose will grow back quickly, but that grape vine takes awhile, and it really only started producing mass amounts of grapes last year. Fingers crossed that it snaps back. 

The next step was to paint. I had some oil-based primer left from ye olden days (maybe we used it on the pickets in the front yard?). Had I used all cedar or all pressure-treated wood, I would have kept it wood-colored, but I used a variety of woods and thought a little paint protection would go a long way.


The original project parameters call for pressure treated wood and store-bought lattice, and estimate the cost at about $100. I have three of these to build (this is the first) so I wanted to bring in my practice arch at closer to $50.

Here in Oregon, 8-foot 4x4 Douglas Fir posts are about $7 apiece. I used a mix of recycled shipping timbers (79 cents) and utility grade 1x2s ($1.50 for an 8-foot length) for the side supports, horizontal lattice,  and crosspieces on the top. The long skinny pieces on the side lattice are 6-foot long cedar garden stakes I already had on-hand.


The front and back pieces at the top are made from 1x6x6 clear grade cedar fence boards for $3 each.


I came in under my $50 target thanks to the river rocks, screws, and paint I already had on hand, as well as using utility grade lumber and a few on-hand and recycled bits. I'm sure that (free) pallet wood could stand in for most of the pieces here, too, so it's entirely possible to build one for even less (in fact, over on my Curb Appeal Pinterest board, there's a link to a plan for a pallet wood arch that's kid-sized).

I'll have more for you later, as the path gets re-done and the garden beds get rebuilt (I'm thinking cement retaining wall blocks this time around), so check back later in the summer!

In the meantime, thanks for reading the latest in my series of posts for the Young House Love / Bower Power Pinterest Challenge! Head on over and link up if you've finished a project inspired by Pinterest, too.

Linking up to:


Wednesday, December 28, 2011

all - stars

I found a little pair of Chuck Taylor's at the thrift store which were just the right size, but not the right color. We don't really wear much pink around our house, so I made them into these sweet little day-and-night Chucks for my kiddo as a Christmas present:


These were in practically new condition, as lots of second-hand kids' things are. You can see how the inner soles look pristine.


Even the laces were still pretty new-looking.


Enter Tulip Soft Fabric Paint.


(photo credit)


They come in teensy little one-ounce bottles, which is plenty for little projects like this one, with enough leftover for a bunch more projects. I bought four colors (Yellow, Glacier White, Marine Blue, and Platinum Metallic) for a little over a dollar each; I had the turquoise color left from those baby onesies I painted awhile back. You could also use regular craft acrylic paints; they're colorfast, too, but can be a little stiff. These come out nice and flexible, which is great for stuff kids are going to wear.

First, I painted one shoe solidly Turquoise for the "Day" shoe. I let it dry for about an hour, then added some puffy white clouds with the Glacier White and a tiny little bird with the Marine Blue.


Next, I used the Yellow to turn the "All-Stars" logo into a little sun.


For "Night", I painted the other shoe in Marine Blue, with accents of the Turquoise for depth and the appearance of galaxies.


Using the Glacier White, Yellow, and Platinum paints (alone and in combination) I dotted in stars of varying sizes, and painted in some starbursts, dashed lines (resembling those on a star map), and a little moon near the logo.


My little dude looks pretty darn cute running around in them.


This is a really fun project that can turn out to be pretty time consuming, depending on the complexity of your design. On the other hand, if you were to start with a pair of shoes that was already some shade of blue, it would go faster.

You can also adapt this project for a ton of other designs, as this company does. How well they turn out will totally be dependent on your artistic ability, but a simple Day-and-Night design should be pretty easy to accomplish with decent results.

Total project cost here was under ten bucks, including the sneakers ($4) and paint ($4.50, with lots left over).


(p.s. you can make these photos bigger by clicking on them . . . but you probably knew that!)


Linking up to:

Photobucket


Pin It

Thursday, November 3, 2011

pinterest challenge — max + wild thing costumes!

Pinterest Challenge time, sponsored by the Young House Love blog and the Bower Power blog, joined this month by Ana White and Erin!

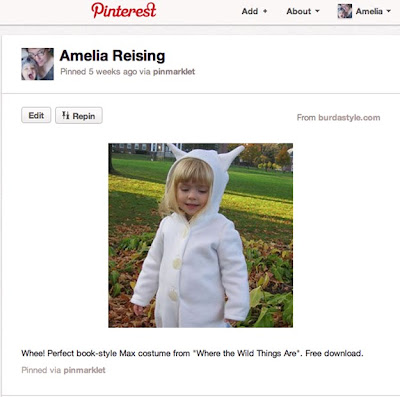
When it was time to get started on a Halloween costume for my kiddo this year, I started searching Pinterest and the web-at-large for a pattern or tutorial to make a copy of Max's wolf suit from the book Where the Wild Things Are. My search turned up this:


a free, downloadable BurdaStyle pattern in exactly the right size—2T. Thanks, SuzeB! I'm almost certain that the poor rating on this pattern isn't a reflection of the pattern itself (it all fit together just fine), but the result of dim bulbs like me trying to click on the bubbles to see other people's ratings, and thereby giving it a poor rating accidentally. The pattern is great. Here's my kiddo wearing it now, up to mischief of one kind and another, as the story goes.


I started with an ivory-colored, slightly stretchy, minky-feeling, polyester faux fur instead of the recommended polar fleece, because I don't really dig the way polar fleece pills after washing—even the "no-pill" kind. The lovely, bushy, furry tail is made from a quarter-yard remnant from JoAnn Fabrics.

Other alterations to the pattern: I made the hood very slightly deeper and made the front closure a velcro closure so that the sewn-on buttons are purely decorative (I like a quick-release one-piece costume for diaper emergencies). No need to get too in-depth on the alterations; SuzeB provides a nice tutorial on how to put the suit together. I just left off the front facings and folded over a narrow hem on the front edge, then stitched in the velcro. Easy peasy.


That's them at the library, right before Halloween story time. Which brings me to the other part of this costume: my husband's Wild Thing. Not something I'd planned on originally, but then I came across this:


while looking for a "quick" way to make a Wild Thing costume head. Hah!

The directions Seamster provides with his Instructable remind me of the way I crochet: intuitively. You see what you want the end result to look like, you get out some materials and a basic set of directions, and you interpret and innovate where necessary. Voila!

A couple of weeks later, you have this guy.


Now, a couple of people on the Instructable commented that they started this project mere days or hours before Halloween, and finished in plenty of time. I guess I forget sometimes how quickly things can get done when a person has all their evening hours free! For me, working a couple of hours a day a few times a week, it took a little longer than anticipated, which is how I ended up at the mall on Halloween in my Where the Wild Things Are t-shirt (or, as my husband called it, my "cloak of invisibility") instead of a matching costume. Never mind. The boys were instant celebrities.

We were sitting at the table, just like this


eating dinner in the food court and cooling off, and still had people coming up to compliment the costumes and take photos. While we were eating. Back off, paparazzi! I'm trying to eat my enchilada!

As for alterations to the Seamster's Instructable, I started with felt instead of polar fleece, this time for cost concerns as well as to make the Wild Thing have more of a Muppet-like appearance. The base is made as described here, except I enlisted my husband to cut it in a 18-inch diameter circle since his head is larger than a child's head.

I used 4 mm newsboard for the base, then, for the step in which I built up the hat base, I used cheaper, more flexible kraft board attached with tape and hot glue.

In the next step, in which I sewed the dome out of felt and attached it to the base, I followed the advice on measuring and cutting the fabric (felt, in my case), but the part about using trial and error stood out to me as being time-consuming . . . so I did this instead:


After stuffing the bubble with polyester fluff, I folded over the saggy parts and used a whipstitch to hold them down. I made sure to keep the whipstitching where I knew it would be out of sight under the Wild Thing's fur. It made a nice, relatively smooth dome shape, without having to rip the thing apart and re-machine sew + stuff a half-dozen times.

Since the whole thing is made out of felt, I also left off the step about stitching together a facade of felt for where the cheek lines would be, and used an alcohol-based marker to sketch those lines in instead.


I followed the instructions for shaping the nose and eyes from newspaper and masking tape (!) which are not materials I would ever have thought of using for this . . . kind of like dry paper mache. Once covered in felt, I was really impressed by how nice and smooth + solid the pieces turned out. I attached them as directed, accented around the eyes with the alcohol marker, then sewed the horns out of the same felt and stitched them on before beginning to hot glue the fur in place.

Next alteration? Instead of gluing down the teeth on top of the red mouth felt, I cut slits through the felt as I was attaching it so that I could poke the teeth up through the felt, concealing the little tabs. Because I have just a touch of the crafting OCD.


I finished the lower jaw mostly as directed, but I used a piece of foam pipe insulation instead of a 2-inch x 3/4-inch piece of foam. The curve presented some challenges, but in the end it looked pretty good, I think!


Here's one more of the boys in the wild (the kiddo's crown is something I sewed out of wool felt and dyed golden yellow):


Materials list:

Max's Wolf Suit
1 yard of 72-inch wide furry stuff (from JoAnn's with coupon)—$7.49
3 large plastic buttons (on-hand from Grandma's button box)—free
1 package bargain velcro (from JoAnn's)—99 cents
1/4-yard faux fur remnant (from JoAnn's)—$1.30

Wild Thing Head-Piece
1 30x48" sheet of 4 mm newsboard (from Oregon Art Supply)—$5.50 (with enough left over for a couple of other projects)
1 24x36" sheet of kraft brown tag board (from Paper Plus)—45 cents
1 9x12" yellow eco-felt rectangle (from JoAnn's, on sale)—25 cents
1 9x12" orange eco-felt rectangle (from JoAnn's, on sale)—25 cents
1 9x12" dark grey eco-felt rectangle (from JoAnn's, on sale)—25 cents (or use a scrap of something you have on-hand)
1/4-yard red 72-inch wide eco-felt (from JoAnn's, on sale)—75 cents
1 yard antique white 72-inch wide eco-felt (from JoAnn's, on sale)—$2.99
1/2-yard "Grizzly" black fur (from JoAnn's, on sale)—$5.10
elastic (on-hand)—free
masking tape (from Jerry's hardware store)—$2.29
20 extra-strength long glue gun sticks (from Jerry's hardware store)—$4.99
1 32-oz. bag polyester Fiber-Fill (from JoAnn's, with coupon)—$5.00
alcohol-based marker (on-hand)—free

Wild Thing Costume
1 heathered-red long-sleeved t-shirt (from Target, on sale)—$6.00
2 yards beige flannel (JoAnn's, on sale)—$4.78
acrylic paint (on-hand)—free
alcohol-based marker (on-hand)—free

(Other Pinterest inspiration posts: here, here, and here!)


(p.s. you can make these photos bigger by clicking on them . . . but you probably knew that!)


Pin It