Showing posts with label paint. Show all posts

Monday, July 28, 2014

sun printing on fabric (seriously the best surface design project of the summer)


 I spent several years at the university earning my BA in art. The last couple of years that I was in school, I was especially drawn in by the fiber arts program. I spent an entire summer term dyeing with indigo vats, for example, and another term learning natural dyeing techniques (with plants and things). I learned to carve stamps and print with acrylic paint, screen print with a Thermofax, photocopy directly on fabric. I learned about resists and cyanotype. I designed costumes and learned the art of sashiko. I tie dyed and sewed and painted and printed and felted and spun . . . and somehow, in all those years of art and fiber classes, I never learned how to sun print on fabric using only acrylic paint, water, and leaves.


It's amazing, really, the many varied ways there are to apply color to surfaces. This effect, in particular, can be obtained a number of ways. I once made an umbrella into a tree canopy for a play, for example, by holding branches and leaves against the umbrella and lightly spraying with spray paint. Cyanotype paper and cyanotype ink can each be used to make sun prints. You can also make simple sun prints on construction paper just by leaving the leaf-covered paper in the sun for a few hours.

This project, though, is astounding in its simplicity. I had all the materials on hand (you can use any fabric paint or acrylic craft paint; the paint shown is Kid Made Modern fabric paint from Target, the same stuff we used on the baby shower onesies awhile back), the set up is simple enough for kids and grown-ups alike, and the results are stunning.


Seriously Easy Sun Printing Tutorial


1) Take a piece of fabric (muslin, canvas, etc., with at least 50% cotton content) and get it wet.


2) Squeeze out the excess water.

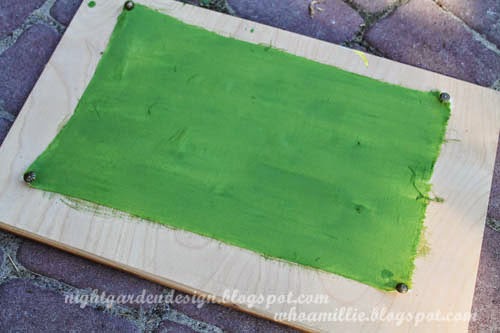
3) Stretch and pin to a board.


4) Pour a little paint and water into a container, and stir to mix.


5) Cover the surface of your fabric with thinned paint solution.


6) Cover the wet, painted surface with leaves, twigs, berries, etc.


7) Leave it in the bright sun, then check on it in about an hour. If the sun is weaker, leave it longer.


And that's it.


The capillary action draws the paint from the shaded portions (under the leaves) into the drier, unshaded portions, leaving lightly colored leaves on a darker colored background.


After your fabric has dried completely, put it in the dryer for a few minutes to heat set the paint, or iron with a cloth. It'll be safe to incorporate into a project and wash.


I'll never be done learning new things, it seems. Isn't that fantastic?


Thanks for reading!

Tuesday, September 3, 2013

sweat, or tears, or the salt sea

"'Do you know a cure for me?' 'Why yes,' he said, 'I know a cure for everything. Salt water.' 'Salt water?' I asked him. 'Yes,' he said, 'in one way or the other. Sweat, or tears, or the salt sea.'"
from The Deluge at Norderney
by Karen Blixen, writing as Isak Dinesen


This photograph has hung in our bathroom(s) for fourteen years now; I like it (alot), but I was ready to change things up a little bit.


I found an oil-painted seascape on canvas at the Village and traced chalk letters onto it.


White acrylic paint to fill in the tracings.


Ready to display.


Other examples of quotations painted on thrifted canvases:
  1. A Beautiful Mess
  2. Style By Emily Henderson
  3. Southern Belle Soul
  4. Young House Love
  5. Six2Eleven
By the way, didn't Karen Blixen have a crazy-interesting life? 


Any artwork change-ups going on in your spaces lately? Do tell!

Thanks for reading.

Linking up to:
The Cottage Market

p.s. you can make these images larger by clicking on them, but you probably already knew that, clever you!

Tuesday, August 27, 2013

quick updates: stenciled adirondack chairs

Awhile back, I saw a quick stencil idea in HGTV Magazine (I think). It happened to coincide with me discovering a vintage set of number and letter stencils at Bring.


I thought about it awhile, then went ahead and bought the stencils and completed the project in about ten minutes. Maybe less, as I already had the paint out for another project.


Six chairs, six numbers.


I used a regular bristled paintbrush; the numbers I stenciled with a mostly dry brush turned out better, with less paint piling at the edges.


I used leftover recycled indoor/outdoor primer from Metro Paint, the same stuff we used on our house a year ago (still going strong!).


It didn't take the Mr. long to notice really. We had people over that weekend and about halfway through the evening he asked, "Hey, when did you paint the numbers on the chairs?" It had only been a couple of days. 

And there you have it! A really quick update to personalize your yard furniture.

Thanks for reading!


Linking up to:


Wednesday, August 14, 2013

another industrial pendant to complete the set

One of the first art lessons I still remember is the one in which we were introduced to the fact that in nature, things often occur in odd numbers (plant leafs, flower petals, etc.). It was an introduction to the Rule of Odds, which is used often in art and design to keep your brain interested and engaged, and you can find it in art from ancient Japan through the Renaissance all the way up through current day.

At the end of a previous lighting post, I mentioned that the idea for a certain spot in our house was to eventually have three hanging pendants for balance. That's the Rule of Odds at play in our living room.

Light number 1 was a five-cent frosted pendant.


Light number 2 was a metal cage light made with salvaged parts. (I've switched out the light kit since the original tutorial to accommodate a standard-sized Edison-style lightbulb.)


And this, the third, is was originally a plastic cage light, like this one, purchased used for 50 cents at Bring (but I've seen them similarly priced at the Habitat ReStore).


I hung it from a coat hanger in the yard and sprayed with gentle layers of primer, aluminum finish, and flat black spray paint to give it the look of aged metal.

Here are all three together at last:


I have them all hung by hooks from the ceiling. 


My original hope was to hard wire them all together, but since I lack the practical expertise for that, the cords run bundled down the edge of the window frame and are turned on and off via a power strip. I hope to get the curtains rehung to hide them a little better soon.

I've seen a few lighting solutions lately that involve swooping black cable and exposed bulbs and while I love the look in a loft space (like the one Brooks designed on DesignStar), it's not practical with 8-foot ceilings. I'd likely accidentally hang myself.

Okay, now you know what you need to know to diy three pendant lighting fixtures on a teeny tiny budget. Of course, if you have a bit more money you want to spend, you can buy industrial metal light cages:


And if the price isn't much of an issue:


But in my house, I'm likely to spend the $1000 per fixture on that last link towards the mortgage or something else really practical, and hang up the diy version instead. How about you?

Thanks for reading!

Linking up to:


Thursday, May 23, 2013

ode to turquoise (via an old door)

This is how I left you at the end of my arbor post, with the new white arbor, and primed door trim . . . and the antique door of the studio looking shabby in some reject paint from the hardware store from several years ago. 


Our Adirondack chairs, on the other hand, are painted in this friendly shade of turquoise, or pool blue. It looks happy and intentional, wheras that old door looked pretty sad and unwelcoming. Worse, I'd say, than when my brother brought me the old door in the first place, with peeling white paint.


We can mark the door off of our never-ending to-do list; I took advantage of the nice weather to prime and spray it, and now it's just as happy and friendly as our chairs. It gives the whole building a different character. (The color is Rustoleum's Aqua.)


Of course, it helps that the sun was shining that day, which always makes things look brighter and happier than on a cloudy day, but I'm giving the new paint an equal share of the credit.

Okay, just that quick update for now, but I've been weeding and planting and working on the yard a bit more since painting the door. You can bet I'll be posting about those adventures very soon.

In the meantime, thanks for reading!


Sunday, December 30, 2012

post christmas craft-a-thon, part 1

After Christmas, when everyone's holding their big post-Christmas clearance sales, I like to spend a little gift card cash on some marked-down craft kits for a change-up to the daily finger-painting and coloring we do.

This little spin art kit in a very nicely designed box came from Bed, Bath, & Beyond and cost under $3.


It came with twenty-five circular sheets of paper, three little bottles of paint, and a "spinner", which is essentially a top.


Of course, if you're working with a not-quite-three-year-old, you're gonna burn through the supplied paint in just five art pieces, but I'm okay with that. The kiddo stayed interested for a half hour (shockingly long these days), and thinned-down tempera paint can substitute for the other stuff. Overall, a nice way to spend a bit of our afternoon.


If you pick up (or build) a similar kit, work inside the box as recommended to avoid spattering walls etc. And experiment with different speeds of spin and different amounts of paint; the results can vary wildly.

What post-Christmas craftiness have you and yours been up to? I've got a couple of competition projects and some birthday stuff in the works, which is good; the holiday projects didn't all come together in time, but I'm finishing stuff and feeling good about my progress.

Thanks for reading!

p.s. you can make these photos larger just by clicking on them, but you probably already knew that.


Wednesday, December 12, 2012

rusty robot "vintage" door sign diy


This post was my recent project audition for "So You Think You're Crafty" and guess what? I was lucky enough to make it into the regular competition phase. To all of the amazing competitors I was up against, well done. I hope I'm up to the challenge of meeting the bar you've all raised. The weekly competition is anonymous and starts in January; I'll let you know when the voting starts for the first round!

I don’t know about you, but I have pin boards full of so many projects over on Pinterest that I’m sure I’ll never get to all of them in this lifetime. I’m gonna have to start farming stuff out. You busy? ;)

One recent love that I’ve been pinning (over and over and over again) is vintage signage. I love old typography, vintage graphics, and weathered finishes. When my love of vintage signs recently dovetailed with my need for a fireplace fix-up, I ended up picking up a pair of vintage army green sheet metal panels from Bring (the local re-building store) for 50 cents each . . . and then, because I tend to eyeball things rather than measuring them, I had a whole panel leftover.


I decided to make my sweet kiddo a sign to go above the door of his room with the leftover panel. Since he’s two and a complete nut for robots,  his room is now labeled a “ROBOTICS LAB". He loves it! In fact, the rest of the afternoon he was sing-songing "robotics lab" over and over again and dancing by the door of his room. Win!


I hope you like my kiddo's rusty robot sign as much as we do! I'll consider it high praise if you sing about it later.


I have a second, similar project I'll be posting soon. In that post, I'll go into more detail about each of the steps, but I hope this photo collage tutorial will help you get started if you're someone who just needs a little push in the right direction. Basically, start with a surface that's a little gritty and old,  paint, then roughen it up and help it rust!

Thursday, September 6, 2012

happy labor day!


We spent the recent Labor Day holiday taking turns masking off the windows and priming/painting the first two sides of the house. Even more exhausting with a toddler!

We used this primer and paint in Sweet Corn Yellow. We'll let you know how it holds up! This is our first experience painting with recycled paint; the price is good, and the paint coverage is pretty decent.

What did you keep busy doing over the long weekend?

Thanks for reading!

Sunday, August 26, 2012

naptime mischief

Awhile back, I wrote about the mural I painted in my kiddo's bedroom. Here's one of the images from that post:


My guy's two-and-a-half now, and we're trying to accommodate his increasing independence. The idea of converting the crib to a toddler bed turned out to be a bad one though, so within a couple of days, we'd converted it back.

Unfortunately, one of the picture frames I'd removed from the bed's new location had left an air bubble under the paint. And, well, you can probably guess what happened from there.


All told, he peeled all the paint off of an area about eighteen inches across. He must have gotten started as soon as I'd closed the bedroom door; this wasn't the only piece of mischief he'd accomplished . . . yikes. That kid is something else.

Happily, we'd built the wall ourselves and painted it using modern paint, so lead exposure wasn't a concern here. Still, that was a bad time.

I phoned my dad for advice on fixing the wall.

His solution called for spreading joint compound over the entire area (available pre-mixed in little buckets at the hardware store), nice and thin. I let it cure for almost a week in the heat, then rolled some primer over the patch, and three coats of paint leftover from the original room painting (lucky lucky!).


Next, I pulled out my acrylic paints for repair and blended the old and new together as best I could, plus one apple.


It looks different from before . . .


but I think I actually like it better now. So far so good; the new apple hasn't tempted him yet!


So, what unexpected projects have you taken on due to your little troublemakers? Do tell!

Thanks for reading.


p.s. you can make these photos larger just by clicking on them, but you probably already knew that.


Linking up to:

Mop it Up Mondays