Showing posts with label industrial. Show all posts

Friday, April 18, 2014

industrial file cabinet makeover (part two)

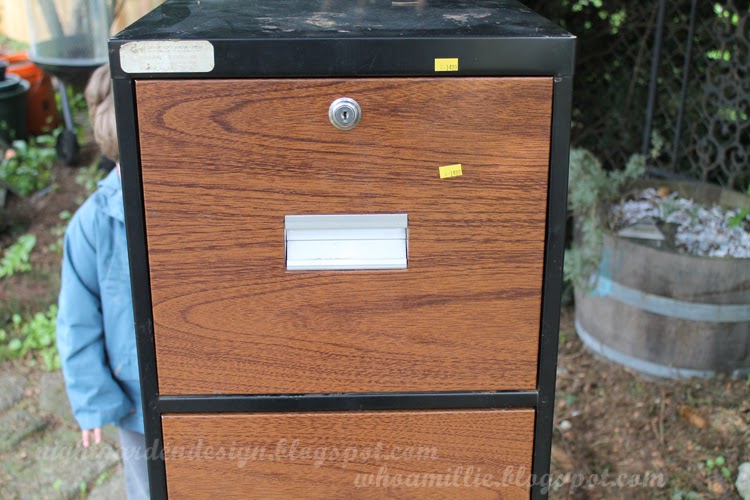
Whee! I'm back with the follow up to my recent entry about the modern industrial makeover I gave this 1980s black + fake wood steel filing cabinet.

As you might recall, a few weeks ago I started cleaning my room, realized we needed a full-sized file cabinet instead of a bunch of file boxes, and got sidetracked from the room cleaning project while I finished making it over . . .


. . . into this bare steel industrial-style cabinet.  I don't mind having it in my house, even though it's full of boring papers and responsibility.


It's not just me, right? This is a little like when Eliza Dolittle turns out to be a stunner. (The rain in Spain is falling mainly on the plain, am I right?) Or like when Rachael Leigh Cook takes off the glasses and Freddie Prinze Jr. realizes she's Superman?

I really like the way this turned out.

When I last wrote about this cabinet, I'd stripped and sanded the main body and managed to get most of the paint off. I decided to keep the paint that remained after hours of palm sanding (aka: clanging and waking the neighbors) and I'm pretty happy about it. The black paint in the rivets, dents, and folds makes me happy.


Then I attached the casters, bought new from Harbor Freight on super sale. I had first searched the big bin o' casters at Bring and came up a couple short of a matching set, sadly. I like to check there first then follow up elsewhere. I don't always find what I need on the first try, but when I do, it's always worth the search.

I flipped the cabinet, exposing its rusty underside . . .


. . . and used the casters to mark where to drill the holes.


Once the holes were drilled and the filings swept away, I used three little bolts and three little nuts to attach each caster to the cabinet (the fourth hole won't fit on the frame).


And then, with all of the wheels attached, I flipped it upright and the easy part was done.


I say that because this next bit was kind of a trial.

I really wanted bare steel fronts until I started sanding the first drawer with the palm sander. It was slow, noisy work that reminded me (negatively) of sanding the cabinet (clangity clang clang!). I thought I might prime + chalkboard the drawer faces instead. And it was a bad idea.


I'd just finished removing all of that black paint from the rest of the cabinet and I didn't at all like it on the drawer fronts. The paintbrush marks didn't appeal to me, either, so I switched courses (after everything was painted, unfortunately) and decided to try sandblasting.

After a few days of waiting and gathering supplies, here's one attempt with the sandblaster + walnut shell media + 30 minutes. Look at how it's not even breaking through the original wood patterned paint. Awesome.


I switched to using sand as media and had an easier time of it, but really, our air compressor is just too wimpy for sandblasting.

I decided to try the orange paint stripper again and actually had pretty awesome luck with it. You can see here the less reflective (darker) areas where, after an hour or so of sandblasting, some of the paint came off. The lighter areas are where the paint stripper did it's thing, and then I did mine with a Scotch Brite pad, a sanding block, and some steel wool.


It took a bit of work to get the finish even, but only on this one drawer. The others hadn't been sandblasted yet when I moved on to paint stripper.

Handles were next! I shared a photo of seemingly random bits of metal hardware in the previous post; they weren't random after all, at it turns out. I used some of those pieces to make four new handles with the character I wanted.

I made the handles from some blank metal outlet plates and what I think were probably sliding screen door handles in a former life. This was my favorite part of this makeover, and the thing I think added the most to the piece. (I bought the light switch plates, too, unsure of which combination would work out. These cost between twenty-five and fifty cents at Bring, and I'll be able to find another use for them so I wasn't concerned about over-purchasing.)


I drilled holes through the old handles, using the blank outlet plates as templates. Little bolts and nuts joined them together to make a nice flat surface for the final piece.


After drilling one more hole and applying one more bolt per drawer, the handles are complete. When well-tightened, these don't shift or wiggle (possibly because the bolts underneath encourage them to stay in place).


Here it is, back in one piece, exuding awesomeness and making paperwork look a whole lot less 1980s-style boring.


This was a time-consuming project, but not outrageously expensive:

• filing cabinet: $11.25 on sale at St. Vincent dePaul
• handle parts: $5 or so, total, used from Bring
• casters: $4 total, on super sale at Harbor Freight for $1 each
• bolts + nuts: $5 or so, including bolts from Bring, nuts from the hardware store
• coarse sandpapers and sanding block: $6
• orange stripping gel spray: $9
• Scotch Brite pads: had on hand

Ultimately the sandblasting kit and media weren't necessary or useful for this project, so I'm leaving them off the materials list. In lieu of a powerful air compressor/sandblaster combination, what you really need to finish something like this is a whole mess of elbow grease.

Thanks for sticking with me through the many, many words and pictures! I'm really pleased with how it came out, in case you couldn't tell. Now I can start obsessing over something else on Pinterest.

Linking up to:

My Repurposed Life
The Cottage Market 
Funky Junk Interiors

Tuesday, April 8, 2014

industrial file cabinet makeover (part one)

Don't avert your eyes; you'll hurt its feelings.


We were in pretty urgent need of a four-drawer filing cabinet for organizing papers and craft supplies, but I had some standards that needed to be met:

1) Must be under 18 inches deep. This was a hard one, as many of the filing cabinets I was scouting out were quite a bit deeper, and I just don't have that kind of space right now.

2) Must be steel. (That wood pattern you see there isn't wood; it's a wood patterned paint on metal drawers. In person, it's really easy to tell the difference.) Steel has the advantage of being lighter than wood (at least, with modern steel construction) and won't let me down by turning out to be made of veneered particle board. Also, modern steel filing cabinets are pretty easy to find at thrift stores; the more modern, the less likely to have lead paint.


3) Must either have a key or have an unlocked top drawer. I passed on a giant antique three-door filing cabinet because the top drawer was locked and I knew it would be a large additional cost to get the lock drilled out. And who knows what was in the top! Could be old papers, could be dead raccoon. Never mind that the cabinet in question met neither of the previous specifications. It was gorgeous blue and had really lovely handles. But the locked cabinet drawer was a deal-breaker for $150.

I spotted this cabinet at St. Vincent de Paul on a day when yellow price tags were 25% off. After discount, I paid $11.24 for it. It met all of the above specifications, with the downside being that it's not a showpiece. I absolutely can't stand the handles.


So, I never intended to leave it as-is. I wanted something more like one of the cabinets I've pinned to my File Cabinets Pinterest board: protected bare metal, nicer hardware, with a style more vintage-industrial than 1980s-office. Sadly, I'm completely priced out of that market. Completely. I'm in more of a $50-filing-cabinet tax bracket.

Okay: so, for the first step, I brought the thing home, removed the drawers, and dug some green paint stripper out of the shed.

I was pretty optimistic after an hour, as the paint on the back was very bubbly and then scraped right off without a tantrum. I'd only used the green paint stripper on wood before (and been frustrated by the lack of results), so I was all excited about how well the rest of the cabinet would go.

You can see the back here, mostly paint-less, and the top, still painty and scabby even after giving the paint stripper another few hours to sit. (I would have let it sit overnight, but for the rain.)


The front and sides fared about the same.


This was a pretty big letdown after how easy the back was. A second run with a different brand of stripper didn't do much but make a mess and waste money.


The palm sander started out not making very good progress, but did better once I'd attached a 35-grit paper and really went at it. It was a lengthy, messy, NOISY undertaking. Sometimes you know a project is done because it's better than you could have imagined. Sometimes you know it's done because no one can listen to even one more minute of the sander vibrating a piece of sheet metal.

After sanding, I buffed it with a coat of automotive wax to protect the finish.

Here is the cabinet as it will stay, with a bit of black left, emphasizing the vintage look (I think it will do nicely).


And here is a sneak peek of what's yet to come:


If getting paint off of these cabinets wasn't such a major pita, I'd have a couple of sets of lockers in my carport stripped already. Wanna know something exciting? We've bought a sandblasting kit! I haven't tried it out yet, but I'm really looking forward to seeing how much faster and easier this project is with that tool in hand.

I'll be back soon with part two of this vintage industrial file cabinet makeover, when things really start coming together. Thanks for reading! 

Thursday, September 5, 2013

aging painted metal signs

I've done a couple of posts now on how to make vintage-look painted signs on metal panels, but I'm still perfecting my methods as I work my way up to a large project. I have a patch of fence, though, in the backyard, that is chain link, and ugly, and has a tiny dog on the other side (a pomeranian, I think) who likes to bark at us when we're minding our own business in our own yard (but only when he can see us). And I had some metal panels laying around, ready to get made into signs.

A project for every purpose, hmmm?


So, let's not talk about how I should have used a template before taping and spraying so that everything would look a little more professional. I freehanded this in chalk and then taped around it; I know it doesn't exactly dress to impress. But I would like to write a little about my experiments with aging. Aging the sign, that is, not myself. (*wink*)

First, I started with a cream painted metal panel from Bring, the recycled building store where I pick up a lot of my project materials. As you can see in the sanded spot in the photo below, there were three other layers of paint under the cream: tan, brown, and gray before the steel shows through. Picking a panel with a lot of layers of old paint in dated colors is a great first step towards making something look vintage, I think.


After I taped my lines, I sprayed with a flat black primer, and then three very light coats of cherry red. Some of the black still shows through, with I think lends some nice age.

You can tell from the above photo there is a flat finish to the red paint. It was glossy out of the can, but if you hit anything with enough scrubber pads, sandpaper, and steel wool, you can dull the finish pretty nicely. 

As you see here, my next method to aging is to scrub all the way through the layers of paint in several areas, down to the bare metal. I made the patches somewhat random in order to look like "natural" aging. 

And then, of course, rust. I scrub the area with salt while it lays flat, then spray with vinegar and leave it to do its thing. Voila! (It's still wet in this photo, but you can still make it out.)


Ah, rust. I left this laying flat in the rain for a couple of days, which helps hasten the process.


I let the kiddo dance on it a bit, too, to give it some dents and chips.


So, the aging is going well, and this hides a pomeranian. Mission accomplished!


Stay tuned, as I'm in the middle of another sign project I'll be sharing soon. This one is even bigger and way cooler.

Thanks for reading!


Wednesday, August 14, 2013

another industrial pendant to complete the set

One of the first art lessons I still remember is the one in which we were introduced to the fact that in nature, things often occur in odd numbers (plant leafs, flower petals, etc.). It was an introduction to the Rule of Odds, which is used often in art and design to keep your brain interested and engaged, and you can find it in art from ancient Japan through the Renaissance all the way up through current day.

At the end of a previous lighting post, I mentioned that the idea for a certain spot in our house was to eventually have three hanging pendants for balance. That's the Rule of Odds at play in our living room.

Light number 1 was a five-cent frosted pendant.


Light number 2 was a metal cage light made with salvaged parts. (I've switched out the light kit since the original tutorial to accommodate a standard-sized Edison-style lightbulb.)


And this, the third, is was originally a plastic cage light, like this one, purchased used for 50 cents at Bring (but I've seen them similarly priced at the Habitat ReStore).


I hung it from a coat hanger in the yard and sprayed with gentle layers of primer, aluminum finish, and flat black spray paint to give it the look of aged metal.

Here are all three together at last:


I have them all hung by hooks from the ceiling. 


My original hope was to hard wire them all together, but since I lack the practical expertise for that, the cords run bundled down the edge of the window frame and are turned on and off via a power strip. I hope to get the curtains rehung to hide them a little better soon.

I've seen a few lighting solutions lately that involve swooping black cable and exposed bulbs and while I love the look in a loft space (like the one Brooks designed on DesignStar), it's not practical with 8-foot ceilings. I'd likely accidentally hang myself.

Okay, now you know what you need to know to diy three pendant lighting fixtures on a teeny tiny budget. Of course, if you have a bit more money you want to spend, you can buy industrial metal light cages:


And if the price isn't much of an issue:


But in my house, I'm likely to spend the $1000 per fixture on that last link towards the mortgage or something else really practical, and hang up the diy version instead. How about you?

Thanks for reading!

Linking up to:


Wednesday, June 5, 2013

thrift store finds: quilting hoop wall art

I find large, wooden quilting hoops at thrift stores all the time, and they're crazily inexpensive. I could have stretched any fabric in it to make some fun, fast wall art, but I chose to do another coffee sack project this time around. 


I loosened up the wing nuts . . .


then chose what part of the design to display, and cut around my hoop with a 2—3 inch border added.


After cutting, I triple zig-zag stitched the edges of the coffee sack oval to keep the burlap from unraveling.


Then I stretched the edged circle over my hoop, and used a large nail to hang it on the wall.


And there you have it! Fast and easy. You can use an iron on the steam setting to make the back lay down flat enough to hang on the wall, but some coffee sacks do fine if you skip that step.

As this project only uses the front of the sack, it's easy to find remnants large enough for other projects. Like maybe a cushion, a lampshade, some tassels, or the edging on a bike basket. You know; just for example. ;)

I have coffee sacks available in my Etsy supplies shop; drop in if you want to try one of these projects for yourself!

Thanks for reading.


Linking up to:

Wednesday, March 6, 2013

hometown tourist: salvage works / solabee / boys' fort


We took the kiddo up north to Stumptown last weekend to visit OMSI, and when he'd tired of watching paper cups fly and making little foam balls hover in mid-air, we packed him back into the car and shuffled him off to my little dreamland of the day.

When you see Paul Bunyan, you know you're getting close. 


Yes, my idea of a good time was visiting Salvage Works, which now shares its space with Boys' Fort Furniture  and Solabee Flowers and Botanicals (they do weddings!). You can see your intrepid blogger reflected in the window below . . . and now I'm gonna link this post to Amy over at While Wearing Heels, whose photo challenge of the month was to photograph your reflection. Bam! Two with one blow.


You can probably guess as to the nature of Salvage Works. They sell architectural salvage, house parts, and assorted oddities. And they dress it up so that the place looks and smells (and costs) boutique. Boys' Fort and Solabee help with that, though it's at times difficult to determine where one venture ends and the next begins, they're all so integrated. 

For example, we have here a gorgeous cabinet with drawers full of hardware and . . . succulents.


A wall built with reclaimed timber sports a vertical wall planter made of old coffee cans; more barnwood planters fill the desk.


Because all three businesses operate so symbiotically in the front area of the store, I think it'd be better for you if I just show you some vintage + green eye-candy and give you a scavenger hunt list.

To Find:
*antique green house/plant stand full of plants
*stump used as a low stool/table
*whiskey barrel
*vertical wall planter made of reclaimed wood


To Find:
*vintage mail slot
*1970s lamp
*oleo margarine trough . . . er, bucket
*old trophy
*painting of Vincent, called Vincent, by a local artist
*really old trunk
*tupperware canisters


To Find:
*an arrow made of reclaimed wood
*an old stool
*a stained concrete floor


To Find:
in this wall installation
*grape crate from the Coachella Valley
*Anglo roast beef crate
*a shout out to San Francisco
*a Scotch Whisky crate
*yardsticks


To Find:
*a yardstick photo frame
*turquoise dishware
*fake fruit
*old yearbook photos


To Find:
*doorknobs
*drawer pulls
*face plates
*a well-loved glass display cabinet


As usual, I missed taking snaps of some of my favorite things inside, like the labelled cabinet full of drawer hardware, a leaning pile of huge reclaimed timbers,  and a rolling stool made with a stump and some casters. Some day I'll get the hang of this blogging thing, readers, and you can say you knew me back when I sometimes still resorted to phone camera pictures and sometimes neglected to document the good parts.

Oh heck, let's do a little scavenger hunt outside, too, shall we?

To Find:
*really BIG chain
*creepy head watching your every move
*fabulous cabinet full of tools (?)
*stack full of singleton drawers and wooden crates


To Find:
*a "staff only" sign I totally missed
*a "detour" sign that someone else hit . . . possibly with a truck
*dart board
*coal buckets


To Find:
*oil can
*$1 license plates
*sign that either reads "she said" or "shed sale" (I'll never know, and it's killing me, Smalls)
*more wooden crates


To Find:
*old red orchard ladder
*army green lockers
*two cast iron bathtubs
*vintage bikes
*spoked metal wheel 


To Find:
*a good reminder
*old shovels
*assorted grates
*the word "schmick's"


They also have a decent-sized reclaimed lumber yard which the weather (and lack of flat bed truck) kept us from exploring, but we mean to take a closer look should we visit again.

So let me tell you the best thing about this place: the really sweet ladies running it for the day. I can't imagine better spokespeople for their businesses. 

The woman from Solabee was headed out on a quick delivery, but paused at the door as we were entering to see if she could answer any questions or offer any help on her way out. She swore she'd be back in a snap before pointing the guys toward a pile of vintage Fisher-Price for the kiddo to paw while I wandered around.

I think Terry was the name of the knowledgable, helpful, and friendly woman at the Salvage Works counter, who directed me to all and sundry and helped the mister pick out a surprise t-shirt for me. When I came back through with a fistful of purchases (two little succulents, two old coat hooks, and a letterpress card with Paul Bunyan on it) she told me all about the fabulous Hidden Portland project Carye Bye (the card's artist) runs. Carye also runs a bathtub museum. (You can file that little bit o' knowledge in your "Weird Portland" drawer.)

Summary: Put it on your bucket list of places to visit in Portland if you're interested in really lovely modern botanicals, vintage finds repurposed and reused, or the raw materials to DIY. It's not as big a heaping heap of supplies as you'll find at my perennial favorite stomp (Bring), but more a carefully curated collection of treasures big and small, and a really enjoyable place to spend some time exploring and imagining possibilities.

Thanks for reading!

p.s. you can make these photos bigger just by clicking on them, but you probably already knew that, clever you.

Linking up to: