Showing posts with label printing. Show all posts

Monday, July 28, 2014

sun printing on fabric (seriously the best surface design project of the summer)


 I spent several years at the university earning my BA in art. The last couple of years that I was in school, I was especially drawn in by the fiber arts program. I spent an entire summer term dyeing with indigo vats, for example, and another term learning natural dyeing techniques (with plants and things). I learned to carve stamps and print with acrylic paint, screen print with a Thermofax, photocopy directly on fabric. I learned about resists and cyanotype. I designed costumes and learned the art of sashiko. I tie dyed and sewed and painted and printed and felted and spun . . . and somehow, in all those years of art and fiber classes, I never learned how to sun print on fabric using only acrylic paint, water, and leaves.


It's amazing, really, the many varied ways there are to apply color to surfaces. This effect, in particular, can be obtained a number of ways. I once made an umbrella into a tree canopy for a play, for example, by holding branches and leaves against the umbrella and lightly spraying with spray paint. Cyanotype paper and cyanotype ink can each be used to make sun prints. You can also make simple sun prints on construction paper just by leaving the leaf-covered paper in the sun for a few hours.

This project, though, is astounding in its simplicity. I had all the materials on hand (you can use any fabric paint or acrylic craft paint; the paint shown is Kid Made Modern fabric paint from Target, the same stuff we used on the baby shower onesies awhile back), the set up is simple enough for kids and grown-ups alike, and the results are stunning.


Seriously Easy Sun Printing Tutorial


1) Take a piece of fabric (muslin, canvas, etc., with at least 50% cotton content) and get it wet.


2) Squeeze out the excess water.

3) Stretch and pin to a board.


4) Pour a little paint and water into a container, and stir to mix.


5) Cover the surface of your fabric with thinned paint solution.
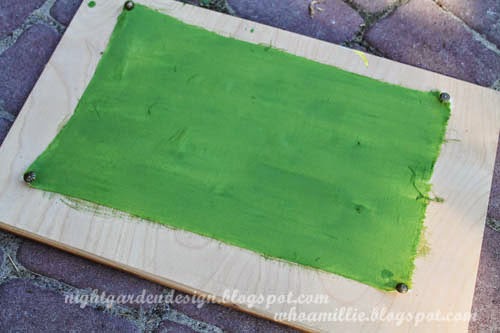

6) Cover the wet, painted surface with leaves, twigs, berries, etc.


7) Leave it in the bright sun, then check on it in about an hour. If the sun is weaker, leave it longer.


And that's it.


The capillary action draws the paint from the shaded portions (under the leaves) into the drier, unshaded portions, leaving lightly colored leaves on a darker colored background.


After your fabric has dried completely, put it in the dryer for a few minutes to heat set the paint, or iron with a cloth. It'll be safe to incorporate into a project and wash.


I'll never be done learning new things, it seems. Isn't that fantastic?


Thanks for reading!

Monday, July 21, 2014

a little bit of summer

Here are a few things we've been working on so far this summer. I hope to go into a bit more detail on some of them in future posts, but with all the play dates and swim lessons and backyard quicksand making, I'm having a hard time settling down to update the blog. The weather's too nice, the days (as long as they are) are too short. We're filling them full.

I hope you're enjoying your summer too!


My booth at the Eugene Mini-Maker Faire in June.

Getting good use out of the studio; the kiddo tells me this is a picture of a queen.

We're going to have so many grapes this year. So many!

Tie dyeing with fabric paint for a special quilt project.

Watching a juggler on the library plaza at the Summer Reading kick-off.

A booth at Black Sheep Gathering where the kind people told me how to fix my spinning wheel.

These b&w dragonflies are all over the place this summer. I love them.

Mashing up the u-pick strawberries from the organic farm to make jam.

Sunset roses.

Sun printing on fabric (it's really easy).

W is for watermelon, if you're eating the alphabet.

Red flowers and pool blue chairs.

Hanging up the ride-on toys on the back of the shed.

A peanut plant.

Yup. We're growing peanuts as a science experiment this summer.

Croquet cart from the thrift store . . .

. . . with some new stain and tightened screws for long life.

Painting the patio bricks with washable tempera paint is fun with kiddos.

Did I mention we also camped out at the beach for a few days, and spent some time at the ballpark, and played mini golf, and have been to the pool like a dozen times (at least)? Yeah. We're totally summering it up over here in the PNW.


Thanks for reading! I'll be back soon with a little post to explain sun printing in six easy steps, because now is the time, people! You crafty folks out there probably already have what you need on hand.

Friday, February 1, 2013

card catalog display coffee table

Click here for a full tutorial and materials list

Let's start at the very beginning. I'm not a hoarder, but I do have a few . . . collections. An art school dilettante, I took classes from every possible area of interest. Printmaking had a hold of me for awhile, and spinning. A couple of courses in letterpress printing inspired my collection of vintage wooden type. The Mister and I even built a little printing press awhile back, but it's been untouched since the birth of my kiddo. But that's not where this project started. The wood block top was an afterthought.


This particular upcycling project (a card catalog coffee table that displays my collection of wooden type in the top) started with a row of card catalog drawers I picked up at Goodwill awhile back. I like Goodwill. Among thrift stores they're organized, clean, and priced right (locally, anyway). And once in awhile, they have things that jump out of nowhere and surprise you, like a row of card catalog drawers hidden among busted wicker furniture.

I spied the antique wooden bobbins (legs) at the Pendleton Woolen Mill Store in Portland. They're retired from the mill and are 80+ years old, their solid wood soaked through with lanolin from the wool. I didn't bring home enough, so I phoned them up a few weeks back and asked them to ship me some for this project, which they were sweet enough to do. The shipping cost almost as much as the bobbins, but it was totally worth it.


The hardware for attaching the legs to the card catalog came from the rebuilding store. Two were still in their ruined packages, missing only the screws; two were dug out of a bin of other hardware bits, used but useable, like everything there. I had to drill into the metal to attach them to the bobbins, which I'd expected (the center of the bobbins being hollow and all). Once those were sturdily attached, I propped the table base upright and started trying to think of what to put on the top.

After considering several possibilities, I decided to use the table to display my collection of vintage wooden type. The exposed drawer supports allowed me to use some leftover tag board to create an inset space I filled with part of my collection. To protect it, I covered the top with a piece of plexiglass that was leftover from a store I ran for awhile. One of the folks at my local builders' supply store cut it down to size for me when I brought it to them measured and marked. Thank you, guy at the cut table!


I used some old game pieces to support the edge and then rounded up some trim pieces at the (other) rebuilding store (it was 25 cents for a 3-foot length of mill seconds) to trim the edge and hold the plexiglass in place. I attached the trim with silver wire nails and then stained it with a Tee Juice pen to match. 

The final step: I typed up some labels for the drawers on my vintage typewriter.

I've seen some furniture made from card catalogs on Pinterest, and I've seen a couple of coffee tables with wooden type collages set in the top. Because I plan to actually use my wooden type for printing, I notched the trim along the back of the table so that the plexiglass top can be removed easily to access the wood blocks. The rest of the time, this lovely stuff isn't locked up in a bin anymore, and we get to enjoy it! Woohoo!

(Bonus: my collection of old house numbers fits around the edge . . . with room to keep adding.) 

This is one of those projects that makes me happy just looking at it. I hope you like it, too!


Click here for the full tutorial and materials list!

Linking up to:
Young Heart, Old Soul

Saturday, January 5, 2013

freezer paper stencil viking shirt

I had a falling out with the owner of a local shop recently. I'd gone there to buy a specific t-shirt for my kiddo, one with a cuuuute viking pattern screen printed on it by a company I like, but can't always buy (because good sense dictates I can't spend $30 on a toddler t-shirt on a regular basis).

But I left without it.

It's all too bad because I like to support local business when I can (even if it means waiting for a sale) and I especially like to support mama-owned businesses. More than that, I like to support good graphic designers, and this particular clothing manufacturer hires great ones.

In the end, though, the idea of stenciling a viking design onto a t-shirt isn't copyrighted. In fact, this tutorial that Cheri wrote over a year ago could have inspired the (more recent) designer t-shirt, for all I know. I know it inspired me!


Freezer paper stenciling is something I've posted about before, but this viking design is a whole lot less complex. As you can see, I made it in two different sizes, one for the mister and one for the kiddo.


I also (word to the wise) accidentally cut it into wax paper the first go-around (which DOES NOT WORK) and had to re-do it, so it's a good thing it's so straight-forward.


Cheri mentions in her tutorial that you can find some free-use images on-line and cut them with your Silhouette cutter; you'll be happy to know you can also free-hand the drawing and cut it out with a craft knife if, like me, you're artsy and don't own a Silhouette.


Cut on FREEZER paper, iron onto t-shirt (plastic side down), paint, and let dry.


If your beard is too close to the color of your shirt, lighten it up, dry again, and remove the wax paper.


Heat set, and you're ready to go!


I used a Gap t-shirt from the Goodwill for this design, so the project was really inexpensive and fast. And we like it! I hope you'll link to your freezer paper stencil projects in the comments section below, if you have the urge!


Happy New Year, and thanks for reading!


Sunday, December 2, 2012

freezer paper stencils + flour sack towels

The night before my sweet cousin's wedding, I had a major 11th-hour craft fail in my family's hotel room. My screen printing project fell all to pieces.

Returning home after the wedding, I dusted off my butt and set aside the silkscreen for awhile, turning instead to freezer paper stencils to make my cousin and her fiance' a set of personalized, woodsy kitchen towels.

Supplies: freezer paper, craft knife, brown Tee Juice dauber, + iron. And, not pictured, cotton tea towels and pencil.


Sketch your design onto the dull, unplasticized surface of the freezer paper, then cut it out with your craft knife. I chose to print one of the towels with a woodgrain pattern and a "carved" heart with their initials inside. I drew this freehand, but if you're not sure where to start, you can find images on-line to inspire your pencil.


A more involved design like mine will require careful handling and ironing.


Iron the stencil on to towels carefully, adding separated elements (like the letters in the "carved heart") after everything else.


Using the Tee Juice dauber, go over the entire design.


After letting it dry for awhile, remove the freezer paper and iron the entire piece to set the dye. Wash and dry, then iron flat.


The second design was the same process but a different graphic: a stand of trees, their state, and their initials.


Thanks so much for reading! Wanna make the photos larger? Just click!

Linking up to:

Six Sisters

Be Different, Act Normal