Showing posts with label acrylic. Show all posts
Wednesday, July 15, 2015
Monday, July 28, 2014
sun printing on fabric (seriously the best surface design project of the summer)
I spent several years at the university earning my BA in art. The last couple of years that I was in school, I was especially drawn in by the fiber arts program. I spent an entire summer term dyeing with indigo vats, for example, and another term learning natural dyeing techniques (with plants and things). I learned to carve stamps and print with acrylic paint, screen print with a Thermofax, photocopy directly on fabric. I learned about resists and cyanotype. I designed costumes and learned the art of sashiko. I tie dyed and sewed and painted and printed and felted and spun . . . and somehow, in all those years of art and fiber classes, I never learned how to sun print on fabric using only acrylic paint, water, and leaves.
It's amazing, really, the many varied ways there are to apply color to surfaces. This effect, in particular, can be obtained a number of ways. I once made an umbrella into a tree canopy for a play, for example, by holding branches and leaves against the umbrella and lightly spraying with spray paint. Cyanotype paper and cyanotype ink can each be used to make sun prints. You can also make simple sun prints on construction paper just by leaving the leaf-covered paper in the sun for a few hours.
This project, though, is astounding in its simplicity. I had all the materials on hand (you can use any fabric paint or acrylic craft paint; the paint shown is Kid Made Modern fabric paint from Target, the same stuff we used on the baby shower onesies awhile back), the set up is simple enough for kids and grown-ups alike, and the results are stunning.
Seriously Easy Sun Printing Tutorial
1) Take a piece of fabric (muslin, canvas, etc., with at least 50% cotton content) and get it wet.
2) Squeeze out the excess water.
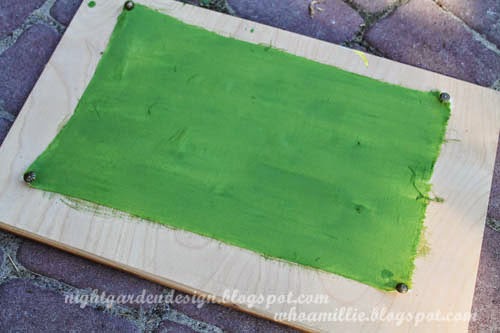
3) Stretch and pin to a board.
4) Pour a little paint and water into a container, and stir to mix.
5) Cover the surface of your fabric with thinned paint solution.
6) Cover the wet, painted surface with leaves, twigs, berries, etc.
7) Leave it in the bright sun, then check on it in about an hour. If the sun is weaker, leave it longer.
And that's it.
The capillary action draws the paint from the shaded portions (under the leaves) into the drier, unshaded portions, leaving lightly colored leaves on a darker colored background.
After your fabric has dried completely, put it in the dryer for a few minutes to heat set the paint, or iron with a cloth. It'll be safe to incorporate into a project and wash.
I'll never be done learning new things, it seems. Isn't that fantastic?
Thanks for reading!
Sunday, December 9, 2012
mural painting at mom's house
I found these old photos the other day from maybe five years ago. The mister and I were visiting my mom's house, and she suggested that we paint a tree mural on the guest room wall together. Just the kind of project I like working on!
First, I used a nice, soft pencil (or possibly charcoal?) to sketch out the tree.
Then Mom and I used artist's acrylics to paint in the bark together. Lots of chatting, too, of course.
I'm pretty sure we were done in a day. Of course, that was before I had my kiddo. If I were to have attempted such a thing with my sweetheart in tow, I imagine it still wouldn't be done. ;)
I hear tell that Mom's since added leaves to the tree, but I haven't been out lately to take a peek for myself. There's a set of bunk beds in there now too, for the grandkids, that I always picture looking just like a treehouse.
So: what kind of projects have you collaborated on? Ever take on a big project with a parent?
Thanks for reading! If you're interested, here's a link to a previous post I did about the blue tree mural I painted in my kiddo's room. It took more than a day, as I recall, but then, I was a new mama working on my own, so I try to go easy on myself.
And here's a link to a post I wrote about repairing the mural, after my busy toddler tried to peel all the paint off his wall during nap time one afternoon.
p.s. you can make these images larger just by clicking on them, but you probably already knew that!
First, I used a nice, soft pencil (or possibly charcoal?) to sketch out the tree.
Then Mom and I used artist's acrylics to paint in the bark together. Lots of chatting, too, of course.
I'm pretty sure we were done in a day. Of course, that was before I had my kiddo. If I were to have attempted such a thing with my sweetheart in tow, I imagine it still wouldn't be done. ;)
I hear tell that Mom's since added leaves to the tree, but I haven't been out lately to take a peek for myself. There's a set of bunk beds in there now too, for the grandkids, that I always picture looking just like a treehouse.
So: what kind of projects have you collaborated on? Ever take on a big project with a parent?
Thanks for reading! If you're interested, here's a link to a previous post I did about the blue tree mural I painted in my kiddo's room. It took more than a day, as I recall, but then, I was a new mama working on my own, so I try to go easy on myself.
And here's a link to a post I wrote about repairing the mural, after my busy toddler tried to peel all the paint off his wall during nap time one afternoon.
p.s. you can make these images larger just by clicking on them, but you probably already knew that!
Wednesday, February 29, 2012
large zelda pixelated cut-out party decorations
As I've previously mentioned, finding Zelda-themed party decorations is difficult. After Googling for awhile, I headed over to Pinterest and did a little browsing, finally, turning up a link that led to the Let's Explore Blog, and a really fabulous Alice in Wonderland party Amy put together for her daughter Delaney's birthday a couple of years ago.
One of the projects Amy and her husband created are these great, large-scale cardboard character cut-outs. Here's a link to my Pin, featuring the Mad Hatter cut-out from Delaney's party.

Of course, the best part of Amy's project is that it's infinitely adaptable. You could use this project for literally any character or theme. For our theme, old-school pixelated Legend of Zelda, the project is even more simple, because the grid used in the tutorial for plotting the design is the perfect way to make pixelated designs. Just find an image, and follow along on your cardboard! Eventually, I had these figures of Link and Zelda:

But first I had to acquire some cardboard, for the figures as well as the cardboard forts I'd planned to build (more on those in a future post). I headed over to a department store and asked about appliance boxes, and instead, the guy at the receiving dock offered me these large 4.5 x 8 foot sheets of corrugated cardboard, which I was told arrived with pallets or something and are usually recycled right away. Instead, I shoved six of them into my husband's car somehow.
This is how they looked in my tiny kitchen (with a shoe box full of recycled rupee crayons on the back counter):

Here's my kiddo standing by a newly-painted Link figure, for size comparison.

And here are some more shots of the figures (Link, Zelda, and an Octorock) decorating at the party.


These take about three hours, start to finish, and if I'd had a little more time, I would have loved to have made a few more. Luckily, as I mentioned, this project is infinitely adaptable, so I'll start even earlier next year and make six or eight figures for birthday number three!
(p.s. you can make these photos bigger by clicking on them . . . but you probably knew that!)
Linking up to:
Young House Love, Bower Power, The Great Indoors, and Hi Sugarplum, who are all co-sponsoring the winter Pinterest Challenge! (I'm borrowing their graphic:)


One of the projects Amy and her husband created are these great, large-scale cardboard character cut-outs. Here's a link to my Pin, featuring the Mad Hatter cut-out from Delaney's party.

Of course, the best part of Amy's project is that it's infinitely adaptable. You could use this project for literally any character or theme. For our theme, old-school pixelated Legend of Zelda, the project is even more simple, because the grid used in the tutorial for plotting the design is the perfect way to make pixelated designs. Just find an image, and follow along on your cardboard! Eventually, I had these figures of Link and Zelda:

But first I had to acquire some cardboard, for the figures as well as the cardboard forts I'd planned to build (more on those in a future post). I headed over to a department store and asked about appliance boxes, and instead, the guy at the receiving dock offered me these large 4.5 x 8 foot sheets of corrugated cardboard, which I was told arrived with pallets or something and are usually recycled right away. Instead, I shoved six of them into my husband's car somehow.
This is how they looked in my tiny kitchen (with a shoe box full of recycled rupee crayons on the back counter):

Here's my kiddo standing by a newly-painted Link figure, for size comparison.

And here are some more shots of the figures (Link, Zelda, and an Octorock) decorating at the party.


These take about three hours, start to finish, and if I'd had a little more time, I would have loved to have made a few more. Luckily, as I mentioned, this project is infinitely adaptable, so I'll start even earlier next year and make six or eight figures for birthday number three!
(p.s. you can make these photos bigger by clicking on them . . . but you probably knew that!)
Linking up to:
Young House Love, Bower Power, The Great Indoors, and Hi Sugarplum, who are all co-sponsoring the winter Pinterest Challenge! (I'm borrowing their graphic:)
Labels:
acrylic,
birthday,
cardboard,
chalkboard paint,
corrugated,
cut-out,
decorations,
DIY,
figures,
legend,
link,
octorock,
of,
party,
stand-up,
zelda
Subscribe to:
Posts (Atom)