Showing posts with label door. Show all posts

Thursday, May 23, 2013

ode to turquoise (via an old door)

This is how I left you at the end of my arbor post, with the new white arbor, and primed door trim . . . and the antique door of the studio looking shabby in some reject paint from the hardware store from several years ago. 


Our Adirondack chairs, on the other hand, are painted in this friendly shade of turquoise, or pool blue. It looks happy and intentional, wheras that old door looked pretty sad and unwelcoming. Worse, I'd say, than when my brother brought me the old door in the first place, with peeling white paint.


We can mark the door off of our never-ending to-do list; I took advantage of the nice weather to prime and spray it, and now it's just as happy and friendly as our chairs. It gives the whole building a different character. (The color is Rustoleum's Aqua.)


Of course, it helps that the sun was shining that day, which always makes things look brighter and happier than on a cloudy day, but I'm giving the new paint an equal share of the credit.

Okay, just that quick update for now, but I've been weeding and planting and working on the yard a bit more since painting the door. You can bet I'll be posting about those adventures very soon.

In the meantime, thanks for reading!


Thursday, March 7, 2013

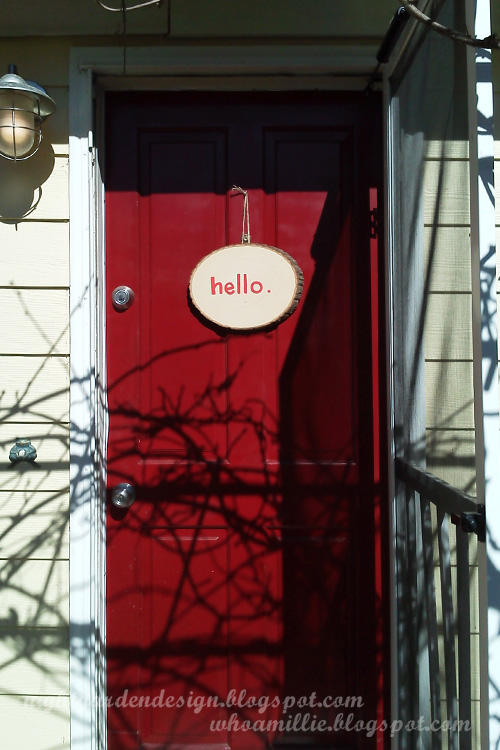
hello!


The day I brought home my kiddo from the hospital, the trees were already blooming. "Hello!" they seemed to say.


Oh man, I'm so ready for spring to be here. My front door is, too.


(You can get these plaques with bark on at Michael's Crafts. I freehanded the letters, then nailed on a picture hanger and hung it with some string {so it wouldn't cover the peep hole}).

Thanks for reading!

Wednesday, December 12, 2012

rusty robot "vintage" door sign diy


This post was my recent project audition for "So You Think You're Crafty" and guess what? I was lucky enough to make it into the regular competition phase. To all of the amazing competitors I was up against, well done. I hope I'm up to the challenge of meeting the bar you've all raised. The weekly competition is anonymous and starts in January; I'll let you know when the voting starts for the first round!

I don’t know about you, but I have pin boards full of so many projects over on Pinterest that I’m sure I’ll never get to all of them in this lifetime. I’m gonna have to start farming stuff out. You busy? ;)

One recent love that I’ve been pinning (over and over and over again) is vintage signage. I love old typography, vintage graphics, and weathered finishes. When my love of vintage signs recently dovetailed with my need for a fireplace fix-up, I ended up picking up a pair of vintage army green sheet metal panels from Bring (the local re-building store) for 50 cents each . . . and then, because I tend to eyeball things rather than measuring them, I had a whole panel leftover.


I decided to make my sweet kiddo a sign to go above the door of his room with the leftover panel. Since he’s two and a complete nut for robots,  his room is now labeled a “ROBOTICS LAB". He loves it! In fact, the rest of the afternoon he was sing-songing "robotics lab" over and over again and dancing by the door of his room. Win!


I hope you like my kiddo's rusty robot sign as much as we do! I'll consider it high praise if you sing about it later.


I have a second, similar project I'll be posting soon. In that post, I'll go into more detail about each of the steps, but I hope this photo collage tutorial will help you get started if you're someone who just needs a little push in the right direction. Basically, start with a surface that's a little gritty and old,  paint, then roughen it up and help it rust!

Tuesday, August 21, 2012

progress (part two): a new closet door

Follow my blog with Bloglovin, if you'd like!

I promised to follow up my post about our thrifty guest room makeover with an update about the closet. And here, a little more than a year later, is the finished product.

I wish I had a "before" image to show you, because the new version looks so much better.


When we moved in, this little closet was unfinished looking, built of 1970s wood paneling and fence boards. Painted barn red. Aack. Trust me, it was U-G-L-Y. And though it doesn't need an alibi, I'm giving it one.

I added sound-proof acoustical board to the back; new shelf supports, boards, and trim to the shelves; and new flooring to the tall side, then caulked and painted everything in coat after coat of primer and paint. Already, it looked much better, but I wanted a door of some sort to cover up the storage. I saw someone use a roller shade as a closet door in a magazine (Living, maybe?) and inspiration struck: I started hunting down an old classroom map.


This one is just about the perfect size. It's a bit outdated (so the population chart at the bottom is really off), but then, so are the globes in my globe collection, and they're not hurting anyone (we teach the kiddo using a new one, so the older ones are just for decoration).

Does it count as a thrifty find if I scored the map on eBay? It only ran me $30.


And I think it looks kinda awesome.

It's pretty easy to hang one of these, if you can find one with the metal roller mechanism intact.


It's a simple matter of two s-hooks, two brackets, and some screws from the hardware store.


Because this is the spare bedroom, we use the closet to store excess canned food (no pantry + small kitchen lead to this sort of behavior), printers, camping gear, and the goods for my Etsy shop. We used to keep the stroller in here, too, but it's been outgrown by my two-year-old, so we donated it to the thrift store this week. One item in, one item out!


The best part, I think, is that I can set the map at any height to hide everything, or just the stuff at the top, or anything in between. It's pretty great.

Thanks for reading! Have you been doing anything awesome with maps lately? Do tell!

p.s. you can make these photos larger just by clicking on them, but you probably already knew that.


Linking up to:

Simple Design's Thrift Haul
Cap Creations' Thrifty Love
Southern Hospitality
Thrift Share Monday
I'm Crafty!
Mop it Up Mondays


Tuesday, July 3, 2012

repurposed faucet handle coat racks & tool racks


This project is one that combines several things that have been popping up on Pinterest lately: chalk paint, old cupboard doors/drawers, and old faucet handles used as hooks. Luckily for me, the two local rebuilding stores and a free paint coupon from Benjamin Moore made this project (which resulted in two coat/tool racks) really inexpensive.

An old cupboard door and drawer front, for example, cost $1 and $1.20 from the Habitat for Humanity Re-Store.


In addition to the boards, I bought a leftover box of unsanded grout at the Re-Store for $1.50. The box also contained a pint of grout sealer and some little square slate tiles, which I'll have to find a project for later. The grout is one of two ingredients in Martha Stewart's chalkboard paint recipe.

Basically, stir 2 Tbsp. unsanded grout into a cup of flat paint. My paint came free with a Benjamin Moore Facebook coupon a couple of months ago. I mixed up a half-recipe (since this project is pretty small), making sure to get rid of as many lumps as possible while stirring.

Most of the directions I've seen for using chalk or chalkboard paint on various blogs say that you don't have to sand down your surface first; I did a brief sanding with 100-grit, because frankly, "no sanding" sounds a little too good to be true.


I let it dry overnight, then sanded the surface with 150 grit sandpaper. The edges got special attention, so that some amount of wood showed there to assist in the "rustic cottage industrial" look I was aiming for.


On the longer of the two racks, I drilled two holes for hanging. Because most modern construction standards require wall studs to be 16 inches apart (on center), and because this rack is for my mom's recently-built house (Happy late Mother's Day, Mom!), the two holes are 16 inches apart.


You can see how, on the back, there is a little splintering from the drill. I knocked down the sharp edges with a bit of sandpaper. You can paint over the exposed wood too, if you want, but I chose not to worry about it, since this is meant to be a rustic piece anyway, and the splintering is on the back.


And these are the "hooks". These faucet handles were 25-cents to 50-cents each at BRING. If you find them still attached to their heavy brass bases, you can expect to pay between $2 and $5 apiece for them (a couple that I bought for the second rack were in this price range, though I went on a sale day and got them for half off). The nuts, with original paint, were $2 a pound, as is most hardware at BRING. (Portland also has a wealth of rebuilding stores, and I know Habitat for Humanity has Re-Stores in most states; check around!)


Beginning assembly. You'll need wood screws between 1.5 and 1.75 inches long, depending on the depth of your handles and nuts, and the thickness of your board. Mark your spots, pre-drill the holes, stack your pieces, and screw everything together.


I prefer that all the handles be different, for the look of something that's been collected and assembled over time. But if you can't find these pieces used for a price you like, you can also buy new outdoor faucet handles for a couple of bucks apiece at the hardware store (at Jerry's here locally, they're $2-3 each).


I also added a layer of beeswax over the top of the paint, since I don't plan to actually use chalk on the chalkboard paint. Also, there was a little more chipping than I like (maybe because I didn't thoroughly sand first?) and I thought the beeswax would probably help seal the finish. I've read some people use paste furniture wax, but I preferred not to buy a can because it's expensive, and I'm not sure I'd use it all before it went bad. The beeswax is something I had on hand.


Cost Breakdown:

(2) boards (an old cupboard door and drawer front); $2.20 total

(8) faucet handles; $6.50 total

(8) large, paint-covered nuts; $2 total

(8) screws; 10 cents ($2 per pound) total

unsanded grout; $1.50 total (with a bunch leftover, plus spare tiles and sealer)

8 oz. paint sample; free, with half leftover

beeswax; $1, if you don't already have some

Total for two coat/tool racks: $13.30, with leftover grout, paint, etc.


Here's a similar project on Apartment Therapy using indoor faucet handles to make a bathroom towel rack/shelf combo.

Here's another from the Our Vintage Home Love blog, in which she uses dowels and rubber gaskets.

And one more from My RePurposed Life, with new handles on the side of a shed.

Thanks for reading! When I find a permanent home for the one we're keeping, I'll post a little blog about it for you. Until then, I'd love to see links for your own repurposing/upcycling projects in the comments section below.

Enjoy your holiday!


(p.s. you can make these photos larger just by clicking on them, but you probably already knew that.)


Linking up to:


Sherry, Katie, Kate, and Michelle

Simple Design's Thrift Haul

Catch as Catch Can at My RePurposed Life

Nifty Thrifty Sundays

The CSI Project


Saturday, April 14, 2012

post - easter peeps

Just a quick little front door upgrade and a little story to share with you.


We hadn't quite gotten around to putting a peep hole on the front door since replacing the door two years ago, and generally, I have been peeking through the front curtain or pretending not to be home if I wasn't expecting a delivery person.

Well, the Friday before Easter, my dad and stepmom were going to be coming through town and wanted to pop in to see the kiddo and me. A phone call let me know they were just a couple of miles outside of town, so we finished straightening up, and heard the knock of their arrival.

Or so I thought. I peeked through the door chain and saw the angle of a jaw that somewhat resembled my dad's, but when I actually opened the door, it was random neighbor X peering through the screen door, wanting to know if he could take the little desk we had put out by the trashcans. I said yes, of course.

In my head, though, I was silently cursing myself. It could literally have been anyone out there, and I had put myself and my kid in danger by not having a stupid peep hole on the front door.

Well, enough of that. I took care of Mission Peep Hole today. It was fast, it looks pretty good, and it only cost a couple of bucks.

In fact, since we'd actually had the peep hole kit sitting in a kitchen drawer for the past two years, I didn't shell out a dime today.

Step one: Drill a hole through your door at about eye-height. Our peep hole kit specified a 1/2-inch hole.


Step two: Pop in the front half of your peep hole and notice how there's a lot of splintered door peeping out behind the eyepiece. There's some showing on the other side of the door, too. Swear under your breath.


Step three: Remember you have a little drawer full of old washers, gears, and other nifty metal findings. Find some with holes that are about half-inch across and add them to the peep hole stems before screwing them together through the hole.


Step four: Try it out! I had the kiddo try mine out for me, while the mister made faces on the other side. Giggles ahoy.

Here's the full door from the outside, underneath a climbing kiwi vine that's proving it's spring.


Hooray for finishing quick projects that make a world of difference! Hooray for nice weather that makes me want to get outside and get stuff done! Hooray for spring!


Thanks for stopping by! I'd love it if you left me a comment below, letting me know what quick fixes you might be working on this spring.

(p.s. you can make these photos bigger by clicking on them . . . but you probably knew that!)


Linking up to:

mop it up mondays


Chic on a Shoestring Decorating

Our Delightful Home

Visit thecsiproject.com


Thursday, May 5, 2011

tabula rasa

I'll be posting more pictures of this soon, but this photo here represents about a hundred hours of work spread out over a month. More if you count the time I spent a few years back stripping the paint off that door and patching and sanding it. That was back when we'd intended to use it for a door.


So the reason for all the hours, for such a "before" looking image? This room, a few weeks ago, was packed to the brim with bins of art and craft supplies, childhood mementos, display items from my former bookstore, and theater leftovers. It's taken a monumental effort to get to this photograph: a clean slate, painted a soft, silvery gray, with the beginnings of a door-turned-headboard on the wall.

I've lost count of the trips to the charity store's donation drop-off. I've given a few things to friends. We held a one-day yard sale that paid for the bed frame and paint. And there's plenty stashed in the studio, and some stuff on my kitchen table ready to get the boot. The recycle and trash bins fill faster than Sanipac can haul it all away, so a friendly neighbor called the city to report us a couple of weeks ago. I frequently feel overwhelmed by the task at hand, which is essentially sifting through and getting rid of so much of my old self in order to have a clean, quiet space. One that we're intending for a guest room, but which the cats are pretty sure is really just for them.

Anyway, I'll go into more detail about the process later. That's all for tonight!