Showing posts with label red. Show all posts

Monday, May 28, 2012

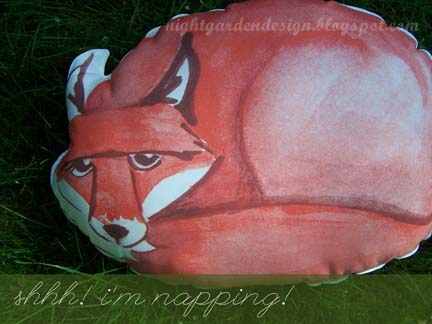
winners of the red fox pillow giveaway!

Sorry for the delay in announcing the winners of the Red Fox Pillow Giveaway! In the end, we had over a hundred entries, which I printed, cut apart, and folded into squares for my kiddo to pull out of a hat.


And the winners are:

Fox pillow of your choice (Sleepy Fox or Sneaky Fox): "I really like the sneaky fox! Your style is so unique, and creative!" --Jessica

Sadly, the winner didn't get in touch with me by the posted deadline, so we chose another winner: "Oh my goodness, the pillows are amazing! My daughter - not quite two - was sitting on my lap when I pulled up your blog and she went NUTS over them! --Kiza. Congratulations Kiza! Your daughter is going to be thrilled to bits!

Two mini pillows (Cold Shoulder Fox and Fox Face): "My son would LOVE these foxes! I envy your drawing skills and will add you to my Google Reader blogroll." --Holly U

Here's a new twist: Holly U can choose to instead to have the second large fox pillow (whichever one isn't chosen by Jessica), in which case, I'd pick a third winner for the two mini pillows. Holly chose to have me send her the second fox pillow, so here's the new winner of the two mini pillows:

"I love your line. If I don't win, I might have to make myself a pillow :) Right now the project I'm most excited about is the one growing inside me - little baby Bright is set to enter on Halloween :) Thanks so much for the generous giveaway! --alli b. Congrats on the new kiddo, and on the mini pillow win!


New winners announced here have until May 31 June 4 to get in touch with me with their preferences and addresses (info at thenightgarden.com). Pillows will be mailed on June 1 June 5. If either winner doesn't get in touch with me by June 1 June 4, the prize is forfeited, and another winner will be selected from the hat and announced here.

Thanks, everyone, for entering! I truly wish I had a bunch more pillows to give away, but if you're still interested in buying fabric and making your own Red Fox pillow, you can find the fabric here: http://www.spoonflower.com/fabric/1136410.

A quarter yard will get the Sleepy Fox pillow front shipped directly to you. A full yard will yield fronts and backs of Sleepy Fox, Sneaky Fox, and both mini pillows (great for sachets, doll pillows, or pin cushions).


Monday, May 21, 2012

red highchair

At the end of last summer, we ran across a wooden restaurant-style high chair at a car boot sale (flea market) a couple of miles from the house. It was $5. I snapped it up, since Baby P's shins had a habit of hitting the high chair we were using. I took it as a sign he was starting to outgrow the high chair, and as I found out at his two-year appointment, he had, in fact, surpassed the weight and height limits set by the manufacturer.

But a new problem presented itself when his shins also hit the cross bar in the new high chair. Imagine there was much cursing at this new discovery. I only imagined it, too, since the bebe repeats everything these days.

I'd resigned myself to getting rid of it via Craigslist and buying a booster seat to strap into a dining chair . . . until I saw a post on another blog about repainting an old wooden high chair, sans tray. And inspiration struck.

Remove the lap bar and straps, and suddenly, we have a functional chair that can we can scoot up to the table without our swiftly growing kiddo getting banged up.


Here are the bar and straps, after.


This is what's left after snipping the straps off of the bottom.


A screwdriver and a pair of pliers take care of the rest.


And thank goodness I ended up pulling the thing apart, because now I don't worry about all the restaurant grime left in and around the straps.

Here's what the arm rests looked like after removing the bar (loosening a few screws made removing the bar very simple!).


And here's the chair, scrubbed, sanded, and de-glossed, ready for paint.


I decided to paint the underside first, using the same cherry red Krylon paint+primer I used for the magazine rack . . . and our front door. Three light coats, with about 20 minutes dry-time in between.


Then I let it dry overnight before flipping it over and painting the top side.


Also three light coats + touch ups.


And there you go! I let it cure outside for about a week (the weather was still cool back in March, so I waited until the smell of spray paint faded).


I added some self-adhesive furniture felt to the runners to keep the chair from marking up the floors, and brought it inside. The kiddo is a big fan! How about you?


The paint has held up really well over the past several weeks; no scuffs, scratches or dents in the surface yet. And that's it for red, for awhile. My next spray paint project is pool blue and leaf green, so stay tuned!


(p.s. you can make these pictures bigger by clicking on them, but you probably already knew that.)


Linking up to:

mop it up mondays


Tuesday, May 15, 2012

a celebration, a lesson, a giveaway!

**Scroll down to the bottom of this post for Red Fox pillow giveaway!


Welcome! Last week, this blog officially hit 10,000 page views, which is a pretty big milestone for me. For the first couple of years of this blog, I didn't blog with any sort of intention of having a whole lot of folks see it, and I didn't blog about every project I did. And I didn't blog very regularly. There was an especially noticeable lack of posts in 2010, after my son was born (who knew newborns could take so much energy? aside from every mother in the world, I mean).

Since finally giving up my regular gig designing book covers at the start of this year, though, I've made a commitment to be more intentional and frequent in my postings, and to try to start increasing readership. Turns out that I really thrive on sharing my creative work with others. So going from a couple thousand page views to ten thousand in the space of a few months has been very encouraging. Thank you! And this week, I'm actually on the precipice of 11,000 views. Incredible. (update: hit 12,000 tonight, 5/24.)

I know this will seem like small potatoes to some bloggers who regularly get thousands of hits per blog entry, but it's a place to start!

I'm also celebrating the release of my Quick Red Fox collection of fabrics over at Spoonflower.


This is a design set that's very close to my heart, as it is the first collection I've done since last year's Baby's Day at the Beach, and also the first since then to have been hand drawn and watercolored.


Doing artwork with my hands (and then manipulating it on the computer) is much more rewarding for me than doing all of my work on the computer. Although I'm designing both, I feel more ownership over the designs including handwork. I've always felt that way when designing book covers, too; the ones with handmade elements always felt more mine.

Of course, as with any design on Spoonflower, designs must be proofed before being sold to the public. Designers can order a single 8x8 sample of a single design ($5), or they can add all their designs to a collection, and order a collection sampler ($20 for up to 15 designs, $30 for 16-30). I always try to wait until I have enough to get a full fifteen designs before ordering, so I feel like I'm being as cost-effective as possible.

Here's a photo of my most recent collection, The Quick Red Fox, on a sampler sheet with four colors of my new Snow White print, my White Swans in a Blue Pool, and a couple of recent contest entries I hadn't had proofed yet (the vintage sewing pattern and the library check-out cards).


And here's the lesson: it might seem like a drag, and it might seem like too long to wait, but it's so important to proof your Spoonflower designs.

For example, there are three patterns in my Quick Red Fox collection that need to be reworked because, well, the color variations didn't have enough differentiation to show up well when printed. These are the three designs that included a neutral tone-on-tone chevron pattern in the background. The colors looked great on screen, but turned out too close to each other to perform well on printed fabric. You'll notice a couple of squares in the photo above that look blank. These are the ones with a nearly-invisible chevron pattern. So I'll make adjustments to beef up the pattern and upload revisions that fix the issues, and in the end, everyone will be happier for it.

That's the reason Spoonflower requires proofing before letting you sell to the public. Otherwise, there'd be a bunch of disappointed customers asking for refunds for bad fabric, and their reputation would suck.

Currently, five of the Quick Red Fox patterns are up for sale here, on my Spoonflower page. But, in celebration of the line going on sale, and in celebration of 11,000 page views (which I'm sure to hit by the end of the day), I'm hosting my first giveaway!


One lucky winner will win a fox pillow of his/her choice (Sneaky Red Fox or Sleepy Red Fox), sewn from my Red Fox Pillow Set fabric.

A second winner will win both mini pillows from the set (Cold Shoulder Fox and Fox Face).


How to enter the giveaway: Comment on this blog post (or any other blog post on the Night Garden Design Blog) about a project or post you especially like by May 25th.

If you post anonymously, add your name to your comment so I can add you to the drawing.

You can enter more than once by leaving comments on more than one blog post. I'll see them all, as my comment settings are set up to run everything by me first.

I'll also count new blog follows as entries, so copy my url into your reader!

On May 27th, I'll put all the names in a hat and let Baby P pick the winning entries at random.


Winners will be announced here on the blog, Flickr, Facebook, Twitter, and on the Spoonflower page for the Fox Pillow Set on May 27th, and the packages will be shipped out by June 1st (assuming I've heard from the winners by then). If you provide a way to contact you, I'll do that, too!


And yes, I'll even ship internationally.

Thanks for reading, everybody, and good luck to you!

UPDATED TO ADD WINNERS: Fox pillow of your choice (Sleepy Fox or Sneaky Fox): "I really like the sneaky fox! Your style is so unique, and creative!" --Jessica

Two mini pillows (Cold Shoulder Fox and Fox Face): "My son would LOVE these foxes! I envy your drawing skills and will add you to my Google Reader blogroll." --Holly U

Here's a new twist: Holly U can choose to instead to have the second large fox pillow (whichever one isn't chosen by Jessica), in which case, I'd pick a third winner for the two mini pillows.


Contact me by 5/31 at info at thenightgarden.com with your address and preferences! If I don't hear from you by the 1st of June, I'll pick a new winner.


Linking up to:


Tip Junkie handmade projects

Photobucket


mop it up mondays


Monday, April 16, 2012

bright red book racks go faster

We have a bit of a book storage issue around these parts. Not only do I still have some of my childhood books hanging around, but I've collected illustrated kids books since my late teens . . . and things went from bad to worse when I started working in bookstores when I was twenty-one (a bookstore discount is a dangerous thing). And then, when you add in the kiddo's books and my husband's collection, the place has been pretty packed.

I actually have culled things down quite a bit in the past year or so, getting rid of between 10 and 20 percent of my own book collection (not counting the illustrated books, which I've passed on to the little dude). But still. Books everywhere. Which I like, but I've been searching for new solutions. Pinterest abounds with ideas on book storage, and I've tried a few different ones (which I'll share in different posts coming up). Today, though, I want to share this one with you.

First, I found a beat up old magazine rack on 1/2-off day at St. Vincent dePaul's (actually, I found two. I'll share the second with you in another post).


I sanded it lightly and then wiped it down with a little deglosser.


I hit the bottom with some cherry red spray paint, the after it dried, put three light coats on the top and sides.


Because it was raining or humid all week, I left it outside to de-fume for three days, then brought it inside to cure for another three days before finally filling it with books.


Now it's prettier, and, as everyone knows, anything red is automatically faster. It also handily wrangles a dozen often-requested books face out, so they're easy to find.

Thanks for stopping in! If you've seen some other awesome book storage ideas, you can post them in the comments section and I'll add them to my book storage pin board.

(p.s. you can make these photos bigger by clicking on them . . . but you probably knew that!)


Linking up to:

mop it up mondays feature

Our Delightful Home

Visit thecsiproject.com


Saturday, April 14, 2012

post - easter peeps

Just a quick little front door upgrade and a little story to share with you.


We hadn't quite gotten around to putting a peep hole on the front door since replacing the door two years ago, and generally, I have been peeking through the front curtain or pretending not to be home if I wasn't expecting a delivery person.

Well, the Friday before Easter, my dad and stepmom were going to be coming through town and wanted to pop in to see the kiddo and me. A phone call let me know they were just a couple of miles outside of town, so we finished straightening up, and heard the knock of their arrival.

Or so I thought. I peeked through the door chain and saw the angle of a jaw that somewhat resembled my dad's, but when I actually opened the door, it was random neighbor X peering through the screen door, wanting to know if he could take the little desk we had put out by the trashcans. I said yes, of course.

In my head, though, I was silently cursing myself. It could literally have been anyone out there, and I had put myself and my kid in danger by not having a stupid peep hole on the front door.

Well, enough of that. I took care of Mission Peep Hole today. It was fast, it looks pretty good, and it only cost a couple of bucks.

In fact, since we'd actually had the peep hole kit sitting in a kitchen drawer for the past two years, I didn't shell out a dime today.

Step one: Drill a hole through your door at about eye-height. Our peep hole kit specified a 1/2-inch hole.


Step two: Pop in the front half of your peep hole and notice how there's a lot of splintered door peeping out behind the eyepiece. There's some showing on the other side of the door, too. Swear under your breath.


Step three: Remember you have a little drawer full of old washers, gears, and other nifty metal findings. Find some with holes that are about half-inch across and add them to the peep hole stems before screwing them together through the hole.


Step four: Try it out! I had the kiddo try mine out for me, while the mister made faces on the other side. Giggles ahoy.

Here's the full door from the outside, underneath a climbing kiwi vine that's proving it's spring.


Hooray for finishing quick projects that make a world of difference! Hooray for nice weather that makes me want to get outside and get stuff done! Hooray for spring!


Thanks for stopping by! I'd love it if you left me a comment below, letting me know what quick fixes you might be working on this spring.

(p.s. you can make these photos bigger by clicking on them . . . but you probably knew that!)


Linking up to:

mop it up mondays


Chic on a Shoestring Decorating

Our Delightful Home

Visit thecsiproject.com