Showing posts with label pillow. Show all posts

Sunday, November 24, 2013

just in time for the holidays: 7 diy gift tutorials from my blog


With the holidays coming up, I wanted to put together a quick post for you all featuring links to seven of my most popular DIY gifts! Here they are, in no particular order, so you can spend less time and money at the mall this year, and give gifts that mean a lot to family and friends who mean a lot to you.

1) The Inventor's Supply Kit


Originally made for my nephew, this has been popular on Pinterest this past year. Wanna put one together for someone special? Here's the link.


2) Rupee Crayons


These were party favors for my kiddo's second birthday party, but if you make a mold using the silicone kit I link to, you could make a set for every kid on your gift list. They look awesome, but are really inexpensive and fun. Find the tutorial here.


3) Faucet Handle Coat Rack


If you like upcycling and repurposing (and you have a second-hand building supply store in your area) these make really nice gifts, and they're something you can put together pretty quickly. You can find instructions here.


4) Monster Pillows


Made of scraps of faux fur and felt, these monster pillows are one of my favorite projects to make for a quick birthday or Christmas present. With a single yard of faux fur, you can make four to six 12-inch pillows (depending on the width of the bolt of fabric). Make a few this holiday season using my quick tutorial.


5) Measuring Tape Growth Chart


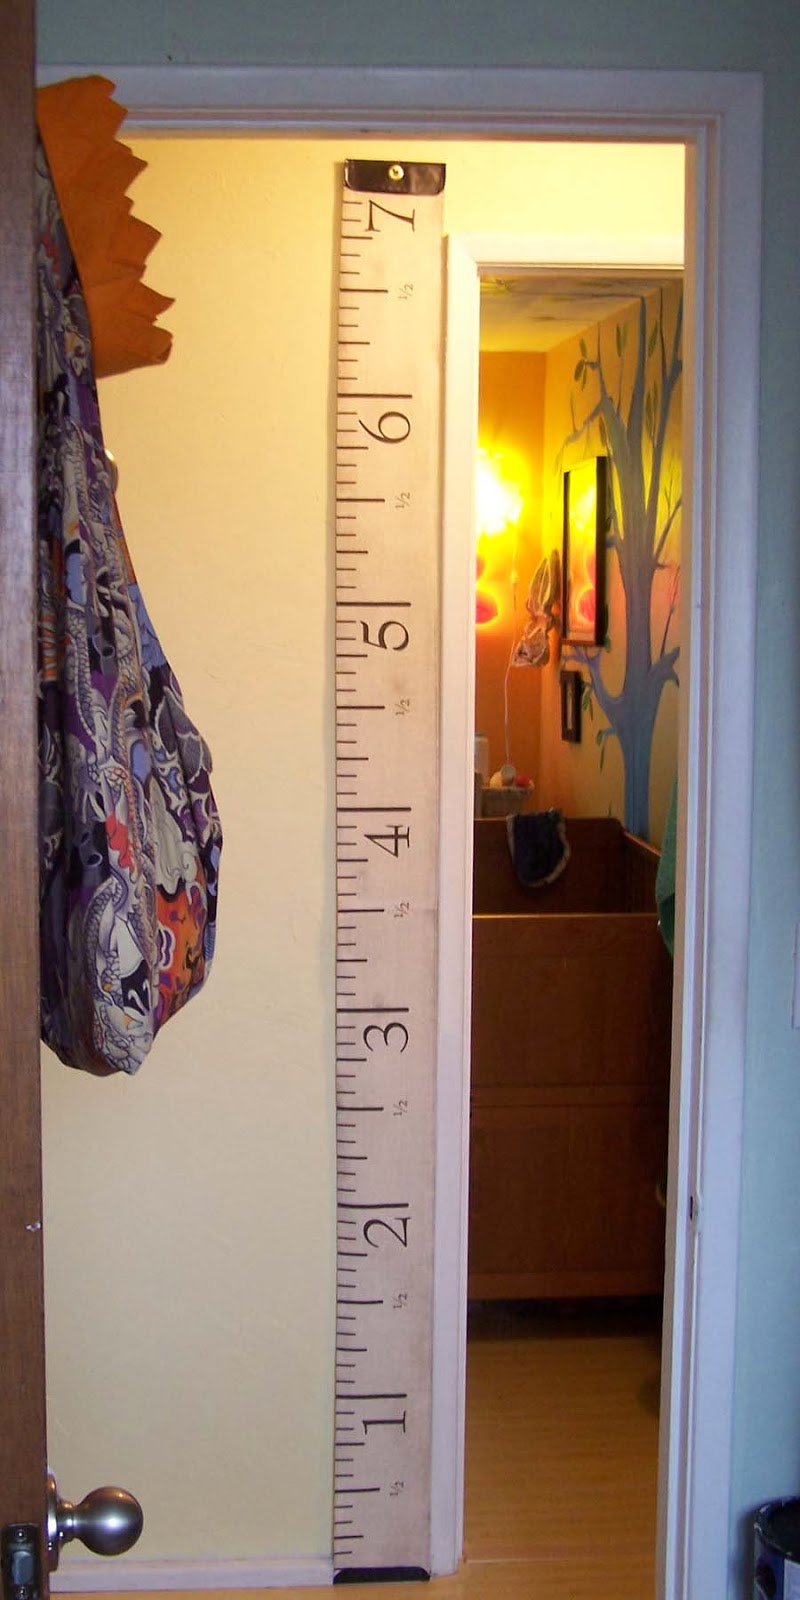
There's still time to order some measuring tape growth chart fabric to put together one of these wall-hangings for someone you love! Spoonflower is about ten days out on orders, but that should still give you a bit of time for assembly if you get your order in soon. (I sell the fabric and finished charts through my Etsy store, too, but my supply is low right now due to holiday orders). Click here for the assembly instructions. Oh, and I have a metric version available, too! (One yard will make 2 1/2 charts, or order single panels directly from me.)


6) Cheap-o Screen Printed T-shirts (or tea towels)


Custom screen printing with mesh fabric, embroidery hoops and latex paint? Yup. Make your own t-shirts this Christmas and knock a bunch of names of of your shopping list.


7) Freezer Paper Printed T-shirts (or tea towels)


This is a great project for one-off prints. In this post, I present a dinosaur t-shirt, and links to other places in my blog where I feature a pretzel shirt, viking t-shirt, and wood-grain flour sack tea towels. Infinitely customizable, without the time investment of making a silkscreen for each design. Find it here.

All right, readers! Go forth and craft like you've never crafted before! Let's do this!

Monday, May 28, 2012

winners of the red fox pillow giveaway!

Sorry for the delay in announcing the winners of the Red Fox Pillow Giveaway! In the end, we had over a hundred entries, which I printed, cut apart, and folded into squares for my kiddo to pull out of a hat.


And the winners are:

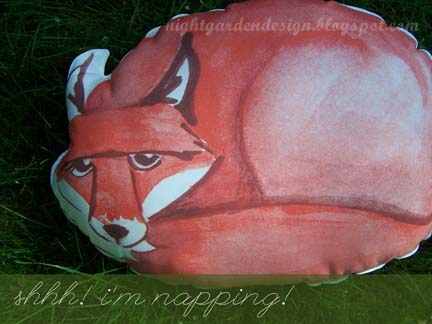
Fox pillow of your choice (Sleepy Fox or Sneaky Fox): "I really like the sneaky fox! Your style is so unique, and creative!" --Jessica

Sadly, the winner didn't get in touch with me by the posted deadline, so we chose another winner: "Oh my goodness, the pillows are amazing! My daughter - not quite two - was sitting on my lap when I pulled up your blog and she went NUTS over them! --Kiza. Congratulations Kiza! Your daughter is going to be thrilled to bits!

Two mini pillows (Cold Shoulder Fox and Fox Face): "My son would LOVE these foxes! I envy your drawing skills and will add you to my Google Reader blogroll." --Holly U

Here's a new twist: Holly U can choose to instead to have the second large fox pillow (whichever one isn't chosen by Jessica), in which case, I'd pick a third winner for the two mini pillows. Holly chose to have me send her the second fox pillow, so here's the new winner of the two mini pillows:

"I love your line. If I don't win, I might have to make myself a pillow :) Right now the project I'm most excited about is the one growing inside me - little baby Bright is set to enter on Halloween :) Thanks so much for the generous giveaway! --alli b. Congrats on the new kiddo, and on the mini pillow win!


New winners announced here have until May 31 June 4 to get in touch with me with their preferences and addresses (info at thenightgarden.com). Pillows will be mailed on June 1 June 5. If either winner doesn't get in touch with me by June 1 June 4, the prize is forfeited, and another winner will be selected from the hat and announced here.

Thanks, everyone, for entering! I truly wish I had a bunch more pillows to give away, but if you're still interested in buying fabric and making your own Red Fox pillow, you can find the fabric here: http://www.spoonflower.com/fabric/1136410.

A quarter yard will get the Sleepy Fox pillow front shipped directly to you. A full yard will yield fronts and backs of Sleepy Fox, Sneaky Fox, and both mini pillows (great for sachets, doll pillows, or pin cushions).


Tuesday, May 15, 2012

a celebration, a lesson, a giveaway!

**Scroll down to the bottom of this post for Red Fox pillow giveaway!


Welcome! Last week, this blog officially hit 10,000 page views, which is a pretty big milestone for me. For the first couple of years of this blog, I didn't blog with any sort of intention of having a whole lot of folks see it, and I didn't blog about every project I did. And I didn't blog very regularly. There was an especially noticeable lack of posts in 2010, after my son was born (who knew newborns could take so much energy? aside from every mother in the world, I mean).

Since finally giving up my regular gig designing book covers at the start of this year, though, I've made a commitment to be more intentional and frequent in my postings, and to try to start increasing readership. Turns out that I really thrive on sharing my creative work with others. So going from a couple thousand page views to ten thousand in the space of a few months has been very encouraging. Thank you! And this week, I'm actually on the precipice of 11,000 views. Incredible. (update: hit 12,000 tonight, 5/24.)

I know this will seem like small potatoes to some bloggers who regularly get thousands of hits per blog entry, but it's a place to start!

I'm also celebrating the release of my Quick Red Fox collection of fabrics over at Spoonflower.


This is a design set that's very close to my heart, as it is the first collection I've done since last year's Baby's Day at the Beach, and also the first since then to have been hand drawn and watercolored.


Doing artwork with my hands (and then manipulating it on the computer) is much more rewarding for me than doing all of my work on the computer. Although I'm designing both, I feel more ownership over the designs including handwork. I've always felt that way when designing book covers, too; the ones with handmade elements always felt more mine.

Of course, as with any design on Spoonflower, designs must be proofed before being sold to the public. Designers can order a single 8x8 sample of a single design ($5), or they can add all their designs to a collection, and order a collection sampler ($20 for up to 15 designs, $30 for 16-30). I always try to wait until I have enough to get a full fifteen designs before ordering, so I feel like I'm being as cost-effective as possible.

Here's a photo of my most recent collection, The Quick Red Fox, on a sampler sheet with four colors of my new Snow White print, my White Swans in a Blue Pool, and a couple of recent contest entries I hadn't had proofed yet (the vintage sewing pattern and the library check-out cards).


And here's the lesson: it might seem like a drag, and it might seem like too long to wait, but it's so important to proof your Spoonflower designs.

For example, there are three patterns in my Quick Red Fox collection that need to be reworked because, well, the color variations didn't have enough differentiation to show up well when printed. These are the three designs that included a neutral tone-on-tone chevron pattern in the background. The colors looked great on screen, but turned out too close to each other to perform well on printed fabric. You'll notice a couple of squares in the photo above that look blank. These are the ones with a nearly-invisible chevron pattern. So I'll make adjustments to beef up the pattern and upload revisions that fix the issues, and in the end, everyone will be happier for it.

That's the reason Spoonflower requires proofing before letting you sell to the public. Otherwise, there'd be a bunch of disappointed customers asking for refunds for bad fabric, and their reputation would suck.

Currently, five of the Quick Red Fox patterns are up for sale here, on my Spoonflower page. But, in celebration of the line going on sale, and in celebration of 11,000 page views (which I'm sure to hit by the end of the day), I'm hosting my first giveaway!


One lucky winner will win a fox pillow of his/her choice (Sneaky Red Fox or Sleepy Red Fox), sewn from my Red Fox Pillow Set fabric.

A second winner will win both mini pillows from the set (Cold Shoulder Fox and Fox Face).


How to enter the giveaway: Comment on this blog post (or any other blog post on the Night Garden Design Blog) about a project or post you especially like by May 25th.

If you post anonymously, add your name to your comment so I can add you to the drawing.

You can enter more than once by leaving comments on more than one blog post. I'll see them all, as my comment settings are set up to run everything by me first.

I'll also count new blog follows as entries, so copy my url into your reader!

On May 27th, I'll put all the names in a hat and let Baby P pick the winning entries at random.


Winners will be announced here on the blog, Flickr, Facebook, Twitter, and on the Spoonflower page for the Fox Pillow Set on May 27th, and the packages will be shipped out by June 1st (assuming I've heard from the winners by then). If you provide a way to contact you, I'll do that, too!


And yes, I'll even ship internationally.

Thanks for reading, everybody, and good luck to you!

UPDATED TO ADD WINNERS: Fox pillow of your choice (Sleepy Fox or Sneaky Fox): "I really like the sneaky fox! Your style is so unique, and creative!" --Jessica

Two mini pillows (Cold Shoulder Fox and Fox Face): "My son would LOVE these foxes! I envy your drawing skills and will add you to my Google Reader blogroll." --Holly U

Here's a new twist: Holly U can choose to instead to have the second large fox pillow (whichever one isn't chosen by Jessica), in which case, I'd pick a third winner for the two mini pillows.


Contact me by 5/31 at info at thenightgarden.com with your address and preferences! If I don't hear from you by the 1st of June, I'll pick a new winner.


Linking up to:


Tip Junkie handmade projects

Photobucket


mop it up mondays


Monday, April 23, 2012

flannel projects - - part one : floor pouf

I always seem to have a few patterns of flannel laying around, partly because I bought a bunch when I was making cloth diapers before the kiddo was born, and partly because I bought some more when I figured out how to make flannel crib sheets (coming up in a future post).

This project, however, uses the owl print flannel that my aunt used to wrap up Little Owl Lost for the little guy's birthday this year. My aunt is a long-time recycler who often uses fabric to wrap gifts (and often gives books. Yay!).

All of the fabrics pictured in the first photo are from Joann Fabrics; I'm having difficulty finding the owl fabric on-line, though, so it might be a discontinued print. Really, you can use almost any fabric for this project, from flannel to upholstery fabric to suede, depending on what you have on-hand.


I decided to make a floor pouf after seeing Sherry over at Young House Love make one based on this tutorial from Living with Punks. And I have to say, it was just as quick and easy as it looked, including the piping!


Now, I should mention, I've had limited adventures with piping in the past. But having the how-to spelled out for me made it look kind of awesome, I think.


We skipped the handle since cotton flannel is kind of a thin fabric, prone to tearing when rough-handled. I'd rather the kiddo pick the whole thing up to move it, and the pouf is light enough that the lack of handle isn't an issue.


And there you have it! One cute owl pouf made from gift-wrap flannel. The kiddo likes to tackle it, but it also makes a great stool, pillow, and foot rest.

Takes about an hour and a half from start to finish, and since I made ours about 24 inches across and about twelve inches tall, it took about two yards of 42-inch flannel to make.

I'd love to see if you tackle this pouf project too! Link in the comments if you want to share photos.

(p.s. you can make these photos bigger by clicking on them . . . but you probably knew that!)


Tuesday, March 20, 2012

hey there!


Well hello!

This happy guy is off to live with Baby O, a present for his very first birthday. Enjoy a long life together, guys!

(I used the same basic recipe from my previous monster pillow project, found here.)


(p.s. you can make these photos bigger by clicking on them . . . but you probably knew that!)


Linking up to:

Visit thecsiproject.com


Saturday, November 12, 2011

leftovers

Whenever I finish a project, there are usually leftovers of one kind or another. In the past, I have just boxed things up and stashed them away, but the recent clean-out of the spare room may just have cured me from that habit. New habit I'm trying to form: using the leftovers to make another fun project right away.

Saving things for later seems like the right thing to do, but when you have as many different kinds of hobbies as I have, and when you tend to forget down the road where the leftovers are or whether you have them at all, you end up buying new stuff each time anyway. Wasteful. Makes storage areas messy, too, and then when you're pulling stuff out to donate, you start adding up in your head the money you spent . . .

The Halloween costume project this year meant leftovers of several kinds: felt and fake fur, most obviously. With Christmas coming up, I thought I'd take some of the stuff and make something cute with it for my kiddo.


Voila! Monster pillows!

To start, I cut the largest rectangle I could from the leftovers of a remnant of faux fur used for the tail of my son's Halloween costume. The pillow pictured is made with a piece that measured about 13 x 25 inches. (Folded in half and stitched, it made a nearly-square pillow approximately 12 x 12 inches.)

Next, I planned the face, and cut face parts out of leftover red, orange, ivory, and charcoal gray felt. I stitched the layers together, then planned where they should go on the pillow (not too close to the edges, and not to close to where the fold would go at the top of the pillow). You can pin your pieces in place; I just free-handed, because I wasn't too picky about having the face end up perfectly placed. I think it looks a little sillier slightly off-kilter.

Using my machine, I stitched around the face pieces close to the edges, attaching them to the fur.

Then, I clipped my threads, made my fold so that the furry sides were together, and stitched around all of the open edges, leaving a space open to turn the pillow right-side out and stuff it. I stuffed it full of fluff, then hand-stitched the opening closed.


I may have a hard time keeping this guy (and his soon-to-be siblings!) out of sight until Christmas. He already looks quite at home in the nursery chair.


(p.s. you can make these photos bigger by clicking on them . . . but you probably knew that!)


Pin It

Friday, May 27, 2011

burlap coffee pillow (designer diy)

I've been seeing some cool burlap projects (also called coffee sack, grain sack, or feed sack projects) in magazines (here), on blogs (here), and on Etsy (here).

These are just a few examples; you'll find tons of others with a quick on-line search, including about a ton of pillows, some in the $50 range and up. I've had a coffee sack hanging around the house for a few years now, and in fact, just dug it out of the spare room during the recent clean-out. It's possible I'm at the tail end of the New Depression trend on this one; I don't know. I still think it looks pretty graphic and cool. So I took an unattractive old cushion/pillow (also dredged up from the spare room) and stitched this nifty fitted cover for it.

Before:


After:


Instructions: Find a cushion and a burlap sack. My coffee sack came from a local coffee shop. You can also find burlap (about $2 per yard)and stencil your own designs (here's a recent tutorial that explains that process).

Wash and dry it.

Cut apart your sack so that you're working with a single layer of burlap at a time. Iron it flat.

Place your cushion over the part of the coffee sack you'd like to feature on your new cushion cover. Cut around the cushion, leaving an extra inch of seam allowance.

If your cushion has a defined side, measure it. Add two inches for seam allowance (one inch for top, one for bottom).

Using your cushion as a guide, pin and sew the two short ends of this piece to form the sides of your cushion. Leave seam on the outside.

Smooth the piece cut for the top face down on the cushion, and pin to the side, making sure the cover is taut.

Remove and sew.

With seam allowance still on the outside, put the cover back on your cushion, and pin the back piece most of the way around, leaving enough of the seam open to remove your pillow.

Remove and stitch.

Reinforce all seams with a row or two of zig-zag.

Turn inside-out, iron, and place on your cushion. Hand-stitch the opening closed.


Of course, simple, rectangular or square pillows are easier. Just cut two same-size pieces, stitch right-sides together, insert pillow, and stitch closed. I have some of the coffee sack leftover, so I'm thinking that, when this room finally gets done, I'll make another one.


Visit thecsiproject.com