Showing posts with label little. Show all posts

Monday, August 10, 2015

fast and easy paper making for kids!

If you have a preschool-aged kid (or older) with an interest in recycling, this is a fun afternoon project! Let's make some paper!

Take scrap paper and, with your kid, tear it up and put it in a blender with some hot water. We used a couple of mis-printed sheets from the printer, a bit of cardboard, two pieces of junk mail, and a sheet of purple construction paper. The trick is: the blender blades have to turn freely, so don't jam-pack the blender and use lots of water.

Blend till pulpy.


Kids can pour into the screen! We actually did the pouring over a catch-basin, then moved it to the table.


Kids can sponge gently to remove excess water. Here, my now-gigantic, soon-to-be-kindergartener kiddo sponges our screened paper.
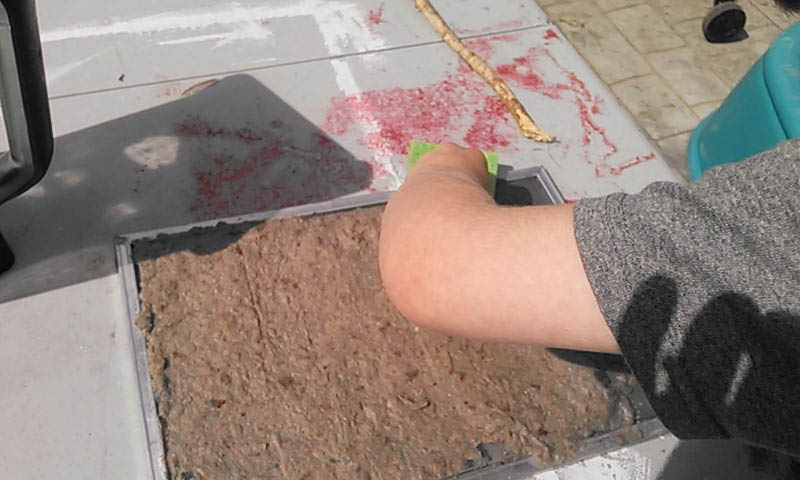


Flip it over on felt, polyester, or polypropylene cloth (heck, linen would probably work, too), then press from the back with a sponge (kids can do this part, too!) (The kiddo is developing his photography skills; these are nicely framed, I think.)


Carefully lift screen, helping paper separate by pulling gently on the corner. Once the  entire screen is separated from the paper, leave it to dry.


And once it's dry, you can cut it into two equal pieces . . . or more.

The resulting paper will vary in thickness and texture, depending on your pour, and color, depending on your source materials. Ours feels a little like egg carton cardboard.

Nice textural quality; the screen leaves crosshatch marks on the surface, which look great when rubbed with a crayon.  

And that's all there is to it! The materials used don't have to be expensive. We used a small window screen from the recycled building materials store (99 cents), some kitchen sponges, and a polypropylene sack.  Serviceable and fun for a summer project! 

We're going to try this at the preschool's day camp this month, too, but using hand mixers; the low-tech kind with a hand crank (go go fine motor skills!). I'll try to remember to post the results for those who want to give it a try!

Thanks for stopping by!

-a

Friday, July 19, 2013

golden book baby shower invitations

I recently offered to throw a baby shower for a good friend of mine, and because this will be her second child and she already has a house full of hand-me-downs, she requested that the gift giving be kept to a minimum. Partially because of that request (and partially because she's a book lover like me) I settled on a "vintage / classic kids' books" shower theme.


The invitations went through an extensive brainstorming and planning phase, after which I finally decided to use vintage Golden Books as the base.


This may not be a new idea entirely; since landing on the concept I've seen a few different versions of Golden Book baby shower invitations. A few use just the covers, discarding the pages.

Yikes. As a book lover throwing a party for a book lover, that idea makes me throw up in my mouth a little. Admittedly, I have that response to pretty much any project I see people blogging about when it involves chopping up vintage books, even having worked in bookstores and witnessed what happens to mass market paperbacks. Or maybe because of it.

Anyway, I trolled St. Vincent dePaul's section of kids' books to find some classic titles in older editions with a bit of age to them. Because the guest list was small, I didn't mind that each of the books was different, but this project might be a little extreme for a guest list of more than a dozen.

Of course, Baby Animals was pretty perfect for this project, but really, nearly any Golden Book can be altered to make the perfect invitation (as shown above).


Using my YA Library Book Slips fabric design as a base in Adobe Illustrator, I designed and printed out some library check-out slips on manila card stock using the family's last name (Geisel, in this case, is a pseudonym) in place of the author and "The New Baby" as the title.  These were the "registry" info cards, except in this case they included language inviting people to forego traditional registry gifts in favor of vintage kids' books or small handmade items.


The little envelopes to hold the cards inside the books are made of the same card stock trimmed, folded, and held in place with GlueDots. (If you can't find manila card stock, do what I did and cut some manilla file folders down to 8.5 x 11" sheets using a paper cutter.)


I scanned the front cover (inside and outside) to alter slightly in Photoshop.

For the fronts, I added on each book the words "& Baby Geisel" to the title, matching the the title font and wear pattern as closely as possible.


For printing on the reverse, I moved up the bookplate and made the endpaper pattern fully repeat, before layering on the text in a font similar to the Little Golden Books font. (Click to zoom for detail.)


Printed and trimmed . . .


. . . then scored along the spine and ready to attach . . .


. . . with three glue dots.


I used washi tape tabs to indicate where to open the books . . .


. . . and used more washi tape (white and yellow, so the golden spines still showed through a bit) to cover the spines. Then I tied them up with baker's twine and put them in some shipping envelopes to ready them for mailing (complete with logo for the Geisel Family Library Foundation).


Repeat for all titles.


This project is, admittedly, a bit labor intensive and requires some knowledge of Adobe Photoshop and Adobe Illustrator. Like the look but want to skip the work? I can put some together for you, too! Contact me for pricing and scheduling by leaving a comment below, or by e-mailing (whoamillie (at) thenightgarden.com).


Thanks for reading!

p.s. you can make these photos larger simply by clicking on them, but you probably already knew that.


Linking up to:
I'm Crafty!

Friday, July 27, 2012

thrift store finds: chairs for kiddo

Woohoo! A new chair for the kiddo! In two easy steps!


I was at BRING a little while back and saw this yellow Little Tikes chair in the free pile. It was a little stained and cobwebby, but there were no holes or chew marks or anything, so I snagged it for the kiddo, figuring it would be a great addition to his backyard play area.


After cleaning, I just put it on some old cardboard and sprayed it with some spray paint meant for plastics.


Just a couple of light coats, then flip it and get the underside, too.


Dries in just a few minutes! I finished it up before we went on a road trip, so it had a week to cure. It blends in with our other yard furniture a lot better now, and it was free.


I also found this little Virco school chair for half off a couple of weeks later, also at Bring.


I know; no one's buying this rusty little guy for what Virco is charging for them right off the assembly line ($160? Wow.). But I still think it was a heck of a steal for $1.50. I'm not sure yet what I'll do to it, but it will probably involve paint. ;)


What about you? Any new seating in your back yard? Any fabulous thrift store finds? I love following your (non-spam) links in the comments section below!


p.s. You can make these photos larger just by clicking on them, but you probably already knew that!


Linking up to:

Simple Design's Thrift Haul

Saturday, November 12, 2011

leftovers

Whenever I finish a project, there are usually leftovers of one kind or another. In the past, I have just boxed things up and stashed them away, but the recent clean-out of the spare room may just have cured me from that habit. New habit I'm trying to form: using the leftovers to make another fun project right away.

Saving things for later seems like the right thing to do, but when you have as many different kinds of hobbies as I have, and when you tend to forget down the road where the leftovers are or whether you have them at all, you end up buying new stuff each time anyway. Wasteful. Makes storage areas messy, too, and then when you're pulling stuff out to donate, you start adding up in your head the money you spent . . .

The Halloween costume project this year meant leftovers of several kinds: felt and fake fur, most obviously. With Christmas coming up, I thought I'd take some of the stuff and make something cute with it for my kiddo.


Voila! Monster pillows!

To start, I cut the largest rectangle I could from the leftovers of a remnant of faux fur used for the tail of my son's Halloween costume. The pillow pictured is made with a piece that measured about 13 x 25 inches. (Folded in half and stitched, it made a nearly-square pillow approximately 12 x 12 inches.)

Next, I planned the face, and cut face parts out of leftover red, orange, ivory, and charcoal gray felt. I stitched the layers together, then planned where they should go on the pillow (not too close to the edges, and not to close to where the fold would go at the top of the pillow). You can pin your pieces in place; I just free-handed, because I wasn't too picky about having the face end up perfectly placed. I think it looks a little sillier slightly off-kilter.

Using my machine, I stitched around the face pieces close to the edges, attaching them to the fur.

Then, I clipped my threads, made my fold so that the furry sides were together, and stitched around all of the open edges, leaving a space open to turn the pillow right-side out and stuff it. I stuffed it full of fluff, then hand-stitched the opening closed.


I may have a hard time keeping this guy (and his soon-to-be siblings!) out of sight until Christmas. He already looks quite at home in the nursery chair.


(p.s. you can make these photos bigger by clicking on them . . . but you probably knew that!)


Pin It