Showing posts with label recycle. Show all posts

Monday, August 10, 2015

fast and easy paper making for kids!

If you have a preschool-aged kid (or older) with an interest in recycling, this is a fun afternoon project! Let's make some paper!

Take scrap paper and, with your kid, tear it up and put it in a blender with some hot water. We used a couple of mis-printed sheets from the printer, a bit of cardboard, two pieces of junk mail, and a sheet of purple construction paper. The trick is: the blender blades have to turn freely, so don't jam-pack the blender and use lots of water.

Blend till pulpy.


Kids can pour into the screen! We actually did the pouring over a catch-basin, then moved it to the table.


Kids can sponge gently to remove excess water. Here, my now-gigantic, soon-to-be-kindergartener kiddo sponges our screened paper.
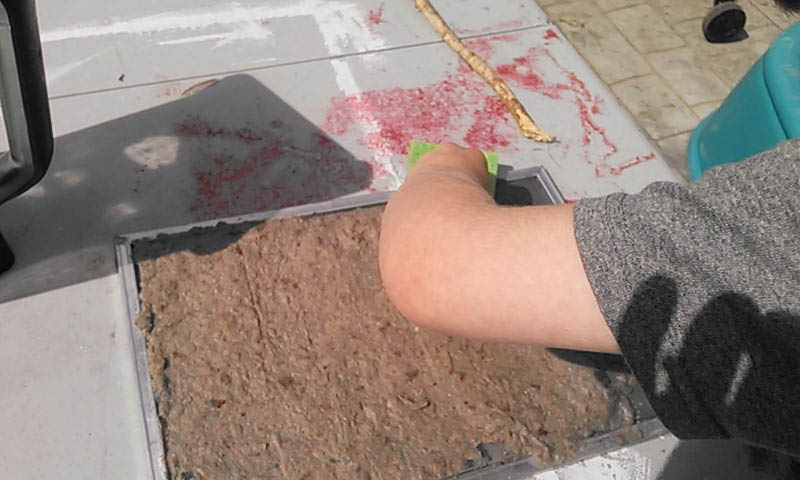


Flip it over on felt, polyester, or polypropylene cloth (heck, linen would probably work, too), then press from the back with a sponge (kids can do this part, too!) (The kiddo is developing his photography skills; these are nicely framed, I think.)


Carefully lift screen, helping paper separate by pulling gently on the corner. Once the  entire screen is separated from the paper, leave it to dry.


And once it's dry, you can cut it into two equal pieces . . . or more.

The resulting paper will vary in thickness and texture, depending on your pour, and color, depending on your source materials. Ours feels a little like egg carton cardboard.

Nice textural quality; the screen leaves crosshatch marks on the surface, which look great when rubbed with a crayon.  

And that's all there is to it! The materials used don't have to be expensive. We used a small window screen from the recycled building materials store (99 cents), some kitchen sponges, and a polypropylene sack.  Serviceable and fun for a summer project! 

We're going to try this at the preschool's day camp this month, too, but using hand mixers; the low-tech kind with a hand crank (go go fine motor skills!). I'll try to remember to post the results for those who want to give it a try!

Thanks for stopping by!

-a

Sunday, November 24, 2013

just in time for the holidays: 7 diy gift tutorials from my blog


With the holidays coming up, I wanted to put together a quick post for you all featuring links to seven of my most popular DIY gifts! Here they are, in no particular order, so you can spend less time and money at the mall this year, and give gifts that mean a lot to family and friends who mean a lot to you.

1) The Inventor's Supply Kit


Originally made for my nephew, this has been popular on Pinterest this past year. Wanna put one together for someone special? Here's the link.


2) Rupee Crayons


These were party favors for my kiddo's second birthday party, but if you make a mold using the silicone kit I link to, you could make a set for every kid on your gift list. They look awesome, but are really inexpensive and fun. Find the tutorial here.


3) Faucet Handle Coat Rack


If you like upcycling and repurposing (and you have a second-hand building supply store in your area) these make really nice gifts, and they're something you can put together pretty quickly. You can find instructions here.


4) Monster Pillows


Made of scraps of faux fur and felt, these monster pillows are one of my favorite projects to make for a quick birthday or Christmas present. With a single yard of faux fur, you can make four to six 12-inch pillows (depending on the width of the bolt of fabric). Make a few this holiday season using my quick tutorial.


5) Measuring Tape Growth Chart


There's still time to order some measuring tape growth chart fabric to put together one of these wall-hangings for someone you love! Spoonflower is about ten days out on orders, but that should still give you a bit of time for assembly if you get your order in soon. (I sell the fabric and finished charts through my Etsy store, too, but my supply is low right now due to holiday orders). Click here for the assembly instructions. Oh, and I have a metric version available, too! (One yard will make 2 1/2 charts, or order single panels directly from me.)


6) Cheap-o Screen Printed T-shirts (or tea towels)


Custom screen printing with mesh fabric, embroidery hoops and latex paint? Yup. Make your own t-shirts this Christmas and knock a bunch of names of of your shopping list.


7) Freezer Paper Printed T-shirts (or tea towels)


This is a great project for one-off prints. In this post, I present a dinosaur t-shirt, and links to other places in my blog where I feature a pretzel shirt, viking t-shirt, and wood-grain flour sack tea towels. Infinitely customizable, without the time investment of making a silkscreen for each design. Find it here.

All right, readers! Go forth and craft like you've never crafted before! Let's do this!

Thursday, August 8, 2013

what's happening in the alley


There's an awkward area of our yard that's about six feet wide and borders the neighbors' property . . . where, in defiance of -- I don't know -- a million local building codes, they've built an addition about a foot away from the property line. It was there before we moved in, it'll be there after we leave. Unless the branches of our nut tree fall and crush it. I'd kinda love to see what kind of insurance claim would attempt to be filed on something like that.

Anyway, I digress. This awkward area of our yard is something I've ignored since moving in several years ago because: a) I'm an expert at avoiding things that drive me bananas; b) it's a very narrow area; and c) we had to break into our house through the fireplace one Fourth of July, and the alley has been full of rubble. 

That last bit is a funny story; it starts with an unusable sixties-era fireplace separating from the foundation (Ha ha! Funny already, right?). The plot thickens when we lock ourselves out of the house on a holiday weekend, then, to regain entry, bust through the decades-old brick and mortar with a sledge to the shock and awe of the house cats. Finally, in the conclusion, your intrepid hero and heroine patch up the wall and, eventually, re-side the entire house, but leave a pile of urbanite, pea gravel, concrete blocks and river stones in the alley. For a couple of years.

It's a major unfinished project to just have laying around, and I started to finally tackle it because my kiddo is getting older and more exploratory, and I don't really want to leave him to the mercy of (possible) rubble-dwelling black widows and (possible) rusted nails from our roof replacement. 

Here's a sneak peek, then, of some of the projects going on in the alley. My goal is to use mostly recycled materials and stuff we have on hand to beautify the alley and make it safer to traverse. This trellis, for example, is something I built using some cedar garden stakes from an estate sale (25 for $5!) and a busted extension ladder.


The raised beds are built of fireplace rubble ("urbanite") and filled with dirt from another spot in the yard, mulch from the city's Free Wood Chips pile, and plants from the local garden center's end-of season sale plant rack. I searched out shade-happy vining plants to help fill in that trellis.


And I made these planters out of a couple of old buckets and some split garden hoses. 


There's a lot of work to do here still, but I'm feeling good that progress is happening. It was a scary, weedy, rubble-y mess that was in desperate need of attention . . . and now it's getting a little. I'll definitely be back with updates and details as this project progresses as it's far from finished; I have so many ideas! So much to do before the weather turns! So much stuff for my kiddo to get into while I'm slaving away in the alley! What about you? Are you trying to make something out of nothing this summer, too?

Thanks for reading.

p.s. Hey! You can make these images larger just by clicking on them, but you probably already knew that, clever you.


Linking up to:

Catch as Catch Can at My RePurposed Life

Wednesday, June 12, 2013

little tree stool

This turned out cute by accident. Somewhere around here is the basketball colored and textured vinyl remnant I intended to use for reupholstering this little 1970s caster stool.

I picked the stool up at a thrift store awhile back for a crafting competition, but never got a chance to use it for a project.


I meant to paint it, too, but I wanted to get the seat covered, first, to see what color might look best with the new upholstery.


Four little screws held the pad on from beneath. A phillips head screwdriver took care of them in about two minutes.


 Here it is, plain brown without padding.


Here's how the other half lives, when the other half is separated from its stool.


And here's the seedy underside, riddled with a hundred staples.


I searched my stash high and low for that basketball vinyl, but couldn't find it. What I found instead was a thrift store upholstery fabric remnant printed with modern leaf outlines in shades of green. And I thought, suddenly, that it would be a much better match to the two Ikea stools that will flank it at the train table.

I cut the fabric to cover, plus about an inch and a half "seam allowance" to wrap around and staple.


So modern! So graphic! So summery! So . . . who designed it and where did it come from? (Google image searches turn up nothing.)


The secret to successful upholstery is to pull tightly, staple securely, and keep your curves smooth. I always start with a staple on one side (call it the west side), then pull the fabric taut and staple directly across from it (east side). Then repeat for the other two points on an imaginary compass rose (north and south).


I keep at it, stapling opposite points all the way around, pulling tight, tight, tight along the curve for a smooth edge. I never need a hundred staples; I think I used maybe twenty for this stool.


And here it is, finished. I could have painted the base white or some shade of green, but in the end,  it didn't need painting after all. The twiggy brown legs are pretty much the perfect complement to the leafy upholstery. My little Peter Pan loves it, and I imagine the Lost Boys would too.


Thanks for reading.


Wednesday, February 27, 2013

pinterest challenge: vertical hanging planter (upcycle!)


Pinterest, I've said it before and I'll say it again: you'll be the death of me.

On the other hand, I'm lucky enough to get to participate in the Young House Love/Bower Power Blog completely unauthorized Pinterest Challenge because of you, so maybe it's a draw?


Okay, fine. I love Pinterest. I've found it an endless source of inspiration and ideas. The only trouble I have is in distilling the content; I want to do everything. Like vertical gardening, for example. Wall pockets, hanging planters, cinder blocks, you name it, I want to make it.


original pin here
inspiration board dedicated to vertical and hanging planters and gardens here


Distill! Distill!

I took all those inspirational images and tutorials and made this: an upcycled wall planter homage to wall gardens. It wasn't exactly free, but it was pretty inexpensive, and mostly used materials (and plants) I already had on hand.


Materials:

Old iron planter basket (sans chains)
soil
pine shavings
hardware cloth or chicken wire remnant
awning remnant
hens & chicks
wire
thyme
heavy coat hook 

Get an old iron planter basket (mine cost $2 at Bring). You'll need to acquire this first, as you'll use it to determine how large to cut your burlap and hardware cloth. You could also use an old bicycle wheel; one of the pins above makes a spinning planter with one. (Note: Bring marks prices with a paint pen; I've had good luck removing their prices with a Magic Eraser.)


After testing placement, replace your chintzy picture hanging hook with a nice, sturdy coat hook.


Sew a "pillow" from old coffee sack burlap, using twine pulled from the sack to sew it up. Turn it inside out and fill with a mixture of potting mix and pine shavings (to make it more lightweight).


Stitch the pillow closed and stuff it into your planter basket.


Cut some hardware cloth to the approximate size and shape of your container's back using tin snips. I had a large piece leftover from an old playhouse we tore down awhile back; chicken wire would work well, too. Cutting it down to an approximate size first makes it easier to work with when you're ready to do more exact cuts later.


Set aside your hardware cloth for the next step.

If you'll be hanging your vertical wall planter on a surface you want to protect marginally, you should add a waterproof layer so that the dirt and water don't soak through the burlap, causing stains and rot. You can use an old piece of tarp, or one of those poly pet food bags, or (like me) a piece of an awning destroyed in a windstorm. Cut it out and place it on top of your dirt pillow.


Trim down the hardware cloth to fit, then tuck it in place over the waterproof layer and use wire and some needle nose pliers to attach it to the basket.


Turn the pod over and lay it flat to begin filling in your plants. 


I trimmed some of my hens & chicks plants down, and also added a divided thyme seedling and a whole lotta moss. (We'll see what survives!)


Poke or cut holes in the burlap and thread roots or runners into the holes.


 Fill in around plants with moss.


I hung mine up right away for photos, but pretty much universally, it's agreed you should water it and leave it flat for a couple of weeks to allow the plants to take root. So after taking some pictures, I took the planter down again and laid it flat to do exactly that.


Patience is a virtue.

Thanks for reading, and thanks to Sherry and Katie for issuing the Pinterest Challenge! It's always good to have the chance to mark a project off my list . . . especially one that first caught my attention over a year ago. 

Linking up to: