Showing posts with label sewing. Show all posts

Friday, November 1, 2013

i'm gonna wreck it!

This is the premise of the video game, Fix-It Felix Jr.
Ralph owns some land. Citing Imminent Domain, the Nicelanders forcibly move Ralph from his land and into a garbage dump in order to build an apartment building. Ralph objects. He gets angry and vows to tear down the building, but everything he breaks, Fix-It Felix Jr. fixes with his dad's magic golden hammer.

Good guy?
So really, Wreck-It Ralph is the underdog. The premise of the movie, Wreck-It Ralph (upon which we designed our costumes this year) is that Ralph gets tired of not being appreciated for doing his job for thirty years. Felix gets all the medals and friendship; Ralph still lives friendless in the dump. So he ventures out into the hub to find a video game in which he can win a medal of his own . . . and the respect of the Nicelanders. 

The Mr. was Wreck-It Ralph this year, to go alongside the kiddo's Fix-It Felix.

We spiked his hair with some red Spirit Gel by Zach's Wax. It has really good hold, and doesn't smear if you hit it with a hair dryer before going out.


The shirt is a burnt orange polo shirt from Value Village ($3) with the collar removed and the cuffs torn to match the movie. I painted on the plaid pattern by blocking off horizontal stripes with masking tape and spraying with watered-down brick red acrylic paint (this worked a ton better than that crappy fabric spray I tried on my leggings awhile back).

Once those were dry, I drew in the blue lines using a Crayola fabric marker, then masked off the vertical stripes. I sprayed those with watered-down white acrylic paint, applied thinly enough that the other colors still show through where the colors overlap. We were all pretty pleased with how close it matched Ralph's "real" shirt.

I made the overalls using four yards of flannel and some white thread.


I used a pair of the Mr.'s jeans for a pattern for the bottom, adding a couple of inches to the side of each piece of fabric before cutting. Then I referred to a pair of my kiddo's overalls to determine the shape of the bibs, pockets, and straps and all the lines of stitching. 


Some metal overall hardware finished them off. Total cost of the overalls was $12.50 with fabric store coupons. 


I thought ahead and bought the orange flip-flops in August on clearance. Ralph usually goes barefoot, but Ralph's a cartoon. Real-world peeps wear shoes in October in the PNW.

We also bought a pair of Disney-licensed Wreck-It Ralph Wrecking Fists, but they were a little tight and hard to work in, so they got left behind on Halloween (although they did make an appearance at the preschool party). Don't worry; we bought them on clearance over the summer, so it wasn't as big a waste as if we'd paid what they're going for now on eBay.

I'm hoping to have a photo of the three of us to share soon; I actually finished my Vanellope costume in time, so I'll be going over that in a future post.

Happy November, everyone, and thanks for reading! I hope your Halloween was a smashing success. Pun intended.

(p.s. you can make these photos larger just by clicking on them, but you probably already knew that, clever you.)

Saturday, July 28, 2012

a doll cradle for a birthday girl

Aack. You'll have to forgive me; I neglected to take a before shot. I got this doll cradle home and started work on it that same evening, when the dark made it impossible to get decent photographs.

We discovered it at a resale store a couple of miles from our house, actually left it behind, and then returned and picked it up when I couldn't stop thinking about it. It was too sweet to leave behind.

Here's the cradle the kiddo and I found, after being scrubbed clean, rubbed with butcher block oil (food-safe, therefore baby-safe), and repaired, with new hardware in a couple of spots.


I also added on these little wooden bird cutouts (painted turquoise, then glued and nailed in place) to cover some places that needed covering.

The old screw eye holes didn't hold the hardware in place tightly enough, and the cradle basket scraped on the bottom support board, so I drilled new, lower holes and filled/covered the old ones. The bluebirds cover the places on the inside where the screw eyes had begun to poke through.


One end of the cradle, so you can see the side supports. U bolts on the side supports connect with screw eyes on the cradle basket to make the cradle rock; I replaced the nuts with cap nuts (also called "acorn nuts") to make them a little safer and prettier.


With the bluebird flannel mattress in place. I pulled sweet fabrics from my stash to make the bedding feminine but not overtly girly (no pink here!).


With the "Celebrations" fabric pillowcase covering the green pillow. (The fabric features butterflies, frogs in party hats, happy women and girls in birthday cake hats, etc. Click to zoom.)


The little doll quilt incorporates all three fabrics: celebrations on the front, green on the back, with bluebirds for binding.


The cradle and bedding set were given to my kiddo's little friend as a birthday gift this afternoon, and for such a simple gift, it was a big hit. Happy birthday, cutie! I hope every one is just as happy as this one.


p.s. you can make these photos larger just by clicking on them, but you probably already knew that.


Linking up to:

Simple Design's Thrift Haul
Mop it Up Mondays
Thrift Share Monday
So You Think You're Crafty's I'm Crafty party
My RePurposed Life's Catch as Catch Can

Saturday, June 2, 2012

quick and easy seatbelt covers

The car seat we recently bought the kiddo (to replace the one in my car that tops out at a 40 lb. weight limit) included a couple of really handy little seatbelt covers. These are a definite bonus as his least favorite thing about riding in his car seats has been that the belts tend to cut into his neck when properly tightened.

He's been loving the new luxury seat. On the other hand, he's not been loving riding in my husband's car, whose seat does not have the accompanying seat belt covers. And on weekends and long road trips, that car is typically the one we travel in. It's been a little bit of an issue.

So okay; I decided I can either keep dressing the kiddo in hooded sweatshirts all summer (and pull the extra fabric up against his neck to protect it from the seatbelt) or I could just make a couple of seatbelt covers like the ones in the kiddo's other seat. Which is what I did.

Manufacturers typically recommend not adding accessories to car seats, but I felt this was an okay move for our family. After all, they also recommend against wearing excess clothing in a car seat, and the hooded sweatshirts were far more likely to interfere with car safety than two layers of thin cloth at one point on a seat belt. Also, because our other car seat had them as part of the stock package, I figured it was probably safer than other alternatives. You'll have to decide for yourself!

So, have I justified myself enough yet? :)

Here's what they'll end up looking like.


You can use any fabric for this project. I used pre-washed scraps of a cute gnome print by Michael Miller Fabrics, and some red felt. You'll also need thread and 3/4-inch sew-on hook-and-loop fastener (like velcro).

I also used the seatbelt covers from our other car seat as a pattern, but I took measurements for you: cut two pieces of patterned fabric and two pieces of felt measuring approximately 5.5 x 6.5 inches.

Round the corners, and stitch together one piece of felt and one piece of patterned fabric with right sides together. Leave about a quarter-inch seam allowance, and leave a couple of inches of one side open to turn inside out.

After turning inside out, press and top-stitch (stitch around the perimeter close to the edge) till it looks like this:


Cut four inches of hook-and-loop to fit along the long, straight sides.


Stitch the strips in place(right on the edge!), with the hook piece on one edge of the seat belt cover, and the loop piece on the other as pictured.


Trim loose threads and sharp corners of hook-and-loop. Fold in half. Complete!


Repeat for the second seat belt cover. Install in your car seat!


These take about twenty minutes, but you'll more than make up for any time spent the first time you ride in the car and no one feels like he's getting strangled in the back seat.

If you decide to make a set, I'd love to see how they turn out! Link in the comments below. Happy travels to you!


(p.s. you can make these pictures larger by clicking on them, but you probably already knew that!)


Linking up to:

mop it up mondays

The Stuff of Success

Tuesday, April 17, 2012

two new spoonflower fabric designs

Spoonflower's hosted a couple of fabric design contests lately that were right up my alley. First up, designs inspired by a love of books.

Assuming there'd be a ton of bookshelf designs, book stacks, etc., I looked back over my history with books, a history that begins with a story my mom tells about tiny little me, in my crib, quietly looking at picture books. Now, I worked through most of my twenties (and the beginning of my thirties) in bookstores (and the past several years designing book covers), but as a kid, I was a pretty constant library patron.

When I got old enough to walk the eight or so blocks after school, we used to spend a couple of hours a day at the public library until our dad could pick us up. Hours we spent spinning the globe, looking up swear words in the dictionary, and, of course, reading. And during that time, I encountered thousands of these library checkout slips. And probably thousands more at the school library, too.


Click here for the full design, featuring four different YA library slips created in Illustrator and Photoshop, without the aid of scans. In fact, created without the aid of my drawing tablet, too, since I couldn't find the pen. Each of the kids' signatures were done using different Photoshop brushes and my mouse. And I think I used either three or four open typewriter-style fonts.

I placed 22nd out of 143, which is cool with me.

Next up was the "Sewing Celebration" contest. Again, I mined my happiest childhood memories. My kindergarten teacher had a shelf full of fun kits that kids could take home to make a little project or do a little activity. Among the dozens I must have taken home, I remember best a little felt bean bag I stitched together with red yarn.

The kit included chartreuse green felt, red yarn, pins, needles, and beans. And my stitches were so huge that the beans would sometimes slip out from between them. I've become a better sewist over the years (luckily, 'cause I was losing a whole lot of beans), and my five-year-old self could never have imagined something as fabulous as Spoonflower, but she would have loved it. And so would my kindergarten teacher.


Click here for the full design. I think you can even still vote, if you're interested, for a couple more hours. Contest results tba!


(p.s. you can make these photos bigger by clicking on them . . . but you probably knew that!)

Wednesday, February 8, 2012

stitched puppets from the lane county historical museum


Tonight, for your consideration, an assortment of puppets from the children's puppet stage at the Lane County Historical Museum. From flappers to hippies, settlers to bar maids, there are probably close to two dozen of these carefully stitched and costumed puppets spread out on a black shelf, out of sight for anyone but those who peek behind the curtain. Waiting to be discovered like starfish in a tide pool.

I'm not sure who pieced the puppets; I didn't notice any markings, but it must have been someone very dedicated.

Patterns for individual dolls (including costumes) are available in the gift shop for under $6.00.


(p.s. you can make these photos bigger by clicking on them . . . but you probably knew that!)

Tuesday, November 15, 2011

sweater better


I've had this cute sweater in my closet for awhile; I picked it up at a thrift store and wore it once or twice, but it was a little short on me and never fit right across the chest (a constant issue with me and clothes).

Last week, I noticed this tutorial over at the I am Momma Hear Me Roar blog and pulled the sweater out of the closet for a quick re-make into a cardigan.


Success!


Now I can wear it way more often. Gonna keep on the look-out for other spare sweaters to make better, too! Awesome project tutorial, Delia. Thanks so much for the inspiration!


(p.s. you can make these photos bigger by clicking on them . . . but you probably knew that!)


Pin It

Thursday, November 3, 2011

pinterest challenge — max + wild thing costumes!

Pinterest Challenge time, sponsored by the Young House Love blog and the Bower Power blog, joined this month by Ana White and Erin!

When it was time to get started on a Halloween costume for my kiddo this year, I started searching Pinterest and the web-at-large for a pattern or tutorial to make a copy of Max's wolf suit from the book Where the Wild Things Are. My search turned up this:
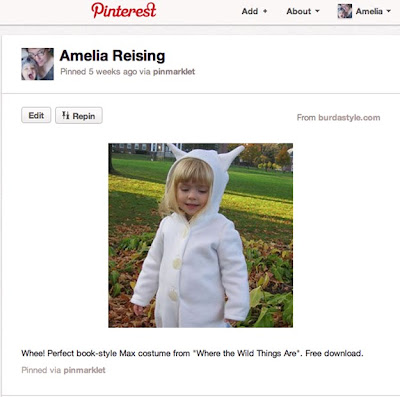


a free, downloadable BurdaStyle pattern in exactly the right size—2T. Thanks, SuzeB! I'm almost certain that the poor rating on this pattern isn't a reflection of the pattern itself (it all fit together just fine), but the result of dim bulbs like me trying to click on the bubbles to see other people's ratings, and thereby giving it a poor rating accidentally. The pattern is great. Here's my kiddo wearing it now, up to mischief of one kind and another, as the story goes.


I started with an ivory-colored, slightly stretchy, minky-feeling, polyester faux fur instead of the recommended polar fleece, because I don't really dig the way polar fleece pills after washing—even the "no-pill" kind. The lovely, bushy, furry tail is made from a quarter-yard remnant from JoAnn Fabrics.

Other alterations to the pattern: I made the hood very slightly deeper and made the front closure a velcro closure so that the sewn-on buttons are purely decorative (I like a quick-release one-piece costume for diaper emergencies). No need to get too in-depth on the alterations; SuzeB provides a nice tutorial on how to put the suit together. I just left off the front facings and folded over a narrow hem on the front edge, then stitched in the velcro. Easy peasy.


That's them at the library, right before Halloween story time. Which brings me to the other part of this costume: my husband's Wild Thing. Not something I'd planned on originally, but then I came across this:


while looking for a "quick" way to make a Wild Thing costume head. Hah!

The directions Seamster provides with his Instructable remind me of the way I crochet: intuitively. You see what you want the end result to look like, you get out some materials and a basic set of directions, and you interpret and innovate where necessary. Voila!

A couple of weeks later, you have this guy.


Now, a couple of people on the Instructable commented that they started this project mere days or hours before Halloween, and finished in plenty of time. I guess I forget sometimes how quickly things can get done when a person has all their evening hours free! For me, working a couple of hours a day a few times a week, it took a little longer than anticipated, which is how I ended up at the mall on Halloween in my Where the Wild Things Are t-shirt (or, as my husband called it, my "cloak of invisibility") instead of a matching costume. Never mind. The boys were instant celebrities.

We were sitting at the table, just like this


eating dinner in the food court and cooling off, and still had people coming up to compliment the costumes and take photos. While we were eating. Back off, paparazzi! I'm trying to eat my enchilada!

As for alterations to the Seamster's Instructable, I started with felt instead of polar fleece, this time for cost concerns as well as to make the Wild Thing have more of a Muppet-like appearance. The base is made as described here, except I enlisted my husband to cut it in a 18-inch diameter circle since his head is larger than a child's head.

I used 4 mm newsboard for the base, then, for the step in which I built up the hat base, I used cheaper, more flexible kraft board attached with tape and hot glue.

In the next step, in which I sewed the dome out of felt and attached it to the base, I followed the advice on measuring and cutting the fabric (felt, in my case), but the part about using trial and error stood out to me as being time-consuming . . . so I did this instead:


After stuffing the bubble with polyester fluff, I folded over the saggy parts and used a whipstitch to hold them down. I made sure to keep the whipstitching where I knew it would be out of sight under the Wild Thing's fur. It made a nice, relatively smooth dome shape, without having to rip the thing apart and re-machine sew + stuff a half-dozen times.

Since the whole thing is made out of felt, I also left off the step about stitching together a facade of felt for where the cheek lines would be, and used an alcohol-based marker to sketch those lines in instead.


I followed the instructions for shaping the nose and eyes from newspaper and masking tape (!) which are not materials I would ever have thought of using for this . . . kind of like dry paper mache. Once covered in felt, I was really impressed by how nice and smooth + solid the pieces turned out. I attached them as directed, accented around the eyes with the alcohol marker, then sewed the horns out of the same felt and stitched them on before beginning to hot glue the fur in place.

Next alteration? Instead of gluing down the teeth on top of the red mouth felt, I cut slits through the felt as I was attaching it so that I could poke the teeth up through the felt, concealing the little tabs. Because I have just a touch of the crafting OCD.


I finished the lower jaw mostly as directed, but I used a piece of foam pipe insulation instead of a 2-inch x 3/4-inch piece of foam. The curve presented some challenges, but in the end it looked pretty good, I think!


Here's one more of the boys in the wild (the kiddo's crown is something I sewed out of wool felt and dyed golden yellow):


Materials list:

Max's Wolf Suit
1 yard of 72-inch wide furry stuff (from JoAnn's with coupon)—$7.49
3 large plastic buttons (on-hand from Grandma's button box)—free
1 package bargain velcro (from JoAnn's)—99 cents
1/4-yard faux fur remnant (from JoAnn's)—$1.30

Wild Thing Head-Piece
1 30x48" sheet of 4 mm newsboard (from Oregon Art Supply)—$5.50 (with enough left over for a couple of other projects)
1 24x36" sheet of kraft brown tag board (from Paper Plus)—45 cents
1 9x12" yellow eco-felt rectangle (from JoAnn's, on sale)—25 cents
1 9x12" orange eco-felt rectangle (from JoAnn's, on sale)—25 cents
1 9x12" dark grey eco-felt rectangle (from JoAnn's, on sale)—25 cents (or use a scrap of something you have on-hand)
1/4-yard red 72-inch wide eco-felt (from JoAnn's, on sale)—75 cents
1 yard antique white 72-inch wide eco-felt (from JoAnn's, on sale)—$2.99
1/2-yard "Grizzly" black fur (from JoAnn's, on sale)—$5.10
elastic (on-hand)—free
masking tape (from Jerry's hardware store)—$2.29
20 extra-strength long glue gun sticks (from Jerry's hardware store)—$4.99
1 32-oz. bag polyester Fiber-Fill (from JoAnn's, with coupon)—$5.00
alcohol-based marker (on-hand)—free

Wild Thing Costume
1 heathered-red long-sleeved t-shirt (from Target, on sale)—$6.00
2 yards beige flannel (JoAnn's, on sale)—$4.78
acrylic paint (on-hand)—free
alcohol-based marker (on-hand)—free

(Other Pinterest inspiration posts: here, here, and here!)


(p.s. you can make these photos bigger by clicking on them . . . but you probably knew that!)


Pin It


Friday, July 8, 2011

spoonflower love

A really cool e-mail came the other day from another Spoonflower user named Julie, who recently purchased some of my Mums-Red print. Seems she made a nifty little handbag from it, and wanted to know if I'd like to see a picture! I did! She agreed to let me share it; I'm always so pleased when someone makes something cool from one of my designs. Thanks again, Julie! You rock!

Saturday, June 11, 2011

progress

Promised: shots of this room in progress. I'm not always awesome about updating the blog on a project from start to finish (there are still, for example, a few dozen Alice in Wonderland shots from last summer that I keep meaning to post), but I'm really excited: a) to have the back room useable (the kiddo loves to wrestle pillows on the bed, and bounce, and read Heedley Pecked Me in the Eye for the umpteenth time); b) to have completed such an insurmountable task as cleaning the space out; c) to be able to have visiting friends and family stay with us when they visit, as opposed to a hotel, a campground, or someone else's house. Have I mentioned how grown up that makes me feel at age thirty+? Really, really, really.

Here is the earlier "in progress" shot from a few weeks ago. The headboard is a cut-down old door from Bring. The bedframe came from Craigslist. No, we did not get robbed at gunpoint.


And here is a current "in-progress" shot. The room isn't done yet (is any room in our house ever done?), but you can see, we'd now be comfortable hosting guests here.


The sheets, dust ruffle, and white curtain panels are recent Target clearance. The name-embroidered pillow is a re-worked wedding present with fabric from Ikea and Troismiettes. The coffee sack bolster is made from the remains of the coffee sack I recently blogged about here. The small rectangular pillow is a Target clearance item from four or five years ago, unearthed in The Great Clearing, with added vintage button details. The grey tweed wool on the square pillow came from the Assistance League of Eugene thrift store shortly after I moved up this way. The finger paintings are the work of my favorite baby boy, hung with vintage wooden pant hangers.


This next photo shows a close-up of some really cute little tiki shot glasses from Archie McPhee, repurposed as tiny planters for some hens-and-chicks and baby tears (don't succulents have the best names?). You can see these in the previous photo as well, on the headboard.


Shown here is the night stand vignette, also still in progress.


The night stand is the first piece of furniture my father's parents bought together after their wedding: a sewing machine table. Inside the hinged front panel is where Grandpa, an electrical engineer, attached the foot pedal to the wall of the cabinet so that Grandma could use her knee instead of her foot to operate the machine. This was probably VERY helpful with little kids around; I've discovered how much my kiddo likes to go after the pedal of my own sewing machine when it's sitting on the floor. Being able to keep it away from little hands while in use as well as when put away is pure genius.

The little spatterware pot is something I picked up at the Olde English Flea Market last weekend. Great for holding the watches and earrings of house guests. The book is the aforementioned Heedley, which is well-loved around here. The lamp is a piece of red cedar we kept from our old rental house when we left. The mister cut both ends flat and sanded off all potentially splintery or pokey parts, and I attached a lamp kit.


The search for the perfect shade has turned up this St. Vinnie's drum shade ($2.50). It's not quite right yet, but I'm still considering how to change it into something fabulous.


The window wall. The clock was on the wall for thirty+ years at the BookMark, the first bookstore to ever employ me. There used to be a large sign over it that read, helpfully, "CLOCK". I still have the sign somewhere, too. The barn star only looks old; it came from the craft store. The tin "Days o' Work" art is actually an antique chewing tobacco mold that came from the Salvation Army's local antique/vintage store, Tea & Crumpets. It's a regular old Salvation Army store now, but for awhile it held a pretty awesome collection of 1920s-1930s inlaid British wardrobes, old photographs, and glassware.


Our Ikea chair folds out into The World's Most Comfortable Cot. People have been sleeping on this in our living room or {former} office for years. Now it makes this room perfect for guests with kids. The corduroy pillow is a Fred Meyer clearance pillow (from six or eight years ago) that I tufted with some buttons. The coffee sack pillow is blogged here. The pillow covers on the seat of the chair were purchased with the bedspread (see bed photo) at Value Village. More about that in a minute.


One of my favorite collections, rediscovered in this room a couple of months ago, is my collection of vintage rackets and paddles. You can find these inexpensively at almost any thrift store, but one of these is my hubby's high school racket. Can you spot it? It's the one peeking up in the bottom left corner.


This is the first racket I ever bought, back in high school. The Salvation Army used to run a salvage store in my home town. Maybe they still do! You could buy clothing there by the pound, and I did. I think I paid a buck for the racket, too. Everything was way underpriced, even by thrift store standards. I later used the racket in a college tennis class, and the PE teacher thought it was awesome. Still strung tightly, with lots of bounce. The Scrabble letter sign (from a vintage 1970s set found at Value Village) takes on a double meaning when displayed with the rackets.


There are a million little details I'm still working on, and I'm saving the closet makeover for another post, but this should give you an idea how things are progressing. It's been so much fun arranging little treasures in here, and we've spent more time in this room in the past couple of months that we have in the past five years. It's been like increasing the size of our house by 10%, and we love it.


One last note, and a nicely lit bed view: The bedspread you see here came from Value Village, together with the two pillow covers you saw on the chair seat. They were a deep charcoal gray when I bought them. Too dark, I thought, for the room, but I liked the texture, and the size and price were right. So, despite knowing better from years of textile and surface design classes in college, I decided to try and fade the color with bleach.

Bleach doesn't just fade black. In fact, if you soak most black textiles in bleach, you'll get some variation of yellow, brown, or orange, not white. I ended up with a bedspread that was Beaver State orange. Over-dyeing with Black Velvet and Jeans Blue Dylon dye turned it chocolate brown. Not at all what I'd intended, but it'll do for now. Sometimes dye accidents aren't the end of the world. In this case, it goes nicely with the reproduction Swiss army blankets from Mills Fleet Farm.


There you go! Consider yourselves updated!