The guys are working on the big one as I type, but here are the two little ones! Happy Halloween!
Showing posts with label halloween. Show all posts
Thursday, October 31, 2013
homegrown jack o'lanterns
This is the sum total of our pumpkin crop from this year. The large one is about preschooler-head-sized, for size reference. The third from the left rotted out before we got the chance to carve it, so we had a total of three home-grown to carve this year.
The guys are working on the big one as I type, but here are the two little ones! Happy Halloween!
Saturday, October 12, 2013
fix it? oh yeah. like three or four times.
If you've been following along, you may have already seen the tutorials for my kiddo's Fix-it Felix hat and golden hammer. Today, we come to a project that had a couple of false starts. It is, so far, the part of his costume that has required the most fixing.
All I could do was laugh (maybe a little maniacally), wait a day, and start over.
And here is is, after the patch was ironed onto the freshly ironed shirt, looking totally legit, especially when paired up with the cap. I took this last photo outdoors, so the actual colors of everything come through.
You folks out there with embroidery machines might giggle a little at how much effort went into this little piece of the costume; trust me, I'm right there with you. I used to work as a machine embroidery operator, so I know that it would take maybe ten minutes to program the "design" and stitch this up on a machine.
I'm kind of glad, really, that I get to show how those of us currently without expensive equipment (embroidery machines, Silhouette cutters, sergers) can still pull off projects with a limited budget. I had the Heat n' Bond and the white felt in my stash already and the blue Friendly Felt was leftover from the hat patch, so I've only invested $2.19 in this completed shirt (including the nineteen cents I paid at the thrift store for some white embroidery floss). That's pretty awesome, right?
Okay: you can check out my hat tutorial and hammer tutorial in previous posts. Still to come: the tool belt, the jeans, and the boots (hint: start hitting up thrift stores for the jeans and boots). If you're following along for Halloween 2013, no worries! I'll have addressed everything by the end of next week.
* Update: glove tutorial here, and tool belt, jeans, and boots post here.
Thanks for reading!
p.s. you can make these photos larger just by clicking on them, but you probably already knew that, clever you.
Yes, the name patch. I started, as with the cap patch, by trying to use my machine's zig-zag stitch to "embroider" the name onto the Friendly Felt oval patch (having traced it on there with chalk). No dice. It looked pretty terrible. You don't get to have a photo.
I picked out the stitches and started over by hand, carefully satin stitching every letter. It took me a couple of hours to get it fairly perfect.
The reason you don't get a photo of that patch is that I decided to iron it before photographing. The iron was too hot. The patch melted to the iron in about 1.5 seconds, and by the time I was able to scrape it loose, it was a blackened jumble of melted plastic (Friendly Felt is made of recycled pop bottles; the polyester setting, not the cotton, is as high as your iron should go when working with this stuff).
Now that we've discussed what NOT to do, we can discuss what worked for me in the end. I cut an oval of the blue, stiffened Friendly Felt. Copying the look of Brush Script, I wrote the name "Felix" onto the felt using a washable marker. After using a chain stitch to embroider the name onto the felt using two strands of embroidery floss, I tied off the end and started satin stitching again to see if I still liked it.
Nope. Not this time. I pulled out the satin stitches and decided I actually liked the chain stitches better on their own. Which is nice for you, because if you're making one of these for your kiddo's shirt, the patch up to this point will take you less than an hour (mine took about 20 minutes, but I was highly motivated).
Again, I tried to rely on my sewing machine's zig-zag function to put a white border on the patch, but it was terrible so I cut it off, then backed the blue with a slightly larger oval of white un-stiffened felt and stitched it in place with a line of white stitches. Bam. Done.
Ooh! Let's take a minute to talk about the shirt, while we're at it! If you happen to have a short-sleeved light blue oxford laying around, you're golden. You can just stick your patch on there and you're done.
After much searching, I found a shirt that almost fit the bill at a thrift store for $2 . . . except that it had long sleeves. But that's an easy fix.
I laid a short sleeve shirt on top to trace the angle of the sleeves, then hemmed them on the machine.
It didn't take long at all.
I don't use this Heat n' Bond stuff for a lot of things, but I have previously used it for the Legend of Zelda patches for the kiddo's second birthday party, and I use it to attach the vinyl ends of my measuring tape growth charts.
Just follow package directions to attach the adhesive to the back of the patch using an iron (remember: POLYESTER SETTING ONLY), then peel the paper and iron it onto your shirt (I found that ironing from the back works best for this step, so work from the inside of your shirt).
You folks out there with embroidery machines might giggle a little at how much effort went into this little piece of the costume; trust me, I'm right there with you. I used to work as a machine embroidery operator, so I know that it would take maybe ten minutes to program the "design" and stitch this up on a machine.
I'm kind of glad, really, that I get to show how those of us currently without expensive equipment (embroidery machines, Silhouette cutters, sergers) can still pull off projects with a limited budget. I had the Heat n' Bond and the white felt in my stash already and the blue Friendly Felt was leftover from the hat patch, so I've only invested $2.19 in this completed shirt (including the nineteen cents I paid at the thrift store for some white embroidery floss). That's pretty awesome, right?
Okay: you can check out my hat tutorial and hammer tutorial in previous posts. Still to come: the tool belt, the jeans, and the boots (hint: start hitting up thrift stores for the jeans and boots). If you're following along for Halloween 2013, no worries! I'll have addressed everything by the end of next week.
* Update: glove tutorial here, and tool belt, jeans, and boots post here.
Thanks for reading!
p.s. you can make these photos larger just by clicking on them, but you probably already knew that, clever you.
Thursday, September 19, 2013
big fun for halloween
We were browsing the Halloween stuff at Target this week and ran across a fabulous display of costume wigs made of foam. It's pretty amazing stuff. Simple designs made of built up layers.
They look better in person and on Chris March's website than they do in my cell phone pics (I can sometimes get some nice shots outside, but everything gets washed out indoors). So after you take a look at the rest of these photos, pop over to Chris's site to see them in actual color.
I remembered Chris's work on Project Runway as soon as his site loaded up. The Big Fun collection is pretty much perfectly him.
If I had more space in my house I'd buy one; they're pretty reasonably priced (under $20). But there's no way I'd be able to throw it out after the holiday. I'd just want to keep it, and, well, with the Kermit and Fozzie heads from Halloween last year, the Wild Thing head from Halloween two years ago, and the birthday robot from the kiddo's birthday party all still hanging around, it's already looking a bit backstage 'round here.
So you, go forth and be my proxy. Add one to your Halloween get-up (it'll be way cooler than some faux-hair thing your cat will be coughing up bits of a week later). And then frame it or something, because each of these designs is pretty damn fantastic.
Thanks for reading!
p.s. no pay or perks, here; I just like cool things made from simple materials.
Wednesday, May 22, 2013
where the wild things are growing at an incredible rate
The Halloween before my kiddo turned two, he and the mister dressed up like this for Halloween:
Max in his wolf suit and his Wild Thing papa, from Where the Wild Things Are were a big hit at the library's Halloween story time that year. And the little Max costume was so soft and comfy and fun to wear that my kiddo didn't want to stop wearing it.
That was a year and a half ago. He was Max quite a bit in the months following Halloween . . . and then he got distracted, and wore it less and less frequently.
When I cleaned out his closet six months ago, coincidentally right around this most recent Halloween (we went as Muppets this year; he was Kermie), he excitedly pulled it out and wore it around the backyard like a hooded jacket because his legs wouldn't fit.
And he kept growing, and the next time he tried to put it on, his arms wouldn't fit either, so he wore it like a hooded cape. And then I wised up and pulled out the leftover fabric and the old pattern (for shape reference) and a shirt one size up (to use as a size reference) and stitched up a hoodie he'll be able to wear for another year or so. Luckily, the tail is a pin-on, and so we just transferred it from the old Max suit to the new Max hoodie.
Because childhood is too short, and Halloweens are too far in between, and because . . . reasons.
*****
And thanks for reading.
p.s. The original toddler-sized pattern has been removed from the Burda Style website; e-mail me or message in the comments below, and I can send you a PDF of my reworked, resized hoodie pattern (it's a 6-7 I'd estimate). If there's enough interest, I'll just post a tutorial.
Thursday, November 3, 2011
pinterest challenge — max + wild thing costumes!
Pinterest Challenge time, sponsored by the Young House Love blog and the Bower Power blog, joined this month by Ana White and Erin!
When it was time to get started on a Halloween costume for my kiddo this year, I started searching Pinterest and the web-at-large for a pattern or tutorial to make a copy of Max's wolf suit from the book Where the Wild Things Are. My search turned up this:
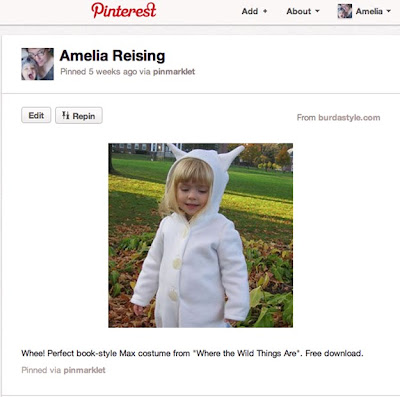
a free, downloadable BurdaStyle pattern in exactly the right size—2T. Thanks, SuzeB! I'm almost certain that the poor rating on this pattern isn't a reflection of the pattern itself (it all fit together just fine), but the result of dim bulbs like me trying to click on the bubbles to see other people's ratings, and thereby giving it a poor rating accidentally. The pattern is great. Here's my kiddo wearing it now, up to mischief of one kind and another, as the story goes.

I started with an ivory-colored, slightly stretchy, minky-feeling, polyester faux fur instead of the recommended polar fleece, because I don't really dig the way polar fleece pills after washing—even the "no-pill" kind. The lovely, bushy, furry tail is made from a quarter-yard remnant from JoAnn Fabrics.
Other alterations to the pattern: I made the hood very slightly deeper and made the front closure a velcro closure so that the sewn-on buttons are purely decorative (I like a quick-release one-piece costume for diaper emergencies). No need to get too in-depth on the alterations; SuzeB provides a nice tutorial on how to put the suit together. I just left off the front facings and folded over a narrow hem on the front edge, then stitched in the velcro. Easy peasy.

That's them at the library, right before Halloween story time. Which brings me to the other part of this costume: my husband's Wild Thing. Not something I'd planned on originally, but then I came across this:

while looking for a "quick" way to make a Wild Thing costume head. Hah!
The directions Seamster provides with his Instructable remind me of the way I crochet: intuitively. You see what you want the end result to look like, you get out some materials and a basic set of directions, and you interpret and innovate where necessary. Voila!
A couple of weeks later, you have this guy.

Now, a couple of people on the Instructable commented that they started this project mere days or hours before Halloween, and finished in plenty of time. I guess I forget sometimes how quickly things can get done when a person has all their evening hours free! For me, working a couple of hours a day a few times a week, it took a little longer than anticipated, which is how I ended up at the mall on Halloween in my Where the Wild Things Are t-shirt (or, as my husband called it, my "cloak of invisibility") instead of a matching costume. Never mind. The boys were instant celebrities.
We were sitting at the table, just like this

eating dinner in the food court and cooling off, and still had people coming up to compliment the costumes and take photos. While we were eating. Back off, paparazzi! I'm trying to eat my enchilada!
As for alterations to the Seamster's Instructable, I started with felt instead of polar fleece, this time for cost concerns as well as to make the Wild Thing have more of a Muppet-like appearance. The base is made as described here, except I enlisted my husband to cut it in a 18-inch diameter circle since his head is larger than a child's head.
I used 4 mm newsboard for the base, then, for the step in which I built up the hat base, I used cheaper, more flexible kraft board attached with tape and hot glue.
In the next step, in which I sewed the dome out of felt and attached it to the base, I followed the advice on measuring and cutting the fabric (felt, in my case), but the part about using trial and error stood out to me as being time-consuming . . . so I did this instead:

After stuffing the bubble with polyester fluff, I folded over the saggy parts and used a whipstitch to hold them down. I made sure to keep the whipstitching where I knew it would be out of sight under the Wild Thing's fur. It made a nice, relatively smooth dome shape, without having to rip the thing apart and re-machine sew + stuff a half-dozen times.
Since the whole thing is made out of felt, I also left off the step about stitching together a facade of felt for where the cheek lines would be, and used an alcohol-based marker to sketch those lines in instead.

I followed the instructions for shaping the nose and eyes from newspaper and masking tape (!) which are not materials I would ever have thought of using for this . . . kind of like dry paper mache. Once covered in felt, I was really impressed by how nice and smooth + solid the pieces turned out. I attached them as directed, accented around the eyes with the alcohol marker, then sewed the horns out of the same felt and stitched them on before beginning to hot glue the fur in place.
Next alteration? Instead of gluing down the teeth on top of the red mouth felt, I cut slits through the felt as I was attaching it so that I could poke the teeth up through the felt, concealing the little tabs. Because I have just a touch of the crafting OCD.

I finished the lower jaw mostly as directed, but I used a piece of foam pipe insulation instead of a 2-inch x 3/4-inch piece of foam. The curve presented some challenges, but in the end it looked pretty good, I think!

Here's one more of the boys in the wild (the kiddo's crown is something I sewed out of wool felt and dyed golden yellow):

Materials list:
Max's Wolf Suit
1 yard of 72-inch wide furry stuff (from JoAnn's with coupon)—$7.49
3 large plastic buttons (on-hand from Grandma's button box)—free
1 package bargain velcro (from JoAnn's)—99 cents
1/4-yard faux fur remnant (from JoAnn's)—$1.30
Wild Thing Head-Piece
1 30x48" sheet of 4 mm newsboard (from Oregon Art Supply)—$5.50 (with enough left over for a couple of other projects)
1 24x36" sheet of kraft brown tag board (from Paper Plus)—45 cents
1 9x12" yellow eco-felt rectangle (from JoAnn's, on sale)—25 cents
1 9x12" orange eco-felt rectangle (from JoAnn's, on sale)—25 cents
1 9x12" dark grey eco-felt rectangle (from JoAnn's, on sale)—25 cents (or use a scrap of something you have on-hand)
1/4-yard red 72-inch wide eco-felt (from JoAnn's, on sale)—75 cents
1 yard antique white 72-inch wide eco-felt (from JoAnn's, on sale)—$2.99
1/2-yard "Grizzly" black fur (from JoAnn's, on sale)—$5.10
elastic (on-hand)—free
masking tape (from Jerry's hardware store)—$2.29
20 extra-strength long glue gun sticks (from Jerry's hardware store)—$4.99
1 32-oz. bag polyester Fiber-Fill (from JoAnn's, with coupon)—$5.00
alcohol-based marker (on-hand)—free
Wild Thing Costume
1 heathered-red long-sleeved t-shirt (from Target, on sale)—$6.00
2 yards beige flannel (JoAnn's, on sale)—$4.78
acrylic paint (on-hand)—free
alcohol-based marker (on-hand)—free
(Other Pinterest inspiration posts: here, here, and here!)
(p.s. you can make these photos bigger by clicking on them . . . but you probably knew that!)
Pin It
When it was time to get started on a Halloween costume for my kiddo this year, I started searching Pinterest and the web-at-large for a pattern or tutorial to make a copy of Max's wolf suit from the book Where the Wild Things Are. My search turned up this:
a free, downloadable BurdaStyle pattern in exactly the right size—2T. Thanks, SuzeB! I'm almost certain that the poor rating on this pattern isn't a reflection of the pattern itself (it all fit together just fine), but the result of dim bulbs like me trying to click on the bubbles to see other people's ratings, and thereby giving it a poor rating accidentally. The pattern is great. Here's my kiddo wearing it now, up to mischief of one kind and another, as the story goes.

I started with an ivory-colored, slightly stretchy, minky-feeling, polyester faux fur instead of the recommended polar fleece, because I don't really dig the way polar fleece pills after washing—even the "no-pill" kind. The lovely, bushy, furry tail is made from a quarter-yard remnant from JoAnn Fabrics.
Other alterations to the pattern: I made the hood very slightly deeper and made the front closure a velcro closure so that the sewn-on buttons are purely decorative (I like a quick-release one-piece costume for diaper emergencies). No need to get too in-depth on the alterations; SuzeB provides a nice tutorial on how to put the suit together. I just left off the front facings and folded over a narrow hem on the front edge, then stitched in the velcro. Easy peasy.

That's them at the library, right before Halloween story time. Which brings me to the other part of this costume: my husband's Wild Thing. Not something I'd planned on originally, but then I came across this:
while looking for a "quick" way to make a Wild Thing costume head. Hah!
The directions Seamster provides with his Instructable remind me of the way I crochet: intuitively. You see what you want the end result to look like, you get out some materials and a basic set of directions, and you interpret and innovate where necessary. Voila!
A couple of weeks later, you have this guy.

Now, a couple of people on the Instructable commented that they started this project mere days or hours before Halloween, and finished in plenty of time. I guess I forget sometimes how quickly things can get done when a person has all their evening hours free! For me, working a couple of hours a day a few times a week, it took a little longer than anticipated, which is how I ended up at the mall on Halloween in my Where the Wild Things Are t-shirt (or, as my husband called it, my "cloak of invisibility") instead of a matching costume. Never mind. The boys were instant celebrities.
We were sitting at the table, just like this

eating dinner in the food court and cooling off, and still had people coming up to compliment the costumes and take photos. While we were eating. Back off, paparazzi! I'm trying to eat my enchilada!
As for alterations to the Seamster's Instructable, I started with felt instead of polar fleece, this time for cost concerns as well as to make the Wild Thing have more of a Muppet-like appearance. The base is made as described here, except I enlisted my husband to cut it in a 18-inch diameter circle since his head is larger than a child's head.
I used 4 mm newsboard for the base, then, for the step in which I built up the hat base, I used cheaper, more flexible kraft board attached with tape and hot glue.
In the next step, in which I sewed the dome out of felt and attached it to the base, I followed the advice on measuring and cutting the fabric (felt, in my case), but the part about using trial and error stood out to me as being time-consuming . . . so I did this instead:

After stuffing the bubble with polyester fluff, I folded over the saggy parts and used a whipstitch to hold them down. I made sure to keep the whipstitching where I knew it would be out of sight under the Wild Thing's fur. It made a nice, relatively smooth dome shape, without having to rip the thing apart and re-machine sew + stuff a half-dozen times.
Since the whole thing is made out of felt, I also left off the step about stitching together a facade of felt for where the cheek lines would be, and used an alcohol-based marker to sketch those lines in instead.

I followed the instructions for shaping the nose and eyes from newspaper and masking tape (!) which are not materials I would ever have thought of using for this . . . kind of like dry paper mache. Once covered in felt, I was really impressed by how nice and smooth + solid the pieces turned out. I attached them as directed, accented around the eyes with the alcohol marker, then sewed the horns out of the same felt and stitched them on before beginning to hot glue the fur in place.
Next alteration? Instead of gluing down the teeth on top of the red mouth felt, I cut slits through the felt as I was attaching it so that I could poke the teeth up through the felt, concealing the little tabs. Because I have just a touch of the crafting OCD.

I finished the lower jaw mostly as directed, but I used a piece of foam pipe insulation instead of a 2-inch x 3/4-inch piece of foam. The curve presented some challenges, but in the end it looked pretty good, I think!

Here's one more of the boys in the wild (the kiddo's crown is something I sewed out of wool felt and dyed golden yellow):

Materials list:
Max's Wolf Suit
1 yard of 72-inch wide furry stuff (from JoAnn's with coupon)—$7.49
3 large plastic buttons (on-hand from Grandma's button box)—free
1 package bargain velcro (from JoAnn's)—99 cents
1/4-yard faux fur remnant (from JoAnn's)—$1.30
Wild Thing Head-Piece
1 30x48" sheet of 4 mm newsboard (from Oregon Art Supply)—$5.50 (with enough left over for a couple of other projects)
1 24x36" sheet of kraft brown tag board (from Paper Plus)—45 cents
1 9x12" yellow eco-felt rectangle (from JoAnn's, on sale)—25 cents
1 9x12" orange eco-felt rectangle (from JoAnn's, on sale)—25 cents
1 9x12" dark grey eco-felt rectangle (from JoAnn's, on sale)—25 cents (or use a scrap of something you have on-hand)
1/4-yard red 72-inch wide eco-felt (from JoAnn's, on sale)—75 cents
1 yard antique white 72-inch wide eco-felt (from JoAnn's, on sale)—$2.99
1/2-yard "Grizzly" black fur (from JoAnn's, on sale)—$5.10
elastic (on-hand)—free
masking tape (from Jerry's hardware store)—$2.29
20 extra-strength long glue gun sticks (from Jerry's hardware store)—$4.99
1 32-oz. bag polyester Fiber-Fill (from JoAnn's, with coupon)—$5.00
alcohol-based marker (on-hand)—free
Wild Thing Costume
1 heathered-red long-sleeved t-shirt (from Target, on sale)—$6.00
2 yards beige flannel (JoAnn's, on sale)—$4.78
acrylic paint (on-hand)—free
alcohol-based marker (on-hand)—free
(Other Pinterest inspiration posts: here, here, and here!)
(p.s. you can make these photos bigger by clicking on them . . . but you probably knew that!)
Pin It
Subscribe to:
Posts (Atom)


