Showing posts with label toy. Show all posts

Thursday, July 10, 2014

orange creamsicle pendleton wool scrap bunny

I keep using wool from this box of blanket header I bought from the Pendleton Woolen Mill Store, but the box doesn't look any emptier. And I keep making bunnies out of it. And subjecting you to the photos.

This one's cream and orange bunny fur is charming enough without adding clothes, but she did get a red wool heart.


I keep making these buns (here and here, also) but I don't really have a barometer for whether they're as loveable as I think they are or not. I'm going to get ahead on my work one of these days (instead of playing Catch Up) and make a few for Etsy, but that day is not today.

Thanks for reading! And if you've received one of my bunnies lately, thanks for cuddling!

Monday, June 23, 2014

straw rockets!! (quick + easy, and so much fun)

You'll have to excuse me. I write maybe two posts a week, but I work on an average of three or four projects in that amount of time. Often more. Sometimes, projects like these straw rockets from February (February, for Pete's sake) get lost in the fray. It's a bit sad; there's a lot of good stuff in that stack of bypassed blog entries.


These are fun for birthdays any time of year (as party favors or as an activity), for Independence Day, or just because it's summer! If you keep back from trees (so none of the rockets get lost in the branches), they're super impressive at the park. Whose rocket can go the highest? Whose can go the furthest? Who can hit a target?

Materials needed:


• large diameter bubble tea or milkshake straws (you can make two rockets from each straw)
• smaller diameter milkshake straws or regular drink straws that can fit inside the larger straws (one per person, labeled with a piece of tape)
• staples + stapler
• washi tape
• scissors


To make:

The smaller straws (not pictured) are the "launchers". Each child will need his or her own, because the rockets are fired by blowing into the thinner straws. Label each with washi tape and a permanent pen to make sure you're not spreading germs.


Each larger straw will make two rockets. Cut one in half. If your straws have a sharp point, cut that off too, so no one gets injured.


Staple one end shut. (The launcher will fit into the other end.)


Use washi tape to make tips and fins, as shown. Trim into the right shape with scissors.


Repeat for each of your other stapled straw halves, until you have a nice assortment of rockets.


To fire:

Insert launch straw into open base of rocket.

Aim at target or up into the sky, and blow! Depending on the amount of force, these can blip up just a bit, or shoot ten feet in the air; it's all in how fast air moves through the launcher.

And there you have it: one perfectly good (no dust at all, I promise) project I meant to post four months ago. Have a good launch!


Linking up to:
Lou Lou Girls 
I Should Be Mopping the Floor

Sunday, May 4, 2014

pendleton blanket bunny


 I worked up a prototype bunny for a little friend's birthday, and I was pretty happy that my tinkering had such sweet results.


This is made with mill scraps from the Pendleton Woolen Mill here in Oregon.


After a couple of small changes, I hope to have a few of these cuties ready for my Etsy shop; I'll update here when that happens, so stay tuned or send me a little message if you'd like to be notified.


Have you been putting bits and pieces together to make anything cool lately? Leave me a link. I'd love to see it!


Thanks for reading.


Linking up to:

The Cottage Market 

My Repurposed Life 

Skip to My Lou 

LouLou Girls


Monday, April 7, 2014

mini art kit

A recent car trip highlighted the need to have various distractions for the kiddo in my bag at all times. I wanted a stash of compact little things to fit in there that won't add too much extra bulk, but will keep him entertained in a restaurant, in the back seat, or in a yurt during an overly rainy overnight trip to the beach. Not that I'm speaking from experience or anything.


An empty mint tin is a great way to organize a few art supplies, including a couple of those crayons that restaurants sometimes give out.

I also added a couple of short colored pencils, some neon posterboard cut to size, and a sheet of stickers sent to me as part of an advertisement. (Kids magazines sometimes send them out to tempt us to subscribe.)


When cutting the posterboard, I made sure to leave an inch of space at the end and a textured edge to make it easier to remove from the box.


And there is is! A mini art kit perfect for stashing in your bag, next to a Hot Wheels car and a travel-sized packet of Play Doh.

I know it's really the Boy Scout motto, but I think I'm going to adopt "Be Prepared" as my own.

Thanks for reading!

Thursday, March 20, 2014

doll cradle + bedding

Donated to the silent auction at the kiddo's school:


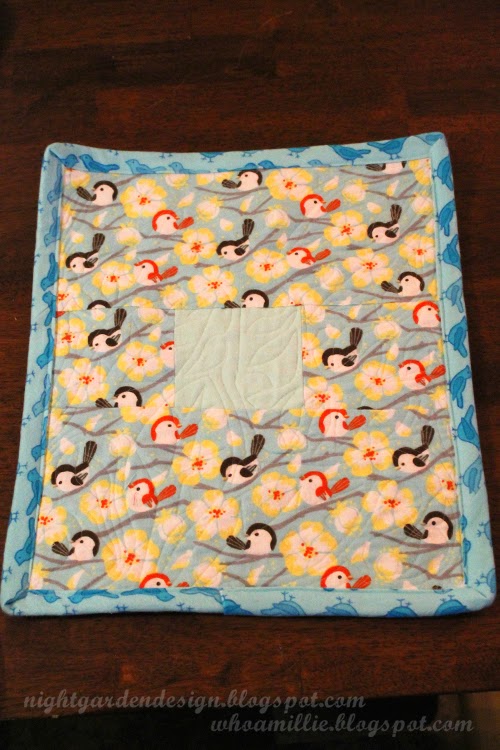
 Birds & Branches flannel doll quilt


Tufted flannel mattress


Pillow and pillowcase


Refinished vintage cradle with leather insets


Yay! It sold!

You can see a previous vintage doll cradle project here. I might make this an annual thing. ;)

p.s. want to see some more detail? click a photo to see a larger version.

Sunday, September 29, 2013

fix-it felix golden hammer

Because I won't hand a three-year-old a hammer spray-painted gold, I had to come up with another idea for the kiddo's Halloween costume hammer.


I could have used a regular toy hammer and spray painted that gold, but I thought something scaled a little more cartoonishly large would be fitting for Fix-It Felix.

I used a 90-cent piece of foam pipe insulation from the hardware store (it's sold in six-foot lengths), a piece of doweling that fit the space in the center, and some duct tape in regular and gold colors.


The handle is cut from an 18-inch piece, with an 8-inch top and two 1.5-inch pieces for the hammerhead.


I used an 18-inch dowel to connect the pieces.


The two pieces of the hammer head fit around the end.


Here's another photo to help illustrate how they fit (some trimming will be necessary to help them fit exactly).


 Then I trimmed the other end to make it look more like a hammer. The bits I cut off were used to fill the hollow spaces at the end of the handle and the hammerhead.


I secured all of the parts together with a layer of standard duct tape. Kids are kinda rough on stuff, so I made sure everything was extra sturdy.


Finally, a decorative layer of shiny gold duct tape to make it shine!


And there you have it! A perfect Fix-It Felix hammer.


You can click here to see how I made a Fix-It Felix cap for the kiddo's costume and here for a tutorial on the shirt and patch . . . and of course, here for my post on Felix's tool belt, pants, and boots. Thanks for reading!


Saturday, July 28, 2012

a doll cradle for a birthday girl

Aack. You'll have to forgive me; I neglected to take a before shot. I got this doll cradle home and started work on it that same evening, when the dark made it impossible to get decent photographs.

We discovered it at a resale store a couple of miles from our house, actually left it behind, and then returned and picked it up when I couldn't stop thinking about it. It was too sweet to leave behind.

Here's the cradle the kiddo and I found, after being scrubbed clean, rubbed with butcher block oil (food-safe, therefore baby-safe), and repaired, with new hardware in a couple of spots.


I also added on these little wooden bird cutouts (painted turquoise, then glued and nailed in place) to cover some places that needed covering.

The old screw eye holes didn't hold the hardware in place tightly enough, and the cradle basket scraped on the bottom support board, so I drilled new, lower holes and filled/covered the old ones. The bluebirds cover the places on the inside where the screw eyes had begun to poke through.


One end of the cradle, so you can see the side supports. U bolts on the side supports connect with screw eyes on the cradle basket to make the cradle rock; I replaced the nuts with cap nuts (also called "acorn nuts") to make them a little safer and prettier.


With the bluebird flannel mattress in place. I pulled sweet fabrics from my stash to make the bedding feminine but not overtly girly (no pink here!).


With the "Celebrations" fabric pillowcase covering the green pillow. (The fabric features butterflies, frogs in party hats, happy women and girls in birthday cake hats, etc. Click to zoom.)


The little doll quilt incorporates all three fabrics: celebrations on the front, green on the back, with bluebirds for binding.


The cradle and bedding set were given to my kiddo's little friend as a birthday gift this afternoon, and for such a simple gift, it was a big hit. Happy birthday, cutie! I hope every one is just as happy as this one.


p.s. you can make these photos larger just by clicking on them, but you probably already knew that.


Linking up to:

Simple Design's Thrift Haul
Mop it Up Mondays
Thrift Share Monday
So You Think You're Crafty's I'm Crafty party
My RePurposed Life's Catch as Catch Can