If I was in the market for a dining solution, one of these hip yellow mid-century foldable diner dinettes would have fit the bill.
Double so because of the price tag. Seating for four for $75? This would be so awesome in a small eat-in kitchen like mine.
They had several of these out at Bring this week; not sure how many are left, but I snapped these photos earlier today, so maybe if you were to call them up first thing in the morning . . .
Me, I have a too-large dining room table filling up my space. Today I was pining for one of these. What's in your dining room?
(p.s. you can make these photos bigger by clicking on them . . . but you probably knew that!)
Sunday, May 6, 2012
Saturday, May 5, 2012
how does your garden grow?
Back when I published this post about our backyard patio project last summer, I mentioned the new garden bed. We built the bed by piling up the dirt excavated from the patio area, and outlining the area with cement landscaping blocks.
I hadn't taken any photos of the area because I considered it to be unfinished; luckily, the mister decided to take some photos of his own, because in retrospect, the new garden beds are pretty attractive, I think. Even unfinished. (All of these photos are from last summer.)
Of course, now they could use a good weeding, but last year's plants are coming back, which makes me incredibly happy. I bought most of them as end-of-summer clearance last September. Cannas, dahlias, foxgloves, heather, etc. . . . I don't think I paid more than six bucks for any of them. And I'm pretty sure the three heather plants cost under a dollar each. (I wish I could remember the name of the bright red stems there . . . )
The chair is part of a matching set of cedar Adirondack chairs I painted pool blue last summer. The birdhouses (also cedar) were painted to match. Black Russian tomatoes fill that pot in the foreground. This summer, it'll be garlic and beans instead.
So that's the beginning! There are about $150 worth of cement landscape blocks in this project, another $100 in plants. The little path was made using pavers from the old patio, so those were free this time around, as was what mulch you can see in the photos (branches and clippings chopped up in a wood chipper). Not a bad deal for something so transformative.
I'll post some more photos this spring and summer as things progress; a major weeding is in order, and some mulch for sure, but I'll wait and see whether any plants need to be added, moved, or replaced. So . . . what's going on in your yard this spring?
(p.s. you can make these photos bigger by clicking on them . . . but you probably knew that!)
I hadn't taken any photos of the area because I considered it to be unfinished; luckily, the mister decided to take some photos of his own, because in retrospect, the new garden beds are pretty attractive, I think. Even unfinished. (All of these photos are from last summer.)
Of course, now they could use a good weeding, but last year's plants are coming back, which makes me incredibly happy. I bought most of them as end-of-summer clearance last September. Cannas, dahlias, foxgloves, heather, etc. . . . I don't think I paid more than six bucks for any of them. And I'm pretty sure the three heather plants cost under a dollar each. (I wish I could remember the name of the bright red stems there . . . )
The chair is part of a matching set of cedar Adirondack chairs I painted pool blue last summer. The birdhouses (also cedar) were painted to match. Black Russian tomatoes fill that pot in the foreground. This summer, it'll be garlic and beans instead.
So that's the beginning! There are about $150 worth of cement landscape blocks in this project, another $100 in plants. The little path was made using pavers from the old patio, so those were free this time around, as was what mulch you can see in the photos (branches and clippings chopped up in a wood chipper). Not a bad deal for something so transformative.
I'll post some more photos this spring and summer as things progress; a major weeding is in order, and some mulch for sure, but I'll wait and see whether any plants need to be added, moved, or replaced. So . . . what's going on in your yard this spring?
(p.s. you can make these photos bigger by clicking on them . . . but you probably knew that!)
Friday, May 4, 2012
flannel projects - - part two : monkey crib sheet and pillowcase
Next up from this pile of fun flannel prints
is this little set of crib sheet + pillowcase made from a monkey/bicycle print flannel from Joann Fabrics.
I discovered about a year-and-a-half ago how easy it is to make fitted crib sheets. That was about the same time I discovered how hard it is to find flannel ones. Our house can be a little chilly in the winter, and at the time, my kiddo was too young to sleep with a blanket. Flannel crib sheets were at the top of my "must-have" list.
Basically, you take a two-yard long piece of 42" wide fabric and cut 8" squares off the corners. Then sew up the cut edges, hem, and add elastic. Go here for the illustrated tutorial from Michael Miller Fabrics that I used to make this one:
Pillowcases are pretty much a cinch, too.
My kiddo's too little to use a pillow in his crib yet, but eventually the crib will convert to a toddler bed and the pillow (and pillowcase) will see lots of good use.
In the meantime, I just keep busting out cute cases in preparation.
Here's the pillowcase tute from Film in the Fridge. It takes about a yard of 42" fabric to make a standard-size case.
Want to see more? Here's Flannel Projects -- Part One featuring the flannel pouf I made from a cute owl print.
(p.s. you can make these photos bigger by clicking on them . . . but you probably knew that!)
is this little set of crib sheet + pillowcase made from a monkey/bicycle print flannel from Joann Fabrics.
I discovered about a year-and-a-half ago how easy it is to make fitted crib sheets. That was about the same time I discovered how hard it is to find flannel ones. Our house can be a little chilly in the winter, and at the time, my kiddo was too young to sleep with a blanket. Flannel crib sheets were at the top of my "must-have" list.
Basically, you take a two-yard long piece of 42" wide fabric and cut 8" squares off the corners. Then sew up the cut edges, hem, and add elastic. Go here for the illustrated tutorial from Michael Miller Fabrics that I used to make this one:
Pillowcases are pretty much a cinch, too.
My kiddo's too little to use a pillow in his crib yet, but eventually the crib will convert to a toddler bed and the pillow (and pillowcase) will see lots of good use.
In the meantime, I just keep busting out cute cases in preparation.
Here's the pillowcase tute from Film in the Fridge. It takes about a yard of 42" fabric to make a standard-size case.
Want to see more? Here's Flannel Projects -- Part One featuring the flannel pouf I made from a cute owl print.
(p.s. you can make these photos bigger by clicking on them . . . but you probably knew that!)
Labels:
baby,
crib,
flannel,
gift,
how-to,
pattern,
pillowcase,
pillowcases,
sheet,
sheets,
shower,
tutorial
Thursday, May 3, 2012
better already
Changes since the last post: six old red/orange lanterns removed; two new white lanterns hung; placement of the large lantern has changed; orange wall primed with first coat of zero VOC primer.
The kiddo saw the area for the first time after his nap today and declared it a window. Right on.
(p.s. you can make these photos bigger by clicking on them . . . but you probably knew that!)
Labels:
anthropologie,
baking,
chinese,
Cupcake,
cups,
design,
lantern,
lanterns,
liner,
paper,
sponge
Tuesday, May 1, 2012
another paper lighting fixture
Yes, I make a lot of lighting fixtures: ReadyMade magazine and I can't seem to get enough of them. And while this one turned out really well (thanks to a DesignSponge tutorial), I'm a little unsure about it.
I read the tutorial on DesignSponge awhile back (based on this $898 light from Anthropologie)and pinned it to one of my Pinterest boards, but didn't really move on it. See, we have seven paper lanterns at present in the corner of our living room. And I've always kind of dug them, aside from the ugly cord messing up the view.
But closer inspection reveals that they're on their way out. There are small tears in the tissue paper here and there. There's some fading in spots. So, while I like them, it was time for a change.
I did things just a little differently; instead of white cupcake papers and patterned candy cups, I used the opposite. And I glued the candy papers into the cupcake papers before attaching them to the lantern to streamline the process a bit.
Here's how it looked when I was a little ways into the assembly:
It took a couple of hours, and here's what came out at the end:
Okay, it's growing on me. Especially in close-up.
The patterned liners are by Reynolds; a blue and grey starburst pattern in their line of Party Baking Cups.
But it does dim things down a bit, and it's pretty clear that the other lanterns need to go. Since I'm in the process of getting rid of the orange walls, the bright colored lanterns are a bit of a deal breaker (in addition to the aforementioned rips and tears). So I guess this is still a work in progress, which I'll update you on eventually. In the meantime, what do you think? Does it make the cut?
(p.s. other versions of this project can be found here, here, and here. there's a whole wide world of internet out there!)
(p.s. you can make these photos bigger by clicking on them . . . but you probably knew that!)
Linking up to:


I read the tutorial on DesignSponge awhile back (based on this $898 light from Anthropologie)and pinned it to one of my Pinterest boards, but didn't really move on it. See, we have seven paper lanterns at present in the corner of our living room. And I've always kind of dug them, aside from the ugly cord messing up the view.
But closer inspection reveals that they're on their way out. There are small tears in the tissue paper here and there. There's some fading in spots. So, while I like them, it was time for a change.
I did things just a little differently; instead of white cupcake papers and patterned candy cups, I used the opposite. And I glued the candy papers into the cupcake papers before attaching them to the lantern to streamline the process a bit.
Here's how it looked when I was a little ways into the assembly:
It took a couple of hours, and here's what came out at the end:
Okay, it's growing on me. Especially in close-up.
The patterned liners are by Reynolds; a blue and grey starburst pattern in their line of Party Baking Cups.
But it does dim things down a bit, and it's pretty clear that the other lanterns need to go. Since I'm in the process of getting rid of the orange walls, the bright colored lanterns are a bit of a deal breaker (in addition to the aforementioned rips and tears). So I guess this is still a work in progress, which I'll update you on eventually. In the meantime, what do you think? Does it make the cut?
(p.s. other versions of this project can be found here, here, and here. there's a whole wide world of internet out there!)
(p.s. you can make these photos bigger by clicking on them . . . but you probably knew that!)
Linking up to:
Labels:
anthropologie,
Cupcake,
design,
designsponge,
DIY,
fixture,
glue,
hot,
lantern,
light,
liner,
paper,
sponge
Friday, April 27, 2012
bedspring trellis + shipping crate planters
Here's a little story about a project using recycled materials and inspiration from Bring.
You might remember that the last time I wrote about Bring, some of the items I'd considered bringing home were these beat up old shipping crates, which I imagined would be awesome as movie props.
You might further remember that they were free, which made them a pretty good deal, considering that the hinges and handles cost a couple of bucks apiece at the hardware store. Since I was in the market for some gate hinges anyway, I ended up going back and picking up a couple of the crates after all. In the end, I needed a couple of planters for a little area of my yard that's been neglected.
Why, here's that neglected area of the yard right now! It is terrible. Weeds, chain link fencing (I hate chain link fencing), old windows leaning against the carport . . .
And here it is, looking better already, after I removed the chain link from the front, weeded (you can see my yard waste bin filled to the brim in the foreground), and put two treated fence posts in place.
Your next question might be, "Why do you need posts for planters?" Well, I don't. But since I took down the chain link fencing and planned to use the alley space to store my recycling cans, I wanted to put in a recycled trellis and some vines to keep that area of our yard private and somewhat secure. So I moved back the fence line about six feet, and used our post-hole digger to dig two post holes about 18 inches deep. Luckily, the ground was soft from recent rains, so digging only took an hour or so during the kiddo's nap time. Then I put the treated timbers into the holes. (I used treated timbers to help prevent damage from rot and termites.)
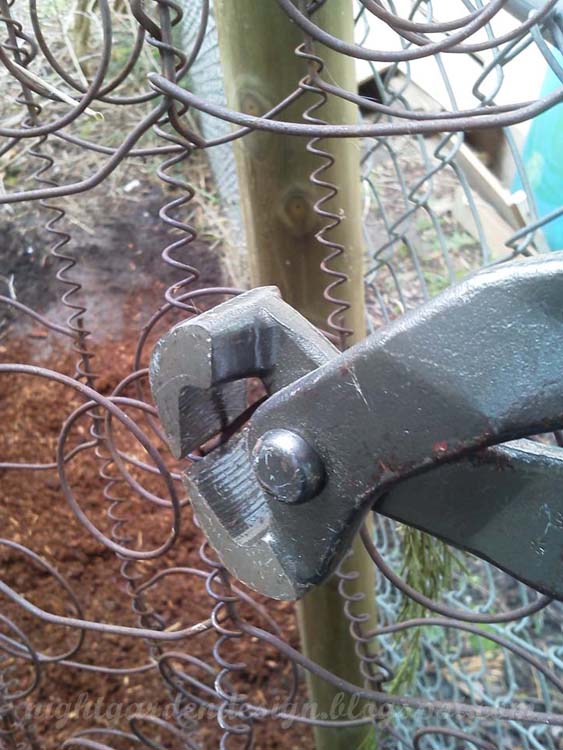
Next, I used my handy-dandy heavy duty wire cutters (which I also used to remove the chain link) to trim down my bed spring. Yes, I said bed spring. I've had this sucker sitting around for awhile, another inspiration from Bring, where they use them as trellises, and sell them for that purpose, too.
Then I used zip ties to temporarily attach the bedspring to the fence timbers. The posts sandwiched perfectly between the outer edges of the springs.
Here's what it looked like, temporarily held in place by zip ties. This is a good way to make sure your posts stay the right distance apart before you permanently set them in place . . .
. . . using Sakrete. I used one-and-a-half 60-pound sacks. Since the ground was already wet, I just poured the dry concrete into the holes and added a little water to the top. Then I let them set for a couple of days, so that I wouldn't upset them if they got bumped or knocked around.
Getting back to the crates, here they are in front of the trellis-in-progress. Looking funky and old.
I had my husband remove the lids for me. We set those aside so I could take the hinges off later for my gate project.
Then, I drilled some holes in the bottom for drainage.
This isn't the best picture, but it shows five holes in the middle and three holes along each edge of the bottom of the crate, drilled with a 1/2-inch drill bit.
Then I took off the remaining bits of box labels and staples, and hit the outsides of the crates with a palm sander. You can tell the one on the left has been sanded, while the one on the right still needs a little 60 grit.
Late last year, I picked up this free sample jar of Arborcoat in a cedar color, using a coupon off of Benjamin Moore's Facebook page. It's good stuff for exterior areas; I used it to coat the benches of our picnic table, but primed the top to receive paint; the primer, this spring, is all peeling, but the Arborcoat held up to a fall, winter, and early spring of heavy rains. Anyway, I had some leftover, so I used it on these planters.
First coat.
Second coat.
Here they are in place, stained and ready to fill. They sat overnight to let the stain set.
I had a plant pot full of pea gravel from a bottle tree I got rid of, so I used the now-recycled pea gravel to fill in the bottoms of the planters to aid in drainage.
I added dirt, evergreen clematis vines, and bark mulch. You might notice something else is different, too!
In those earlier shots that there are some big old windows leaning at an angle against the side of the carport, behind the trellis. Here, I'll show you an earlier shot so you don't have to scroll back.
BEFORE:
AFTER:
Luckily, I hadn't wired the bedspring in place yet, so I just clipped the zip ties on one side and pivoted the trellis out of the way while I dragged the old windows out of the alley and into the driveway.
A couple of caveats: because I don't know what, exactly, was shipped in those crates (or whether they'd been treated with anything), I decided it was safest not to plant food plants in them. The evergreen clematis was specially selected for it's climbing habit, but also because it can take part sun/part shade and remains green all year long (unlike regular clematis, which dies off in winter).
I also ended up digging out some space beneath the planters to put in some old pavers we had leftover from tearing out the broken fireplace. This was because, when I moved the old windows, the frames had begun to rot and there was some insect damage, and I really didn't want my planters meeting a similar fate. It's best to keep wood off of the ground.
Thanks for dropping by! I'd love to see your recycled projects, too! Give me a link in the comments section if you have something to share.
(p.s. you can make these photos bigger by clicking on them . . . but you probably knew that!)
Linking up to:

You might remember that the last time I wrote about Bring, some of the items I'd considered bringing home were these beat up old shipping crates, which I imagined would be awesome as movie props.
You might further remember that they were free, which made them a pretty good deal, considering that the hinges and handles cost a couple of bucks apiece at the hardware store. Since I was in the market for some gate hinges anyway, I ended up going back and picking up a couple of the crates after all. In the end, I needed a couple of planters for a little area of my yard that's been neglected.
Why, here's that neglected area of the yard right now! It is terrible. Weeds, chain link fencing (I hate chain link fencing), old windows leaning against the carport . . .
And here it is, looking better already, after I removed the chain link from the front, weeded (you can see my yard waste bin filled to the brim in the foreground), and put two treated fence posts in place.
Your next question might be, "Why do you need posts for planters?" Well, I don't. But since I took down the chain link fencing and planned to use the alley space to store my recycling cans, I wanted to put in a recycled trellis and some vines to keep that area of our yard private and somewhat secure. So I moved back the fence line about six feet, and used our post-hole digger to dig two post holes about 18 inches deep. Luckily, the ground was soft from recent rains, so digging only took an hour or so during the kiddo's nap time. Then I put the treated timbers into the holes. (I used treated timbers to help prevent damage from rot and termites.)
Next, I used my handy-dandy heavy duty wire cutters (which I also used to remove the chain link) to trim down my bed spring. Yes, I said bed spring. I've had this sucker sitting around for awhile, another inspiration from Bring, where they use them as trellises, and sell them for that purpose, too.
Then I used zip ties to temporarily attach the bedspring to the fence timbers. The posts sandwiched perfectly between the outer edges of the springs.
Here's what it looked like, temporarily held in place by zip ties. This is a good way to make sure your posts stay the right distance apart before you permanently set them in place . . .
. . . using Sakrete. I used one-and-a-half 60-pound sacks. Since the ground was already wet, I just poured the dry concrete into the holes and added a little water to the top. Then I let them set for a couple of days, so that I wouldn't upset them if they got bumped or knocked around.
Getting back to the crates, here they are in front of the trellis-in-progress. Looking funky and old.
I had my husband remove the lids for me. We set those aside so I could take the hinges off later for my gate project.
Then, I drilled some holes in the bottom for drainage.
This isn't the best picture, but it shows five holes in the middle and three holes along each edge of the bottom of the crate, drilled with a 1/2-inch drill bit.
Then I took off the remaining bits of box labels and staples, and hit the outsides of the crates with a palm sander. You can tell the one on the left has been sanded, while the one on the right still needs a little 60 grit.
Late last year, I picked up this free sample jar of Arborcoat in a cedar color, using a coupon off of Benjamin Moore's Facebook page. It's good stuff for exterior areas; I used it to coat the benches of our picnic table, but primed the top to receive paint; the primer, this spring, is all peeling, but the Arborcoat held up to a fall, winter, and early spring of heavy rains. Anyway, I had some leftover, so I used it on these planters.
First coat.
Second coat.
Here they are in place, stained and ready to fill. They sat overnight to let the stain set.
I had a plant pot full of pea gravel from a bottle tree I got rid of, so I used the now-recycled pea gravel to fill in the bottoms of the planters to aid in drainage.
I added dirt, evergreen clematis vines, and bark mulch. You might notice something else is different, too!
In those earlier shots that there are some big old windows leaning at an angle against the side of the carport, behind the trellis. Here, I'll show you an earlier shot so you don't have to scroll back.
BEFORE:
AFTER:
Luckily, I hadn't wired the bedspring in place yet, so I just clipped the zip ties on one side and pivoted the trellis out of the way while I dragged the old windows out of the alley and into the driveway.
A couple of caveats: because I don't know what, exactly, was shipped in those crates (or whether they'd been treated with anything), I decided it was safest not to plant food plants in them. The evergreen clematis was specially selected for it's climbing habit, but also because it can take part sun/part shade and remains green all year long (unlike regular clematis, which dies off in winter).
I also ended up digging out some space beneath the planters to put in some old pavers we had leftover from tearing out the broken fireplace. This was because, when I moved the old windows, the frames had begun to rot and there was some insect damage, and I really didn't want my planters meeting a similar fate. It's best to keep wood off of the ground.
Thanks for dropping by! I'd love to see your recycled projects, too! Give me a link in the comments section if you have something to share.
(p.s. you can make these photos bigger by clicking on them . . . but you probably knew that!)
Linking up to:
Monday, April 23, 2012
flannel projects - - part one : floor pouf
I always seem to have a few patterns of flannel laying around, partly because I bought a bunch when I was making cloth diapers before the kiddo was born, and partly because I bought some more when I figured out how to make flannel crib sheets (coming up in a future post).
This project, however, uses the owl print flannel that my aunt used to wrap up Little Owl Lost for the little guy's birthday this year. My aunt is a long-time recycler who often uses fabric to wrap gifts (and often gives books. Yay!).
All of the fabrics pictured in the first photo are from Joann Fabrics; I'm having difficulty finding the owl fabric on-line, though, so it might be a discontinued print. Really, you can use almost any fabric for this project, from flannel to upholstery fabric to suede, depending on what you have on-hand.
I decided to make a floor pouf after seeing Sherry over at Young House Love make one based on this tutorial from Living with Punks. And I have to say, it was just as quick and easy as it looked, including the piping!
Now, I should mention, I've had limited adventures with piping in the past. But having the how-to spelled out for me made it look kind of awesome, I think.
We skipped the handle since cotton flannel is kind of a thin fabric, prone to tearing when rough-handled. I'd rather the kiddo pick the whole thing up to move it, and the pouf is light enough that the lack of handle isn't an issue.
And there you have it! One cute owl pouf made from gift-wrap flannel. The kiddo likes to tackle it, but it also makes a great stool, pillow, and foot rest.
Takes about an hour and a half from start to finish, and since I made ours about 24 inches across and about twelve inches tall, it took about two yards of 42-inch flannel to make.
I'd love to see if you tackle thispouf project too! Link in the comments if you want to share photos.
(p.s. you can make these photos bigger by clicking on them . . . but you probably knew that!)
This project, however, uses the owl print flannel that my aunt used to wrap up Little Owl Lost for the little guy's birthday this year. My aunt is a long-time recycler who often uses fabric to wrap gifts (and often gives books. Yay!).
All of the fabrics pictured in the first photo are from Joann Fabrics; I'm having difficulty finding the owl fabric on-line, though, so it might be a discontinued print. Really, you can use almost any fabric for this project, from flannel to upholstery fabric to suede, depending on what you have on-hand.
I decided to make a floor pouf after seeing Sherry over at Young House Love make one based on this tutorial from Living with Punks. And I have to say, it was just as quick and easy as it looked, including the piping!
Now, I should mention, I've had limited adventures with piping in the past. But having the how-to spelled out for me made it look kind of awesome, I think.
We skipped the handle since cotton flannel is kind of a thin fabric, prone to tearing when rough-handled. I'd rather the kiddo pick the whole thing up to move it, and the pouf is light enough that the lack of handle isn't an issue.
And there you have it! One cute owl pouf made from gift-wrap flannel. The kiddo likes to tackle it, but it also makes a great stool, pillow, and foot rest.
Takes about an hour and a half from start to finish, and since I made ours about 24 inches across and about twelve inches tall, it took about two yards of 42-inch flannel to make.
I'd love to see if you tackle this
(p.s. you can make these photos bigger by clicking on them . . . but you probably knew that!)
Subscribe to:
Posts (Atom)