Tuesday, October 18, 2011

wonderland part 8 — summer 2010

In which the blogger adds a glut of photos never-before-shared from the Roving Park Players production of Alice in Wonderland, summer 2010.

I wish I had taken more photos of a bunch of this stuff; in the time crunch leading up to the production, I didn't pause often enough to take photos of completed projects. I'm regretting it now, because some of the props and costumes really did turn out beautifully. Also, it's my policy not to publish photos of other people's children to the blog without permission, and since most of the cast was under age 18, I can't currently show many photos of finished costumes. Here's a link, though, to the Roving Park Players website, where you can see a few more photos of some of the costumes and props we all made, including a turtle shell from a garbage can lid, several nifty pairs of animal ears, the Queen of Hearts' laboriously constructed beauty of a dress, and Alice's dress, stitched from a button down shirt and some white muslin by Stacie W (who actually did a whole lot of really nice sewing on several of the kids' costumes).

Here we have wo different horse heads I made of foam, spray paint, faux fur and plastic animal eyes. These were worn on top of the girls' heads like hats. The foam, purchased in sheet form, has one side with a smooth "skin" on it, which is the side I spray painted.


This next set are images of the Queen of Hearts' deck of cards tabbards. I cut a large stencil from waterproof poster board for the card backs, based on a drawing of the red queen from the original publication of Alice. I applied the stencil to some plain painters' canvas (drop cloths = cheap!) using red spray paint. The fronts are hand-appliqued felt that Lisa S-B painstakingly stitched onto separate sheets of canvas.


The tree in the garden was portrayed by an actor in brown clothing. His canopy is something I made from an old umbrella. Using several shades and coats of spray, I stenciled several different kinds of real leaves onto the umbrella to make an easy-to-transport tree canopy.


These next shots show two pocket watches (one for the Mad Hatter, and one for the White Rabbit) in the early stages. These are Trader Joe's chocolate tins with little plastic windows (still taped off, in these photos). I drilled holes and attached hook-eyes for chain attachment, then spray painted the tins using a hammered metal and antique bronze spray. You can see what a nice texture the hammered metal gives the watches, while nicely hiding text, scratches, and dents. I later filled the tins with all sorts of gears and watch hands and charms, and attached them with some simple hardware chain.


You can see here, across the Mad Hatter's vest near the bottom, the chain of his watch. The coat is the same one I made for Captain Hook in the previous season's production of Peter Pan (and it was used this past summer as the Wizard's coat in The Wizard of Oz. I can't wait to see where it turns up next!).


This is a first sketch of Frog's outfit. The pants ended up being made from a striped thrift store sheet, and the actress portraying the frog stitched up her own vest from some other sheet fabric leftover from the Caterpillar's coat. Oh Rosalie! I wish I had a photo of you in your wonderful costume!


Caterpillar's fez, made of a buckram base I stitched together, then handed off to Lisa S-B, who did an amazing job covering it in felt and trim.


Caterpillar's coat, which the actor really liked. The volunteer who stitched this together for him, Miss Phoebe, hadn't previously tackled such a complicated pattern. I was SO PROUD though, of the way she stuck with it and eventually finished it. It turned out so beautifully, and really does credit to the character of the Caterpillar.


The actress to the left there is not Phoebe; it's actually the beautiful and talented Misty, trying on her costume for the Red Queen. Here's a better shot of her costume during a performance. The dress is one I thrifted, with a skirt I altered to Misty's preference. I also added a sash at the waist and a scarf/capelet thing to the back. Her felt hat was commissioned by the director from an artist whose name I'm afraid I don't know.


Here we have the wire frame for the Queen of Hearts' crown. I made it from twisted floral wire . . .


. . . then covered the wire with one layer of white, then several layers of red and yellow tissue paper soaked in Elmer's glue.


The result is an inexpensive (under $2) lightweight crown that catches light beautifully, though it may be considered a bit fragile for normal wear-and-tear. I admit I was led more by aesthetic and budget than practicality on this project; though it lasted the length of the show's run, the heart ornaments at the top required careful handling. Overworked wire has a tendency to break.


I think I might have shown these before; Phoebe made several pairs of ears for this production from a tutorial over at Threadbanger, and some furry felt (awesomely useful stuff we also used for the animal mitts and various other projects) These ears belonged to the March Hare.


And one of the Tweedle's hats, hand appliqued by Lisa. I loved the way these looked with the boys' striped shirts onstage.


Again, I'm so wishing I had better photographs! Though I'm currently retired from the theater, if I were ever to work another show I'd certainly take more photographs of everything.

Thanks again to the Volunteer Fabrication Department who helped put together a bunch of props and costumes. If you're the parent of one of the child actors from Alice and you'd be okay with me publishing a few photos from the production, please get in touch! And if you're a costumer or props person who'd like a little more info on how we fabricated some of this delightful stuff, I'd be more than happy to give you some info. Shoot me an e-mail or leave a comment below!


(p.s. you can make these photos bigger by clicking on them . . . but you probably knew that!)


Pin It

Sunday, October 2, 2011

free printable letterpress - style poster

I made this to put in my kiddo's room, and decided to share the love! Feel free to print for personal use. (conditions appear after the jpgs)


If you post on your blog, please link back to me and give credit. Selling electronic files or prints of this design is prohibited. Basically, be fair, be honest, respect others' work!


(p.s. you can make these photos bigger by clicking on them . . . but you probably knew that!)


Pin It

Saturday, September 17, 2011

printing onesies with vintage wooden type

I'm 99% sure this will stay secret from the intended recipient here, but just in case, if you're related to me and expecting a baby, this is your first and only spoiler alert.


Is she gone? Great! Then here's the low-down.

I have a collection of vintage and antique wooden type blocks that I pull out for letterpress projects now and again. I wanted to print some onesies for a new family member, so I pulled out a box of type . . .


and printed these up, with some hand-painted accents.


Of course, this one is all hand-painted.


A fun afternoon project you can pull off during naptime!


(p.s. you can make these photos bigger by clicking on them . . . but you probably knew that!)


Pin It


Thursday, September 15, 2011

new coupon code for night garden etsy shops!

I'll be adding a ton of new stuff to my Etsy shops over the next several weeks; to thank you for your continued support of my endeavors (and my little boy's eventual college education), please use the coupon code FRSHIP11 for free domestic U.S. shipping now through December 25, 2011.

This code will work at all three of my Etsy shops:

Night Garden Design

Night Garden Vintage

and

Night Garden Supplies


Pin It

Saturday, September 3, 2011

name — dropping

I was reminded of this story today when a friend asked for a Chuck Palahniuk book recommendation. It's kinda funny.

Back when I ran a bookstore here locally, I went to the PNBA fall book show one year. Chuck Palahniuk was the keynote speaker at the luncheon one day, and arrived wearing a tuxedo with tails in a room of casually dressed booksellers.

The jacket of the tuxedo was covered (sleeves, back, lapels, under the arms, everywhere) with vintage faux-jeweled brooches.

He delivered his speech without mentioning it; likable, quirky, if maybe a bit full of himself. At the end, he says something like, "And I've noticed you all staring at my jacket all this time. Most of these are worth only a few dollars, but one is very valuable. I'd like everyone to come up and pluck a brooch off of my jacket, and take it home with you."

Picture: a swarm of ladies + a few men surrounding Chuck Palahniuk, who's standing Christ-posed (to allow access to the underarm pins?) while they examine and start pulling at his clothes.

I hung back until the crowd thinned (it was a little too "mall-on-Christmas-Eve" for me), and he noticed a few of us brooch-less and flapped us forward with his hand. He pointed out a green one to me (right sleeve) and I thanked him and took it back to my chair. Then he thanked us, and we applauded, and he went back to his seat.

I still wonder what was up with that, whether he was just trying to give us a good show, or liked the idea of a roomful of otherwise sedate people pulling at his clothes, or wanted another good story to tell at parties. The latter of which is what I'd have, if I ever went to the sort of parties where Chuck Palahniuk is brought up in conversation (I don't).

My brooch was not the super-valuable one, but I did have it pinned to my messenger bag for awhile, until the clasp broke, and it fell off, and presumably, someone else found it and carried it home. Which might be a good story, too.

Friday, August 26, 2011

baby's day at the beach — spoonflower

My new collection of fabric, Baby's Day at the Beach, is now for sale on Spoonflower!

The Baby Sandcastles print features a pencil sketch of my bebe playing in the sand (although in real life, he smashes castles faster than I can build them for him!):


I included five colors of this umbrella print (my favorite); honeysuckle, quarry, teal, sand, and storm:


and an all-over print of this apple juice bottle (my husband's favorite!):


I'm considering adding a different colorway, and maybe including a print that features this little hermit crab, who didn't make it into my final design:


Click on over and take a look!


These images are copyright protected, like everything on this blog. Please ask before using them!


Pin It

Tuesday, August 16, 2011

legen - patio - dary

Call me crazy, but the Petersiks from the Young House Love blog made their paver patio look so easy that when it came time to make a little spot for the bebe's pirate sandboat to moor, I thought, "I can do that!" (Note: it's hard to tell how hard a project is by looking at photos on a blog.)

Initially, we'd planned to add just a little 5x8' paver patio addition, kind of off to the side of the cast concrete patio we put in about five years ago. After a little more thought about the logistics of digging it all up, compacting everything, and getting the new segment to line up seamlessly with the eventual total patio re-do (not to mention considering the possibility of renting a compacter and a paver saw multiple times), we decided to just do the whole thing all at once.

Sadly, my camera went missing for awhile, so I have no photographs of the prep work. You'll have to trust me that it was EPIC.

PREP STEPS:
* Pulling out the old cast concrete patio
* Piecing the old cast concrete bits together to widen the pathway from the backdoor to the patio
* Tearing up the sod
* Digging everything down to a depth of approximately 6 inches
* Trying to level the dug-out space (a fool's errand in a backyard that isn't level to begin with)
* Laying down weed barrier
* Shoveling, spreading, and compacting gravel
* Shoveling, spreading, and leveling sand

This list took the better part of two weeks during the bebe's nap time and in spare minutes when he felt like playing in his sandbox while his dad and I worked nearby.

I did get this photo of all of the rusty nails and screws I found while I was digging up the sod. These had likely been down there since the house was built in 1961.


This next photo is what you get when a paver company accidentally sells your special order of pavers to another customer from Jerry's hardware store (mistaking the other customer for you), but promises that when a new pallet arrives, it won't happen again because your name is on the new pallet.

That's right. Instead of hubby's name, they wrote "Jerry's Customer" on the new pallet of pavers. (*Sigh*)


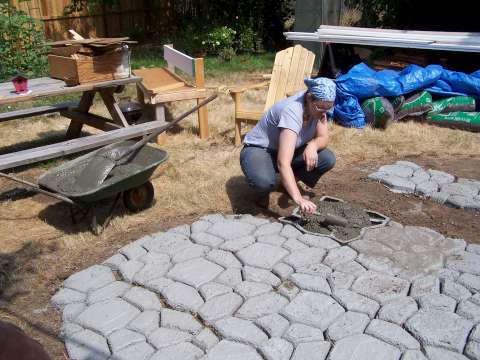
Now, this is where we veered sharply off course from the Young House Love blog. We started by laying a circle.


We made it bigger and bigger.


The "soldier row" was added around the perimeter of the full patio.


We nailed in the Snap-Tight border. A second circle was added, and all of the "pattern" bricks that didn't require cuts were laid in around the circles.


I measured and marked, and hubby made more than a hundred cuts on the paver saw in the course of one afternoon. I can't express enough how glad I am that we rented the paver saw. The rental cost $50, but the alternatives (chiseling them apart or using the tile saw to make shallow cuts on both side, then breaking) would have been really time consuming, and the edges would not have been so clean.


We compacted the pavers with a rented gasoline-powered plate compacter (another time-saving tool I wouldn't have wanted to tackle this project without, though we did make sure to use an old piece of carpet to keep the compacter from chipping the pavers), and added layers of polymeric sand (compacting between each layer), then misted, and voila!

Here are some close-ups of the finished pattern of pavers. As you might be able to tell, the sanding is a really important step. It disguises all the gaps and helps the patio look uniform and cohesive.


We're still working on adding a garden bed and making the path meet the edge of the patio, so there'll be a few more photos between now and "DONE"; in the meantime, here's a photo of me putting in the original cast concrete patio way back in 2006.


I'm determined to make this the last patio I put in for quite awhile, but as I remember, I swore the same oath the last time, and we all know how that turned out.


Pin It

Monday, August 15, 2011

rainbow tie - dye birthday cake

Happy Birthday to Me!


I saw a similar cake on Pinterest awhile back and wanted to replicate it, but the only recipe I found was pretty wild, including diet Sprite and diet pudding mix. Since I avoid artificial sweeteners when possible, I chose to go a more straight-forward route.

Pretty simple; mix up a box of white cake mix according to package instructions. Scoop out a cup or so, dye it red, add raspberries. Divide evenly and dollop in the center of two prepared pans. Scoop out another cup or so, dye it orange, add mandarin orange bits. Divide evenly and spoon on top of the two red dollops. Repeat for yellow and green, without fruit. Help mounded batter settle by striking the side of the pan with your hand.

Repeat for blue, indigo, and purple, mixed with blueberries. Once settled evenly in pan, bake in pre-heated oven. Cool, remove from pans, frost with confetti frosting.


I want to try it with cupcakes next!

(Other Pinterest inspiration posts: here, here, and here!)


Pin It

Monday, August 1, 2011

re - design : spoon sunburst mirror

Young House Love's Pinterest Challenge was issued last week, and it was just the motivation I needed to get off my duff and get a project started!

My Pinspiration:


Pinned by a Pinterest user a few weeks back, from Marie Claire Idees (although I've since seen it on the Country Living website as well).

I nixed the plastic spoons, backed a small mirror with a galvanized pipe collar from the hardware store, and surrounded the mirror with silver-plated spoons and forks from the thrift store.


The mirror (6 inches) is attached to the 3-inch pipe collar using mirror adhesive (3 inches is the measurement of the hole on the pipe collar; the actual disk is approximately 12 inches in diameter). The silverware is attached to the pipe collar using epoxy and wired through drilled holes. Total cost of this project is under $20.

It doesn't really look anything like the original pin, but in a way, that's what I like most about it. I let the original materials inspire me to make something similar, but really different and completely my own.

If you want more specifics, leave me a comment or shoot me an e-mail, and I can walk you through the steps. If there's enough interest, I may just post a follow-up blog. Thanks for reading and looking!

Visit thecsiproject.com

Hey cool! This project earned a top ten spot at The CSI Project blog!

Visit thecsiproject.com