Friday, August 26, 2011

baby's day at the beach — spoonflower

My new collection of fabric, Baby's Day at the Beach, is now for sale on Spoonflower!

The Baby Sandcastles print features a pencil sketch of my bebe playing in the sand (although in real life, he smashes castles faster than I can build them for him!):


I included five colors of this umbrella print (my favorite); honeysuckle, quarry, teal, sand, and storm:


and an all-over print of this apple juice bottle (my husband's favorite!):


I'm considering adding a different colorway, and maybe including a print that features this little hermit crab, who didn't make it into my final design:


Click on over and take a look!


These images are copyright protected, like everything on this blog. Please ask before using them!


Pin It

Tuesday, August 16, 2011

legen - patio - dary

Call me crazy, but the Petersiks from the Young House Love blog made their paver patio look so easy that when it came time to make a little spot for the bebe's pirate sandboat to moor, I thought, "I can do that!" (Note: it's hard to tell how hard a project is by looking at photos on a blog.)

Initially, we'd planned to add just a little 5x8' paver patio addition, kind of off to the side of the cast concrete patio we put in about five years ago. After a little more thought about the logistics of digging it all up, compacting everything, and getting the new segment to line up seamlessly with the eventual total patio re-do (not to mention considering the possibility of renting a compacter and a paver saw multiple times), we decided to just do the whole thing all at once.

Sadly, my camera went missing for awhile, so I have no photographs of the prep work. You'll have to trust me that it was EPIC.

PREP STEPS:
* Pulling out the old cast concrete patio
* Piecing the old cast concrete bits together to widen the pathway from the backdoor to the patio
* Tearing up the sod
* Digging everything down to a depth of approximately 6 inches
* Trying to level the dug-out space (a fool's errand in a backyard that isn't level to begin with)
* Laying down weed barrier
* Shoveling, spreading, and compacting gravel
* Shoveling, spreading, and leveling sand

This list took the better part of two weeks during the bebe's nap time and in spare minutes when he felt like playing in his sandbox while his dad and I worked nearby.

I did get this photo of all of the rusty nails and screws I found while I was digging up the sod. These had likely been down there since the house was built in 1961.


This next photo is what you get when a paver company accidentally sells your special order of pavers to another customer from Jerry's hardware store (mistaking the other customer for you), but promises that when a new pallet arrives, it won't happen again because your name is on the new pallet.

That's right. Instead of hubby's name, they wrote "Jerry's Customer" on the new pallet of pavers. (*Sigh*)


Now, this is where we veered sharply off course from the Young House Love blog. We started by laying a circle.


We made it bigger and bigger.


The "soldier row" was added around the perimeter of the full patio.


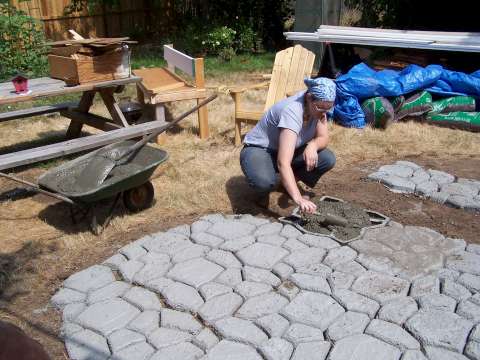
We nailed in the Snap-Tight border. A second circle was added, and all of the "pattern" bricks that didn't require cuts were laid in around the circles.


I measured and marked, and hubby made more than a hundred cuts on the paver saw in the course of one afternoon. I can't express enough how glad I am that we rented the paver saw. The rental cost $50, but the alternatives (chiseling them apart or using the tile saw to make shallow cuts on both side, then breaking) would have been really time consuming, and the edges would not have been so clean.


We compacted the pavers with a rented gasoline-powered plate compacter (another time-saving tool I wouldn't have wanted to tackle this project without, though we did make sure to use an old piece of carpet to keep the compacter from chipping the pavers), and added layers of polymeric sand (compacting between each layer), then misted, and voila!

Here are some close-ups of the finished pattern of pavers. As you might be able to tell, the sanding is a really important step. It disguises all the gaps and helps the patio look uniform and cohesive.


We're still working on adding a garden bed and making the path meet the edge of the patio, so there'll be a few more photos between now and "DONE"; in the meantime, here's a photo of me putting in the original cast concrete patio way back in 2006.


I'm determined to make this the last patio I put in for quite awhile, but as I remember, I swore the same oath the last time, and we all know how that turned out.


Pin It

Monday, August 15, 2011

rainbow tie - dye birthday cake

Happy Birthday to Me!


I saw a similar cake on Pinterest awhile back and wanted to replicate it, but the only recipe I found was pretty wild, including diet Sprite and diet pudding mix. Since I avoid artificial sweeteners when possible, I chose to go a more straight-forward route.

Pretty simple; mix up a box of white cake mix according to package instructions. Scoop out a cup or so, dye it red, add raspberries. Divide evenly and dollop in the center of two prepared pans. Scoop out another cup or so, dye it orange, add mandarin orange bits. Divide evenly and spoon on top of the two red dollops. Repeat for yellow and green, without fruit. Help mounded batter settle by striking the side of the pan with your hand.

Repeat for blue, indigo, and purple, mixed with blueberries. Once settled evenly in pan, bake in pre-heated oven. Cool, remove from pans, frost with confetti frosting.


I want to try it with cupcakes next!

(Other Pinterest inspiration posts: here, here, and here!)


Pin It

Monday, August 1, 2011

re - design : spoon sunburst mirror

Young House Love's Pinterest Challenge was issued last week, and it was just the motivation I needed to get off my duff and get a project started!

My Pinspiration:


Pinned by a Pinterest user a few weeks back, from Marie Claire Idees (although I've since seen it on the Country Living website as well).

I nixed the plastic spoons, backed a small mirror with a galvanized pipe collar from the hardware store, and surrounded the mirror with silver-plated spoons and forks from the thrift store.


The mirror (6 inches) is attached to the 3-inch pipe collar using mirror adhesive (3 inches is the measurement of the hole on the pipe collar; the actual disk is approximately 12 inches in diameter). The silverware is attached to the pipe collar using epoxy and wired through drilled holes. Total cost of this project is under $20.

It doesn't really look anything like the original pin, but in a way, that's what I like most about it. I let the original materials inspire me to make something similar, but really different and completely my own.

If you want more specifics, leave me a comment or shoot me an e-mail, and I can walk you through the steps. If there's enough interest, I may just post a follow-up blog. Thanks for reading and looking!

Visit thecsiproject.com

Hey cool! This project earned a top ten spot at The CSI Project blog!

Visit thecsiproject.com

Friday, July 22, 2011

penguin classics

Sometimes, I daydream about illustrating book covers like these, from the Penguin Classics collection.

This one, for Huck Finn, is my favorite. I love the sunny color palette and the quartered layout, which neatly divides the cover. But the line drawings are just charming, and that's what sells it for me. I've already read The Adventures of Huckleberry Finn, I already have a copy, but this is one I'm thinking of picking up for the kiddo because of the cover art. See? Cover design is important!


Here are a few more lovelies from the series:


Monday, July 11, 2011

lampshade re - do ( with upcycled milk jug )


Awhile back, one of the cats knocked down my very tippy lamp, breaking the amber glass bowl shade. I never could find a replacement with a properly sized hole, although I'm sure they exist somewhere.


I thought about getting a bowl and a glass-cutting hole bit for the drill and just cutting my own to fit. WIth cats still on the prowl, I figured at that point I was probably just begging for another broken shade. Instead (inspired by THIS article), I decided to use the translucent plastic of a plastic milk jug to make my own.


I didn't create a polygonal shade like the article describes, but drew inspiration from the use of materials. I really thought that my lamp needed to be a glowing flower (the stem!).


Here's how I did it: From a piece of the milk plastic I cut a petal shape that was approximately the size I envisioned for the lamp. My petals vary in size from 4-7 inches long and from two to four inches wide (but yours could be narrower and longer for a daisy or chrysanthemum!).

By tracing the nut that held the old shade in place, and with some trial and error, I cut one end of the petal to fit in place around the lamp socket.


Keeping this template in mind, I cut 12 petal shapes from milk jug plastic (from two milk jugs). I avoided the sections with hard edges, but cut a nice combination of flat and gently curved pieces.

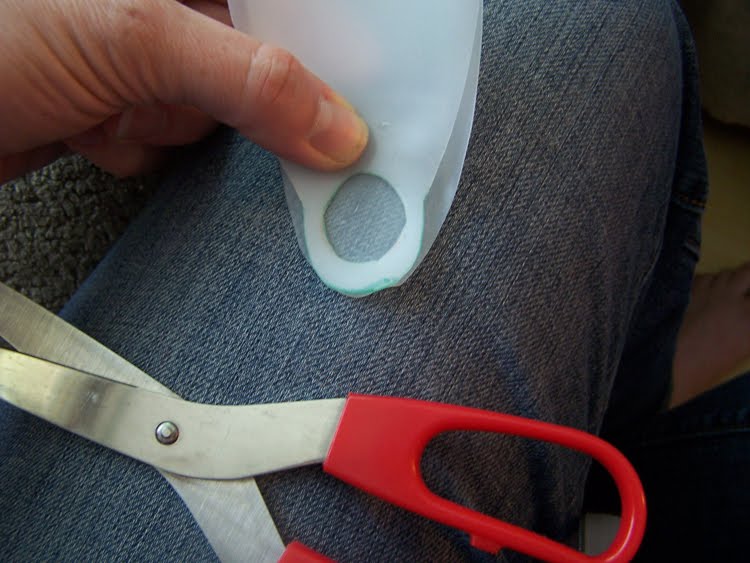
Using my template, I traced the socket-compatible end onto one end of my petals. I used a hole punch to start the center holes, then cut around them with scissors.


I fit several of the flatter petals over the lamp socket.


As I worked around the center, building my flower, I added the more-curved petals so that the flower would cup upwards toward the center.


Lastly, I replaced the nut to hold all of the petals in place, and put in a new (very low wattage) bulb.


Ta-dum! A lamp that looks like a flower!


After the fact, I noticed how strongly it resembles a book cover I designed awhile back at Wipf and Stock:


Funny how an image can stick to your subconscious.

If you use these directions to create your own lampshade, I'd love to see!

I think this project would also work really well for small pendant shades; just make sure to use very low-wattage bulbs. Materials used in commercial shades are rated for use near lightbulbs, but when you make your own, from whatever material, things can become questionable. That said, I've had a milk plastic shade on my lamp for over a year, without incident, because I use a teensy little low-wattage bulb. Enjoy!


Linking up to:

Visit thecsiproject.com

Friday, July 8, 2011

spoonflower love

A really cool e-mail came the other day from another Spoonflower user named Julie, who recently purchased some of my Mums-Red print. Seems she made a nifty little handbag from it, and wanted to know if I'd like to see a picture! I did! She agreed to let me share it; I'm always so pleased when someone makes something cool from one of my designs. Thanks again, Julie! You rock!

Sunday, July 3, 2011

Thursday, June 30, 2011

cozy coupe gas to electric conversion (free dash sticker download)

There's nothing quite like an early morning garage sale to get you going! The bebe and I ended up going across town to this one because the Craig's List ad promised lots of kids yard toys. I had my eye on a Radio Flyer wagon (which turned out to be a different model, and more money, than I'd been dreaming of). Instead of the wagon, we hauled home this sweet ride, a turquoise and orange Cozy Coupe with a $5 price tag. One of these was on my wish list as well, and my little guy LOVES it!


Ooh, I had a ton of fun cramming it into the front seat of the car.

It had been outside a bit, so the dash stickers and warning tag on the back were peeling and flaking. Not something I wanted the kiddo putting in his mouth (and you know he would).


It was the perfect opportunity for a Cozy Coupe gas-to-electric conversion! I did a bit of research to see what the dash of an electric or hybrid vehicle looks like, and then put these new dashboard displays together.


And of course, because there was a half sheet of sticker label paper left after designing the dashboard displays, the kiddo also got this "I'm Great!" Oregon license plate!


I added a line on the bottom edge of the plate sticker that has some of the safety warnings of the original sticker, just so that we remember the weight limit and the ban on steep hills and whatnot.

Download your own sticker label sheet here:
Cozy Coupe Dashboard Stickers


For best results from home, print on 8.5 x 11 inch, full-sheet label paper, using a laser printer. Or have a print shop print these for you on vinyl for truly weather-safe labels!

Have another idea in mind for dashboard stickers, or need a different license plate? Contact me for details.