Showing posts with label piñata. Show all posts

Wednesday, January 29, 2014

candy airplane party favors


A big "thank you!" to the blog Sewing Mama Raeanna for inspiring this fast and easy party favor.

Supplies list:
• Wint-o-green Lifesavers 
• rubberbands
• Smarties
• sticks of gum wrapped with scrapbook paper and washi tape (for decoration + sturdiness)


Thread a rubberband through two Lifesavers. If your rubberbands are tiny, you can link two or more together.


Insert a stick of gum through the looped ends sticking out of the Lifesavers.


Insert a roll of Smarties into the space between the gum (wings) and the Lifesavers (wheels). The rubber band will hold everything in place.


Repeat as necessary!


More Flying Machines Party projects:


Monday, January 27, 2014

motorcycle pull-string piñata

As previously mentioned, the kiddo had picked a flying theme for this year's birthday party a few months back, then fell in love with a motorcycle piñata at the local grocery store. I've only ever heard of one flying motorcycle, and thought that might be stretching the theme a bit. So I put together the hot air balloon piñata from the last post for his friends party, and then set to work making a motorcycle piñata for his family party.

I've seen the construction on some of the commercially available piñatas, and I'm not super-impressed. I know they're meant to break, but I still like things to look pretty. Lots of crepe, nice graphics. These things all go pretty far, in my book.

Here's a photo of our finished motorcycle pull-string piñata, to be followed by instructions.


I had all these materials on-hand except for the ribbon:

*scrap cardboard
*hot glue
*glue sticks
*crepe paper streamers
*construction paper
*scissors
*awl
*shiny gold labels
*fine-tip permanent pen
*curling ribbon
*craft knife
*computer + printer

I started by designing a motorcycle image in AdobeIllustrator. I could have printed the image in full color and used it as-is to decorate the piñata, but I wanted a more hand-crafted look.


I used an awl to trace each piece onto sheets of construction paper by poking through the layers of paper to outline each section (doubling up the construction paper so I could decorate the front and back of the piñata identically). Then I cut out the pieces and used a glue stick to stick them together.


The gold colored pieces are cut from sheets of gold awards seals from the dollar store that have been gathering dust for eons.


I used the constructed motorcycle image to determine the size of the piñata, too, by tracing around it and adding a couple of inches. Two identical pieces for two identical sides! We're building a sort of box, here, if that helps you visualize.


For the sides, I cut strips of scrap cardboard four inches wide, perpendicular to the corrugations. This allowed me to bend the board all along the corrugations for nice, smooth curves.


If you plan ahead, you can incorporate the factory creases into your strips, or you can score along the length leaving a 1/2-inch strip along each side for building the piñata. It's a lot like a seam allowance; I cut slits and "v" shapes into the edges for proper fitting when assembling.


A hot glue gun does the trick for quickly assembling the pieces without clamping. I just glued along the edge on the backside of one of the motorcycle-shaped boards, then pressed the "seam allowance" into the glue all the way around. I started at the bottom so that I wouldn't have to cut a door later.


To add the top (front?) I just glued along the corrugated edge and lined things up as best I could. Crepe paper covers a world of imperfections.


Speaking of crepe paper, I attached short strips of fringed paper in a stripe pattern all around, then pasted the construction paper motorcycles on the front and back.


The overlaps at the end of the side strips aren't glued in place; they are left unattached so that a trap door is created. Ribbons are strung through awl holes and tied + taped in place.


A sparkly pipe cleaner makes a good hanger when strung through awl holes at the top.


And ready to go!


Click photos to enlarge.


Tuesday, January 21, 2014

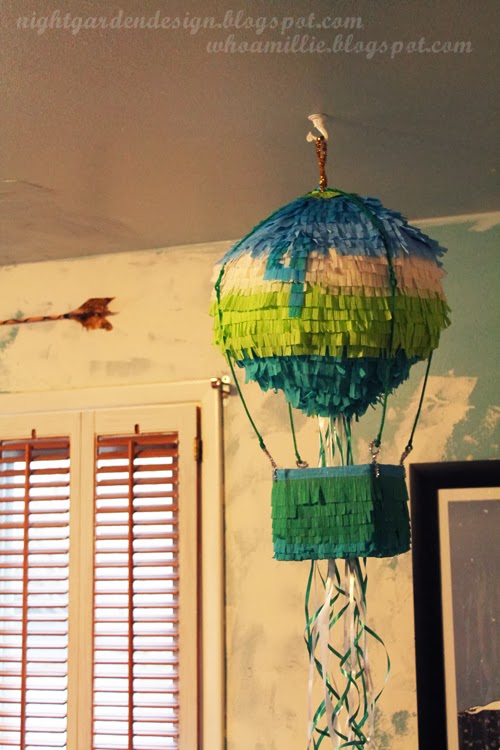
hot air balloon pull-string piñata

We're actually having two piñatas this year for the kiddo's birthday; this one, a hot air balloon, is for his Flying Machines Party with his friends; the other, a motorcycle (saving that for a future post) is something he fell in love with at the grocery store. And because I'm a sucker, I said I'd make him one for his family party as well.

But let's talk about that hot air balloon, hmmm? 

Round paper maché isn't hard to make, really. Just blow up a balloon and coat with layers of paper and paste et voila! After a few days of drying time to make sure your piñata doesn't mold, you have a blank canvas.

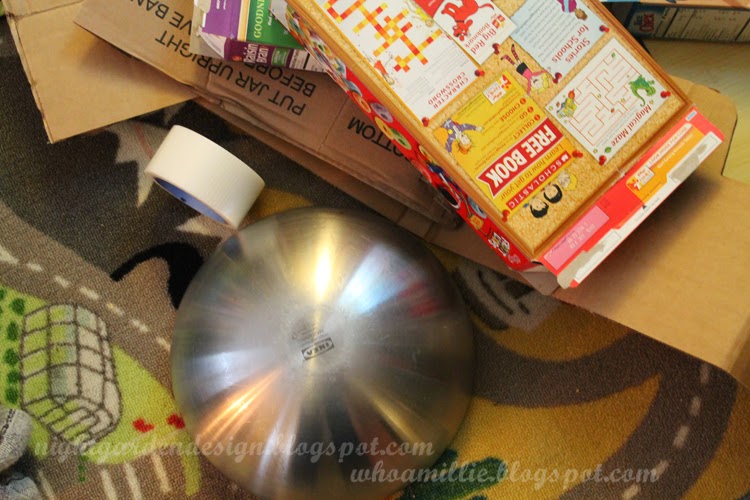
But I've had a thing for simple, dry piñatas the past couple of years, with pull-strings to boot. I started this one with some cardboard boxes, a round metal bowl, a Make-Do cardboard connector, and some duct tape.


After making a strip of sturdy corrugated board for the bottom rim, I cut long petal shapes out of thin, pliable cereal boxes. These are taped to the rim at the bottom . . .


. . . and have holes poked in the top to fit the cardboard connector.


Here's a view of the inside, which on its own makes a pretty cool design.


I made two, one top and one bottom, then attached at the center with more transparent duct tape.


The Make-Do cardboard connector will support the pipe cleaner hanger coming up.


I used thrift store streamers cut into fringe to decorate (this is actually their third life; last year these streamers were streamer chandeliers at the kiddo's robot party). Glue sticks work really well for attaching the strips quickly and cleanly, but regular white craft glue has a good sturdiness factor.


It's good, I think, to have a shot of how the top is finished off. I just loosened the connector a bit and slipped in some strips of un-fringed crepe, attached with glue. Then I tightened the connector back up for a nice, clean finish.


The basket of the hot air balloon is a four-sided box (no top, no bottom) covered inside and out with more streamers.


To get a number or other design, I work with 3/4-inch sections of streamer, cut into two fringes. I just slip them up under the existing rows of fringe and glue in place, then trim to match row length.


A gold pipe cleaner runs through the piñata, through the two holes in the connector (essentially wiring everything together), then wraps around the exposed end and forming a hanging loop.


The basket is also held in place by pipe cleaners. Silver ones poke through holes in the cardboard and make hook eyes on each of the four corners. Two long green pipe cleaners twist together end to end to attach the pieces, looping through the silver hook eyes and around the connector at the top.


 After carefully removing the bottom cardboard connector on the balloon, ribbons are strung through the holes in each petal and knotted + taped in place. After filling, I did a little crepe paper repair work for a seamless finish, then let the ribbons hang down through the hanging basket.


And here it is all finished in one night! One long night, yes, with all that crepe paper work, but still less drying time than a paper maché ball.


We can't wait for all the kids to bust out the treats when the birthday party arrives!

Saturday, January 19, 2013

pull-string robot piñata and candy filler

Hey everyone! This has been a long week here at the old homestead. We've been home sick, and I finished in the bottom two this week over at So You Think You're Crafty?, despite my mad love for this project. I'm through to the next round, but the person I tied this week could just have easily have been the one to stay. I've got my fingers crossed for next week and I'll let you know when the voting opens!

I made this super fun robot piñata using mostly found materials and some crepe paper that I've had out in the studio since (*gasp*) my wedding ten years ago. My piñata is a robot for an upcoming birthday party (my kiddo's third!) but you could adapt the project for basically any theme. Just look in the recycling bin, and you probably have enough materials to start building one today!


I built the basic structure using boxes, tubes, and containers held together with duct tape and Makedo cardboard connectors, then covered it using glue sticks and crepe paper, and decorated with bits and pieces.

I like crepe paper better than the tissue paper I see used on most commercial piñatas because crepe has more flexibility to it. Curves aren't a problem. Tight corners aren't a problem. Stretching it to fill a gap isn't a problem. It's kinda awesome. And it's nice to have a way to use this dove grey color that I hadn't found a use for in the past decade. Plus, he's pretty adorable, isn't he?


Because this is a pull-string piñata (more suitable than the traditional "bash-able" kind for a group of really young kids), the harder-edged pieces (like the connectors and the reflectors) aren't a problem like they would be if you were going to hit them with a stick. All the kids just grab a string and pull till the base opens and all the treats spill out!


And speaking of treats, we spent some time last week making some yummy homemade gummy robots and chocolate robots in matching packages (designed in Illustrator) as piñata filler. I'll include the printable packaging graphics in the tutorial , for anyone who's been searching high and low for robot-themed party favors.

In fact, two separate tutorials are coming your way soon; one for the piñata and one for the candies; subscribe if you don't want to miss either of those!

Thanks a ton for reading and for voting over at So You Think You're Crafty! Wish me luck this coming week, too! It's heating up to be another edge-of-your-seat contest for me.