Showing posts with label to. Show all posts

Monday, July 28, 2014

sun printing on fabric (seriously the best surface design project of the summer)


 I spent several years at the university earning my BA in art. The last couple of years that I was in school, I was especially drawn in by the fiber arts program. I spent an entire summer term dyeing with indigo vats, for example, and another term learning natural dyeing techniques (with plants and things). I learned to carve stamps and print with acrylic paint, screen print with a Thermofax, photocopy directly on fabric. I learned about resists and cyanotype. I designed costumes and learned the art of sashiko. I tie dyed and sewed and painted and printed and felted and spun . . . and somehow, in all those years of art and fiber classes, I never learned how to sun print on fabric using only acrylic paint, water, and leaves.


It's amazing, really, the many varied ways there are to apply color to surfaces. This effect, in particular, can be obtained a number of ways. I once made an umbrella into a tree canopy for a play, for example, by holding branches and leaves against the umbrella and lightly spraying with spray paint. Cyanotype paper and cyanotype ink can each be used to make sun prints. You can also make simple sun prints on construction paper just by leaving the leaf-covered paper in the sun for a few hours.

This project, though, is astounding in its simplicity. I had all the materials on hand (you can use any fabric paint or acrylic craft paint; the paint shown is Kid Made Modern fabric paint from Target, the same stuff we used on the baby shower onesies awhile back), the set up is simple enough for kids and grown-ups alike, and the results are stunning.


Seriously Easy Sun Printing Tutorial


1) Take a piece of fabric (muslin, canvas, etc., with at least 50% cotton content) and get it wet.


2) Squeeze out the excess water.

3) Stretch and pin to a board.


4) Pour a little paint and water into a container, and stir to mix.


5) Cover the surface of your fabric with thinned paint solution.
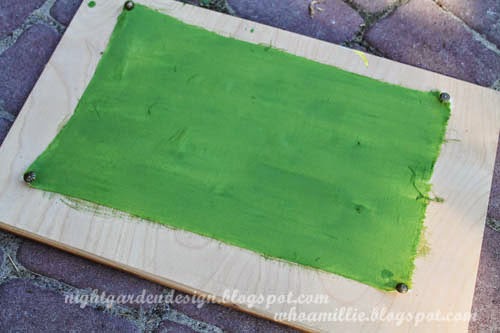

6) Cover the wet, painted surface with leaves, twigs, berries, etc.


7) Leave it in the bright sun, then check on it in about an hour. If the sun is weaker, leave it longer.


And that's it.


The capillary action draws the paint from the shaded portions (under the leaves) into the drier, unshaded portions, leaving lightly colored leaves on a darker colored background.


After your fabric has dried completely, put it in the dryer for a few minutes to heat set the paint, or iron with a cloth. It'll be safe to incorporate into a project and wash.


I'll never be done learning new things, it seems. Isn't that fantastic?


Thanks for reading!

Monday, July 21, 2014

a little bit of summer

Here are a few things we've been working on so far this summer. I hope to go into a bit more detail on some of them in future posts, but with all the play dates and swim lessons and backyard quicksand making, I'm having a hard time settling down to update the blog. The weather's too nice, the days (as long as they are) are too short. We're filling them full.

I hope you're enjoying your summer too!


My booth at the Eugene Mini-Maker Faire in June.

Getting good use out of the studio; the kiddo tells me this is a picture of a queen.

We're going to have so many grapes this year. So many!

Tie dyeing with fabric paint for a special quilt project.

Watching a juggler on the library plaza at the Summer Reading kick-off.

A booth at Black Sheep Gathering where the kind people told me how to fix my spinning wheel.

These b&w dragonflies are all over the place this summer. I love them.

Mashing up the u-pick strawberries from the organic farm to make jam.

Sunset roses.

Sun printing on fabric (it's really easy).

W is for watermelon, if you're eating the alphabet.

Red flowers and pool blue chairs.

Hanging up the ride-on toys on the back of the shed.

A peanut plant.

Yup. We're growing peanuts as a science experiment this summer.

Croquet cart from the thrift store . . .

. . . with some new stain and tightened screws for long life.

Painting the patio bricks with washable tempera paint is fun with kiddos.

Did I mention we also camped out at the beach for a few days, and spent some time at the ballpark, and played mini golf, and have been to the pool like a dozen times (at least)? Yeah. We're totally summering it up over here in the PNW.


Thanks for reading! I'll be back soon with a little post to explain sun printing in six easy steps, because now is the time, people! You crafty folks out there probably already have what you need on hand.

Monday, June 30, 2014

backyard sink!

I've been thinking for awhile that it might be nice to have a spot to wash hands and clean sandy toys and shoes in the backyard, aside from the hose. After pinning a few backyard sinks on Pinterest, I brainstormed what I might build as a sink support structure. We have a scrap pile, of course, that I regularly dip into for building projects. I considered building a counter top on legs (with a bucket underneath to capture what drains out of the sink). I considered attaching a shelf to the house with a sink imbedded. And then I thought about how already full of stuff our yard is, and where I'd put whatever contraption I came up with.

It made sense, really, to use something we already had back there, and this hardwood outdoor bar was a logical choice. We've had it for about seven years now; we use it occasionally for backyard barbecues, but not much else. I talked it over with the Mr., deciding finally that adding a sink wouldn't ruin the bar's usefulness, but add to it.


After measuring the bar to determine sink size, the next step was to scavenge for a sink. Bring Recycling was my first stop; they have dozens of sinks over there, and the kiddo and I considered several hefty porcelain-coated cast iron antiques before finally choosing a simple stainless steel bowl sink for its light weight. We picked a faucet, too, then headed over to the hardware store for various connectors, a length of hose, and some plumber's putty.


It had been suggested to simply cap off one of the brass water supply hoses to avoid the added plumbing work required for two; it was a suggestion that made sense, since we wouldn't be running hot water to the backyard anyway.


Capping it off is pretty easy. We found the right size threaded cap at the hardware store, put a little plumber's putty on the threaded brass water supply line, then screwed the cap on. Easy peasy.


The hose coupler is equally simple. It has two female ends, one that fits over the other brass water supply, and the other, larger end to fit over the hose. We eventually used plumber's putty on this area as well.


I cleaned the wood with a scrub brush, water, and some spray cleaner, then I used the sink turned upside down to trace the hole we'd have to cut.


To support the lip of the sink bowl, I traced a second line about 3/4 inch inside the first. This was our cut line.


I wasn't too worried about perfection; as long as the lip of the sink bowl covers the hole and is well-supported, I'm happy.


I'm not too fond of the reciprocating saw as there's a bit too much motor movement to use a blade that big with a kid running around in the yard with me. I waited until the weekend and the Mr. ended up cutting it out for me. And it looked awesome, set in place, like it was meant for this bar.


After testing for fit, I popped the sink back out and stained the top, since the weather had really worn down the previous finish. Then I put the sink back in place so we could get the faucet lined up right.


The yellow paper is one of the paper templates that I made up for each of three faucets to test for fit, and to help drill the holes in the right places. The original faucet I'd picked out had been too wide at the base, and the faucet was a little on the short side (sad trombone).


We tried out a couple more, finally settling on a faucet that fits pretty well. It doesn't have the two-handles I'd prefer, but the base is a tiny bit narrower and the faucet is a bit longer, so it works out pretty well.


This is what it looks like underneath. The hose lead connects to a y-splitter at the house (so we can still use another hose to water the garden). The black drain pipe drains into a bucket for the time being, to be used for watering plants, etc. The Mr. has some big ideas about adding more plumbing under there and a run-off hose, but I'm happy with this set up for now.


I caulked around the sink and faucet, and also some of the crevices along the surface. It's clear caulk, but it hasn't fully cured yet. I'll try to get an update shot in here once it's fully cured, but in the meantime, here it is, all finished and useful.


Thanks for reading!

Linking up to:
My Repurposed Life 
Lou Lou Girls