Showing posts with label kid. Show all posts

Saturday, August 1, 2015

recycled solar crayons

old crayon bits in a silicon mold, inside a clear shoe box in the full sun.

two-hour time lapse.

trying it with a full set!

Friday, February 20, 2015

packaged airplane crayon party favors

You last saw these in November, when I was casting them by stove top. Here they are all packaged up! I designed the backers in Illustrator and attached the crayons with glue dots.


Monday, July 28, 2014

sun printing on fabric (seriously the best surface design project of the summer)


 I spent several years at the university earning my BA in art. The last couple of years that I was in school, I was especially drawn in by the fiber arts program. I spent an entire summer term dyeing with indigo vats, for example, and another term learning natural dyeing techniques (with plants and things). I learned to carve stamps and print with acrylic paint, screen print with a Thermofax, photocopy directly on fabric. I learned about resists and cyanotype. I designed costumes and learned the art of sashiko. I tie dyed and sewed and painted and printed and felted and spun . . . and somehow, in all those years of art and fiber classes, I never learned how to sun print on fabric using only acrylic paint, water, and leaves.


It's amazing, really, the many varied ways there are to apply color to surfaces. This effect, in particular, can be obtained a number of ways. I once made an umbrella into a tree canopy for a play, for example, by holding branches and leaves against the umbrella and lightly spraying with spray paint. Cyanotype paper and cyanotype ink can each be used to make sun prints. You can also make simple sun prints on construction paper just by leaving the leaf-covered paper in the sun for a few hours.

This project, though, is astounding in its simplicity. I had all the materials on hand (you can use any fabric paint or acrylic craft paint; the paint shown is Kid Made Modern fabric paint from Target, the same stuff we used on the baby shower onesies awhile back), the set up is simple enough for kids and grown-ups alike, and the results are stunning.


Seriously Easy Sun Printing Tutorial


1) Take a piece of fabric (muslin, canvas, etc., with at least 50% cotton content) and get it wet.


2) Squeeze out the excess water.

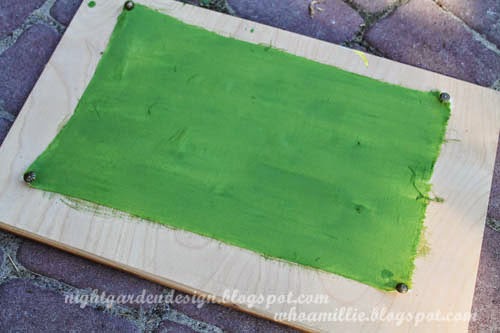
3) Stretch and pin to a board.


4) Pour a little paint and water into a container, and stir to mix.


5) Cover the surface of your fabric with thinned paint solution.


6) Cover the wet, painted surface with leaves, twigs, berries, etc.


7) Leave it in the bright sun, then check on it in about an hour. If the sun is weaker, leave it longer.


And that's it.


The capillary action draws the paint from the shaded portions (under the leaves) into the drier, unshaded portions, leaving lightly colored leaves on a darker colored background.


After your fabric has dried completely, put it in the dryer for a few minutes to heat set the paint, or iron with a cloth. It'll be safe to incorporate into a project and wash.


I'll never be done learning new things, it seems. Isn't that fantastic?


Thanks for reading!

Monday, April 7, 2014

mini art kit

A recent car trip highlighted the need to have various distractions for the kiddo in my bag at all times. I wanted a stash of compact little things to fit in there that won't add too much extra bulk, but will keep him entertained in a restaurant, in the back seat, or in a yurt during an overly rainy overnight trip to the beach. Not that I'm speaking from experience or anything.


An empty mint tin is a great way to organize a few art supplies, including a couple of those crayons that restaurants sometimes give out.

I also added a couple of short colored pencils, some neon posterboard cut to size, and a sheet of stickers sent to me as part of an advertisement. (Kids magazines sometimes send them out to tempt us to subscribe.)


When cutting the posterboard, I made sure to leave an inch of space at the end and a textured edge to make it easier to remove from the box.


And there is is! A mini art kit perfect for stashing in your bag, next to a Hot Wheels car and a travel-sized packet of Play Doh.

I know it's really the Boy Scout motto, but I think I'm going to adopt "Be Prepared" as my own.

Thanks for reading!

Tuesday, June 12, 2012

sweet pea and pool blue lockers


I bought this busted up locker set for $20 at Borders when they went out of business last summer. And then it sat in my carport for about seven months, through the fall and winter. Looking like this.


I have this problem a lot. I buy something because it won't be available anymore when I'm actually ready for it, and then I have to find a place to store it until I'm ready. In the case of these lockers, they were meant to take over storage duties for the changing table in my kiddo's room. But we were still using the changing table, and the lockers were busted and rusted and needed some serious TLC.

Finally spring came along, and it was (kind of) spray painting weather again! First, taping off all the elements that wouldn't get painted, including the number plates and the strikers. I used standard masking tape.


And I reattached all the shelves and the side panel.


Next, I sanded down the rusty areas and applied some liquid de-glosser, then primed and spray painted the inside in sweet pea green. Over spray didn't matter at that point, because the outside would be painted over anyway.


After letting the paint cure for a week, I taped off the inside of each locker window and spray primed and painted the outside in pool blue.


After I let it cure another week, I removed the tape . . . and it looked kinda awesome!


And then I had to let it cure outside quite awhile longer . . . like a couple of months longer.

At first, the cool spring temperatures refused to let the paint cure and harden correctly. I could still press into it with my fingernail after a couple more weeks. Later, we were still having trouble kicking our changing-table habit, although the kiddo's legs were hanging way over the edge and he was constantly kicking things on the floor.

Finally, last Friday, I dragged the old changing table outside, and after some crazed re-arranging, finally fit the lockers into their new home!


Tips for replicating this project:

* Prep work, prep work, prep work. Take your time to clean, de-rust, de-gloss, and tape carefully! 90% of this project is in the preparation.

* Layer up the spray paint in light, barely-there layers to avoid drips, runs, and scabby places that take forever to cure.

* Keep it out of your kiddo's room until it doesn't stink anymore. Spray paint takes a while to cure completely in cook humid weather, and until it does, it'll be stinky.

* Attach tall furniture to the wall so it doesn't get pulled over. 'Kay thanks.

I think these lockers are going to be around for a nice long time in the bebe's space. Unlike the changing table and the crib, it's not baby-specific, so I can see him getting use out of it well into his teenage years, though I imagine we'll have to paint it to match his favorite sports team, if he goes that route, or flat black if he turns out to be moody ("if". Ha!).

What about you? Have you been altering anything with spray paint recently? Let's see some links in the comments below. Thanks for reading!


p.s. you can make these photos larger just by clicking on them, but you probably already knew that.


Linking up to:

Handy Man, Crafty Woman

Tip Me Tuesday at Tip Junkie

A Bowl Full of Lemons

Mommy by Day, Crafter by Night

Today's Creative Blog

DIY Show Off

The Stuff of Success