Showing posts with label reuse. Show all posts

Monday, June 30, 2014

backyard sink!

I've been thinking for awhile that it might be nice to have a spot to wash hands and clean sandy toys and shoes in the backyard, aside from the hose. After pinning a few backyard sinks on Pinterest, I brainstormed what I might build as a sink support structure. We have a scrap pile, of course, that I regularly dip into for building projects. I considered building a counter top on legs (with a bucket underneath to capture what drains out of the sink). I considered attaching a shelf to the house with a sink imbedded. And then I thought about how already full of stuff our yard is, and where I'd put whatever contraption I came up with.

It made sense, really, to use something we already had back there, and this hardwood outdoor bar was a logical choice. We've had it for about seven years now; we use it occasionally for backyard barbecues, but not much else. I talked it over with the Mr., deciding finally that adding a sink wouldn't ruin the bar's usefulness, but add to it.


After measuring the bar to determine sink size, the next step was to scavenge for a sink. Bring Recycling was my first stop; they have dozens of sinks over there, and the kiddo and I considered several hefty porcelain-coated cast iron antiques before finally choosing a simple stainless steel bowl sink for its light weight. We picked a faucet, too, then headed over to the hardware store for various connectors, a length of hose, and some plumber's putty.


It had been suggested to simply cap off one of the brass water supply hoses to avoid the added plumbing work required for two; it was a suggestion that made sense, since we wouldn't be running hot water to the backyard anyway.


Capping it off is pretty easy. We found the right size threaded cap at the hardware store, put a little plumber's putty on the threaded brass water supply line, then screwed the cap on. Easy peasy.


The hose coupler is equally simple. It has two female ends, one that fits over the other brass water supply, and the other, larger end to fit over the hose. We eventually used plumber's putty on this area as well.


I cleaned the wood with a scrub brush, water, and some spray cleaner, then I used the sink turned upside down to trace the hole we'd have to cut.


To support the lip of the sink bowl, I traced a second line about 3/4 inch inside the first. This was our cut line.


I wasn't too worried about perfection; as long as the lip of the sink bowl covers the hole and is well-supported, I'm happy.


I'm not too fond of the reciprocating saw as there's a bit too much motor movement to use a blade that big with a kid running around in the yard with me. I waited until the weekend and the Mr. ended up cutting it out for me. And it looked awesome, set in place, like it was meant for this bar.


After testing for fit, I popped the sink back out and stained the top, since the weather had really worn down the previous finish. Then I put the sink back in place so we could get the faucet lined up right.


The yellow paper is one of the paper templates that I made up for each of three faucets to test for fit, and to help drill the holes in the right places. The original faucet I'd picked out had been too wide at the base, and the faucet was a little on the short side (sad trombone).


We tried out a couple more, finally settling on a faucet that fits pretty well. It doesn't have the two-handles I'd prefer, but the base is a tiny bit narrower and the faucet is a bit longer, so it works out pretty well.


This is what it looks like underneath. The hose lead connects to a y-splitter at the house (so we can still use another hose to water the garden). The black drain pipe drains into a bucket for the time being, to be used for watering plants, etc. The Mr. has some big ideas about adding more plumbing under there and a run-off hose, but I'm happy with this set up for now.


I caulked around the sink and faucet, and also some of the crevices along the surface. It's clear caulk, but it hasn't fully cured yet. I'll try to get an update shot in here once it's fully cured, but in the meantime, here it is, all finished and useful.


Thanks for reading!

Linking up to:
My Repurposed Life 
Lou Lou Girls

Monday, September 9, 2013

siding: the sequel

We spent part of the weekend finishing up the siding and cedar shakes on the sides of the studio building. It's been in progress for a long time coming, and I'm happy to say the end is in sight (knock on cedar).

The siding is cement fiber board lap siding, the same stuff we used on our house. It also matches the cedar plank siding on the tool shed. Both of those buildings are painted yellow with MetroPaint Sweet Corn (which, by the way, is nowhere near as bright as the screen displays it on their color chart, thank goodness). The studio's siding hasn't been painted yet; it came primed this yellow-ish color.


The cedar shakes at the top have a fun history on our property; they came with our cedar shed kit as roofing material, which wasn't going to work for us, longevity-wise. We used some to shake the roof peak on the west side of the studio. We used some more to side a playhouse, which was later disassembled for being a spider haven. Those were repurposed here when we finally got around to adding shakes to the east side roof peak yesterday afternoon.  Thank goodness for nice weather and a weekend coinciding in the PNW in September.


And here's the west side, behind a garden-gone-wild at summer's end. This side, too, only recently got the lap board siding (over this past summer, and finishing up Saturday night), but it's had the cedar detail for awhile.


Here it is when it was fresh!


How long ago, you might ask? Answer.

Oh man, we're so close. Just a couple of boards on the front and some caulk and paint, and all three structures will match. It's going to be freaking AMAZING.


Thanks for reading!

Tuesday, August 27, 2013

quick updates: stenciled adirondack chairs

Awhile back, I saw a quick stencil idea in HGTV Magazine (I think). It happened to coincide with me discovering a vintage set of number and letter stencils at Bring.


I thought about it awhile, then went ahead and bought the stencils and completed the project in about ten minutes. Maybe less, as I already had the paint out for another project.


Six chairs, six numbers.


I used a regular bristled paintbrush; the numbers I stenciled with a mostly dry brush turned out better, with less paint piling at the edges.


I used leftover recycled indoor/outdoor primer from Metro Paint, the same stuff we used on our house a year ago (still going strong!).


It didn't take the Mr. long to notice really. We had people over that weekend and about halfway through the evening he asked, "Hey, when did you paint the numbers on the chairs?" It had only been a couple of days. 

And there you have it! A really quick update to personalize your yard furniture.

Thanks for reading!


Linking up to:


Thursday, August 8, 2013

what's happening in the alley


There's an awkward area of our yard that's about six feet wide and borders the neighbors' property . . . where, in defiance of -- I don't know -- a million local building codes, they've built an addition about a foot away from the property line. It was there before we moved in, it'll be there after we leave. Unless the branches of our nut tree fall and crush it. I'd kinda love to see what kind of insurance claim would attempt to be filed on something like that.

Anyway, I digress. This awkward area of our yard is something I've ignored since moving in several years ago because: a) I'm an expert at avoiding things that drive me bananas; b) it's a very narrow area; and c) we had to break into our house through the fireplace one Fourth of July, and the alley has been full of rubble. 

That last bit is a funny story; it starts with an unusable sixties-era fireplace separating from the foundation (Ha ha! Funny already, right?). The plot thickens when we lock ourselves out of the house on a holiday weekend, then, to regain entry, bust through the decades-old brick and mortar with a sledge to the shock and awe of the house cats. Finally, in the conclusion, your intrepid hero and heroine patch up the wall and, eventually, re-side the entire house, but leave a pile of urbanite, pea gravel, concrete blocks and river stones in the alley. For a couple of years.

It's a major unfinished project to just have laying around, and I started to finally tackle it because my kiddo is getting older and more exploratory, and I don't really want to leave him to the mercy of (possible) rubble-dwelling black widows and (possible) rusted nails from our roof replacement. 

Here's a sneak peek, then, of some of the projects going on in the alley. My goal is to use mostly recycled materials and stuff we have on hand to beautify the alley and make it safer to traverse. This trellis, for example, is something I built using some cedar garden stakes from an estate sale (25 for $5!) and a busted extension ladder.


The raised beds are built of fireplace rubble ("urbanite") and filled with dirt from another spot in the yard, mulch from the city's Free Wood Chips pile, and plants from the local garden center's end-of season sale plant rack. I searched out shade-happy vining plants to help fill in that trellis.


And I made these planters out of a couple of old buckets and some split garden hoses. 


There's a lot of work to do here still, but I'm feeling good that progress is happening. It was a scary, weedy, rubble-y mess that was in desperate need of attention . . . and now it's getting a little. I'll definitely be back with updates and details as this project progresses as it's far from finished; I have so many ideas! So much to do before the weather turns! So much stuff for my kiddo to get into while I'm slaving away in the alley! What about you? Are you trying to make something out of nothing this summer, too?

Thanks for reading.

p.s. Hey! You can make these images larger just by clicking on them, but you probably already knew that, clever you.


Linking up to:

Catch as Catch Can at My RePurposed Life

Wednesday, May 8, 2013

pinterest challenge: a backyard arbor

At last, it's time to show you a little more about this teaser photo I showed at the end of my last post:


Of the many pins on my Curb Appeal Pinterest board, most are variations on the pergola/arbor/garden arch theme. I've been collecting ideas for nearly two years now. 


In front of my house, I have two random metal garden arches (in different styles) that came to me on sale from a couple of different places. In the backyard, the "arch" in front of the studio building (which is now mostly sided! Hooray!) looked like this:


Urgh. The green metal arch (can you even see it?) is a leftover craft store "wedding arch" from our wedding ten years ago. It was clearly not meant for heavy labor.

I had it pretty neatly disguised for awhile with twigs and branches woven in. A windstorm collapsed the whole thing last year. 

I then had it supported by the side supports of a pergola that had also collapsed in the windstorm . . . total eyesore. That part had been removed by the time I thought to take this photo, along with a lot of the sticks and weeds.


Yes, I'm embarrassed that things got to this neglected, overgrown state. That's life in a fixer-upper, folks. Some things get fixed-up faster than others.

Which explains all of those arbor pins on my pin board, and my burning desire to take care of the issue.

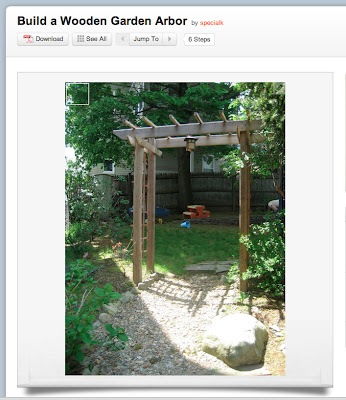
This project was uploaded to Instructables by someone calling himself/herself SpecialK, who deserves the credit for this photo. And it's the project I decided I could take on, by myself, before my husband came home from work one day last week.


So, that didn't exactly work out. I did have it about 90% built by the time the mister rolled up that evening (just needed cross bars and lattice on top and sides), but in my eagerness to get to building, I built it out of place. This presents some challenges I hadn't properly anticipated, like, say, assembling the thing with only one adult present, and moving it, and keeping things square and level. But let's set that aside, and assume that you'll do things the EASIER way: holes first, arbor built in place.


I finished it up the next afternoon (with some help from my kiddo and his toy drill) and started measuring for and digging the holes for the legs.


After the mister helped me finish digging with the post hole digger (approximately 15 inches deep), I put some pea gravel in the bottom of each hole (approximately 3 inches worth) and we finagled the arch into place, working until it was in-line with the roofline of the studio.


The bottoms of the legs are coated with spray-on rubber sealant about 18-inches along the bottom and sides. They are made of Douglas Fir, which needs a little insect and rot resistance. The gravel is for drainage as well as anchoring. I filled around the legs with some more pea gravel, and finally some larger river rocks near the top to disguise the sealant and to keep dirt away.


I also trimmed back the rose and grape vines a ton, which hurt to do. The rose will grow back quickly, but that grape vine takes awhile, and it really only started producing mass amounts of grapes last year. Fingers crossed that it snaps back. 

The next step was to paint. I had some oil-based primer left from ye olden days (maybe we used it on the pickets in the front yard?). Had I used all cedar or all pressure-treated wood, I would have kept it wood-colored, but I used a variety of woods and thought a little paint protection would go a long way.


The original project parameters call for pressure treated wood and store-bought lattice, and estimate the cost at about $100. I have three of these to build (this is the first) so I wanted to bring in my practice arch at closer to $50.

Here in Oregon, 8-foot 4x4 Douglas Fir posts are about $7 apiece. I used a mix of recycled shipping timbers (79 cents) and utility grade 1x2s ($1.50 for an 8-foot length) for the side supports, horizontal lattice,  and crosspieces on the top. The long skinny pieces on the side lattice are 6-foot long cedar garden stakes I already had on-hand.


The front and back pieces at the top are made from 1x6x6 clear grade cedar fence boards for $3 each.


I came in under my $50 target thanks to the river rocks, screws, and paint I already had on hand, as well as using utility grade lumber and a few on-hand and recycled bits. I'm sure that (free) pallet wood could stand in for most of the pieces here, too, so it's entirely possible to build one for even less (in fact, over on my Curb Appeal Pinterest board, there's a link to a plan for a pallet wood arch that's kid-sized).

I'll have more for you later, as the path gets re-done and the garden beds get rebuilt (I'm thinking cement retaining wall blocks this time around), so check back later in the summer!

In the meantime, thanks for reading the latest in my series of posts for the Young House Love / Bower Power Pinterest Challenge! Head on over and link up if you've finished a project inspired by Pinterest, too.

Linking up to: