At last, it's time to show you a little more about this teaser photo I showed at the end of my last post:

Of the many pins on my Curb Appeal Pinterest board, most are variations on the pergola/arbor/garden arch theme. I've been collecting ideas for nearly two years now.

In front of my house, I have two random metal garden arches (in different styles) that came to me on sale from a couple of different places. In the backyard, the "arch" in front of the studio building (which is now mostly sided! Hooray!) looked like this:

Urgh. The green metal arch (can you even see it?) is a leftover craft store "wedding arch" from our wedding ten years ago. It was clearly not meant for heavy labor.
I had it pretty neatly disguised for awhile with twigs and branches woven in. A windstorm collapsed the whole thing last year.
I then had it supported by the side supports of a pergola that had also collapsed in the windstorm . . . total eyesore. That part had been removed by the time I thought to take this photo, along with a lot of the sticks and weeds.

Yes, I'm embarrassed that things got to this neglected, overgrown state. That's life in a fixer-upper, folks. Some things get fixed-up faster than others.
Which explains all of those arbor pins on my pin board, and my burning desire to take care of the issue.
This project was uploaded to Instructables by someone calling himself/herself SpecialK, who deserves the credit for this photo. And it's the project I decided I could take on, by myself, before my husband came home from work one day last week.
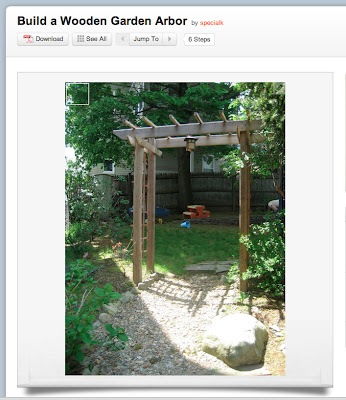
So, that didn't exactly work out. I did have it about 90% built by the time the mister rolled up that evening (just needed cross bars and lattice on top and sides), but in my eagerness to get to building, I built it out of place. This presents some challenges I hadn't properly anticipated, like, say, assembling the thing with only one adult present, and moving it, and keeping things square and level. But let's set that aside, and assume that you'll do things the EASIER way: holes first, arbor built in place.


I finished it up the next afternoon (with some help from my kiddo and his toy drill) and started measuring for and digging the holes for the legs.

After the mister helped me finish digging with the post hole digger (approximately 15 inches deep), I put some pea gravel in the bottom of each hole (approximately 3 inches worth) and we finagled the arch into place, working until it was in-line with the roofline of the studio.

The bottoms of the legs are coated with spray-on rubber sealant about 18-inches along the bottom and sides. They are made of Douglas Fir, which needs a little insect and rot resistance. The gravel is for drainage as well as anchoring. I filled around the legs with some more pea gravel, and finally some larger river rocks near the top to disguise the sealant and to keep dirt away.


I also trimmed back the rose and grape vines a ton, which hurt to do. The rose will grow back quickly, but that grape vine takes awhile, and it really only started producing mass amounts of grapes last year. Fingers crossed that it snaps back.
The next step was to paint. I had some oil-based primer left from ye olden days (maybe we used it on the pickets in the front yard?). Had I used all cedar or all pressure-treated wood, I would have kept it wood-colored, but I used a variety of woods and thought a little paint protection would go a long way.

The original project parameters call for pressure treated wood and store-bought lattice, and estimate the cost at about $100. I have three of these to build (this is the first) so I wanted to bring in my practice arch at closer to $50.
Here in Oregon, 8-foot 4x4 Douglas Fir posts are about $7 apiece. I used a mix of recycled shipping timbers (79 cents) and utility grade 1x2s ($1.50 for an 8-foot length) for the side supports, horizontal lattice, and crosspieces on the top. The long skinny pieces on the side lattice are 6-foot long cedar garden stakes I already had on-hand.

The front and back pieces at the top are made from 1x6x6 clear grade cedar fence boards for $3 each.


I came in under my $50 target thanks to the river rocks, screws, and paint I already had on hand, as well as using utility grade lumber and a few on-hand and recycled bits. I'm sure that (free) pallet wood could stand in for most of the pieces here, too, so it's entirely possible to build one for even less (in fact, over on my Curb Appeal Pinterest board, there's a link to a plan for a pallet wood arch that's kid-sized).
I'll have more for you later, as the path gets re-done and the garden beds get rebuilt (I'm thinking cement retaining wall blocks this time around), so check back later in the summer!
In the meantime, thanks for reading the latest in my series of posts for the Young House Love / Bower Power Pinterest Challenge! Head on over and link up if you've finished a project inspired by Pinterest, too.
Linking up to: