Showing posts with label wood. Show all posts

Tuesday, July 15, 2014

craft stick + embroidery hoop drum light

I'm still working through some details on this one, but I wanted to show you an "in progress" of this drum light. I started with a couple of embroidery hoops and a package of craft sticks, all from a thrift shop. The craft sticks are a little like wooden coffee stirrers, but longer. 


I started with the outer part of the embroidery hoop pretty loose, and put a stick between the hoops at 12, 3, 6, and 9 o'clock (imagining the circle as a clock, just for placement). Then I tightened the hoop somewhat to hold them steady. Those four sticks were the anchors, to hold the inner and outer parts of the hoop the right distance apart to insert more sticks.


Once things started to get unwieldy, I sandwiched the second hoop at the top.


All done. The next step was to slide the top hoop all the way to the end of the sticks. (I worked with the hoop a little low so that I wouldn't have so many slip loose.)


Done and hung up with cup hooks, surrounding the "boob light" in the hallway.


I like the effect, but I think it might need some tweaks; maybe with the sticks cut in half for a lower profile in my short hallway. Maybe a piece of thin, buffed plexi to help diffuse the light.  And I need a better way to hang it. I'm not in love with the exposed cup hooks.


If you can think of any ways to make this look more awesome, leave your ideas in the comments below! Thanks for stopping by to visit.

Monday, May 26, 2014

a mother's day planter with new house numbers

The kiddo and I dipped into our scrap lumber pile to put together a new planter + house numbers for his grandma for Mother's Day. Actually, it was partially a birthday present for his grandpa, too, whose birthday had been a couple of weeks earlier. They've been needing something like this for awhile as someone (they both swear it wasn't them) had run into the previous house number post quite awhile ago.

Here's the before and after:


The Mr. picked up some potting mix and we picked out a plant at the hardy plant sale (it's an ornamental grass that's drought resistant and will eventually have golden plumes on top), but otherwise, we had all of the materials on hand.

If you make a planter out of your own scrap pile (old fence boards, leftover trim, etc.) your dimensions will vary based on what you have on hand, but here's a general guide:

Decide on your dimensions and sketch it out. A sketch will help solidify your plan and guide you as you work . I decided to make this planter three boards wide and two feet high, to make maximum advantage of our leftover and recycled wood.

Making a four-sided box planter, I constructed two sides with the trim overhanging a bit to cover the ends of the other two sides. I used 1x2 lumber scraps leftover from another project screwed onto the top and bottom.


On the backs of these two pieces, I added a couple of scrap lengths of 2x2 to the edges to act as interior braces.


The other two sides were built with the trim even with the ends.


Then I screwed the four sides together using the 2x2 braces to make everything secure, and screwed bottom boards in place. Spaces between the boards make for efficient drainage.


(Grainy early-evening photo alert!)


Four short stubs of pressure-treated 2x4 (leftover from a fence project) make great rot-resistant feet (the Mr. nailed them in place from the inside), and I let the kiddo help me stain the planter. He helped me pick the stain color, too. (It's Benjamin Moore Arborcoat in redwood color).


I managed to stop him from coating the front panel, though, which left room for the house numbers.

(If you make a measurement error {like I did} when planning the sides, some lengths of cedar garden stakes can be added at this point, too, to cover the corner gaps and add a nice design element.)


Not pictured here is the layer of black plastic I stapled to the inside (with holes cut through for drainage) to protect the wood from the wet dirt. Most of the planter is made with cedar fence board scraps, but my hope is that the plastic will keep the supports from rotting right away.

We waited until we had the planter in place before filling with soil, then planted it and added about six inches of mulch to the top to keep the plant happy and the soil moist.


As with any project, there are things I'd do differently next time around (like hiding the screws by screwing from the other side, measuring better, stenciling instead of free-handing), but the good thing about building anything for the first time is that you learn little things that will help you out the next time. And you know what? No one who loves you will complain about small imperfections anyway.

Thanks for reading!

Linking up to:
My Repurposed Life


Wednesday, April 16, 2014

free mulch? sign me up.


I'm sure there are other communities out there where this is a thing: the public works department chips up downed tree limbs and trimmings from parks and public lands, and makes the chips available for free. Research to see if your community offers the same.


There are several of these stations around town. We stumbled upon one while out for a bike ride a couple of summers ago. Now when I need mulch, I pack the kiddo, a shovel, five plastic bins and a couple of Ikea's big blue bags in my car and head off.


It's been a pretty awesome resource for our yard. Thanks Public Works Department!

Wednesday, January 8, 2014

paul bunyan christmas boxes

You've already seen some of the things I packed into this year's Christmas boxes, including the Paul Bunyan Towel-endar . . .


. . . the saved mammoth sunflower seeds . . .


. . . and the woodsy snow globe ornaments.


So let's look at some of the other stuff that went in the boxes with these goodies. Here's some coconut candied peanuts. I packaged them in triangular treat bags and added gold ties and vintage-style labels. (I should have chosen tree nuts to stay on theme, but I had a momentary lapse)


And here are some bar coasters I printed with a log slice pattern (for fun, some also had a bark pattern on the backs).


These little Paul Bunyan books (Paul Bunyan Comes West, originally published 1928) were my favorite, though. I'll talk more about them in a future post, but here's a sneak peek at them after I bound  them but before they were wrapped and put into the boxes.


I packed everything into a treat box with a window on the top. You'll notice I also enclosed a box of packaged tea and a little parchment paper package of birch branch paper straws.


Then I added some colorful paper shreds I reused out of a Pijon Box delivery. They use a lot, so I had plenty for twelve boxes.


I tucked the Paul Bunyan towels in on top of everything . . .


. . . then sealed up the boxes (bought during last year's post-Christmas clearance) with the towel wrap showing through the window.


Finally, I used some recycled brown paper to print some wrapping paper using the same block I used for the coasters. I tied the packages shut with baker's twine and added more wood veneer tags on top. These ones say, "Paul Bunyan says, 'Merry X-Mas'" in gold pen.


Positive feedback from family and friends! I had a lot of fun, and some frustration, and a few late nights putting everything together this year. I even got boxes in the mail in time for Christmas for those I wouldn't be visiting. Now to start planning for next year . . .

p.s. make photos larger with a click!

Linking up to:


Friday, January 3, 2014

snow globe ornaments

To go along with the Paul Bunyan towelendars and some other things (to be discussed in my next post), I made these cute snow globe ornaments with tiny bottle brush trees and a ton of glitter (both opalescent and silver). I inserted the trees with long tweezers and attached them with hot glue.


I found the bottle brush trees and clear ornaments at Ben Franklin Crafts here locally, which turned out to have ample supplies of both after the other chain stores sold out (also better pricing than JoAnn).

I tried this with both plastic and glass ornaments, and each had some pros and cons.


Mainly, I had more problems with hot glue strings sticking all over the inside of the plastic bulbs, but this also meant that the trees were more secure once they were stuck in place.

The glass bulbs didn't have as many problems with glue strings sticking, but I also had more trees come loose from the bottoms of the bulbs. In addition, I had one glass ball break, so buy one or two extra if you have a set number of people on your gift list.

Again in the pro column (for me) is that the glitter is statically attracted to the inside of the glass, so there's a bit more of a "falling snow" effect on the sides of the glass ornaments than inside the plastic ornaments.


I finished these off with baker's twine loops and tags cut from wood veneer. I purchased a large piece (2 x 5 feet) of wood veneer at the recycled building store for $3, and it cut easily with kitchen scissors. To prevent ink from running in the grain, I drew the year on with pencil. As a bonus, it has a nice handmade look to it.


I'll link you here to my inspiration for this project, last year's Prep & Landing snow globe project from Disney's Family Fun Magazine. I ended up foregoing the bases and using bottle brush trees after seeing a few similar projects on Pinterest, and was happy with the decision. I think my additions of the twine and wood veneer tags are what make them really stand out as a nice tie-in to the Paul Bunyan tales though.


Did you put together any fun Christmas ornaments this year?

Thanks for reading!

p.s. Did I mention that you can make these photos larger just by clicking on  them? You probably already knew that, but I thought I'd mention it.

p.p.s. Did I also mention that I cut our cedar Christmas tree out of our yard this year, Clark W. Griswold style? Yeah, that totally happened.

Wednesday, May 8, 2013

pinterest challenge: a backyard arbor

At last, it's time to show you a little more about this teaser photo I showed at the end of my last post:


Of the many pins on my Curb Appeal Pinterest board, most are variations on the pergola/arbor/garden arch theme. I've been collecting ideas for nearly two years now. 


In front of my house, I have two random metal garden arches (in different styles) that came to me on sale from a couple of different places. In the backyard, the "arch" in front of the studio building (which is now mostly sided! Hooray!) looked like this:


Urgh. The green metal arch (can you even see it?) is a leftover craft store "wedding arch" from our wedding ten years ago. It was clearly not meant for heavy labor.

I had it pretty neatly disguised for awhile with twigs and branches woven in. A windstorm collapsed the whole thing last year. 

I then had it supported by the side supports of a pergola that had also collapsed in the windstorm . . . total eyesore. That part had been removed by the time I thought to take this photo, along with a lot of the sticks and weeds.


Yes, I'm embarrassed that things got to this neglected, overgrown state. That's life in a fixer-upper, folks. Some things get fixed-up faster than others.

Which explains all of those arbor pins on my pin board, and my burning desire to take care of the issue.

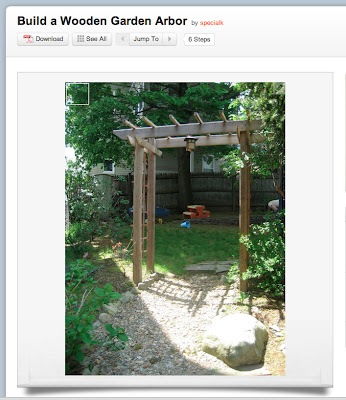
This project was uploaded to Instructables by someone calling himself/herself SpecialK, who deserves the credit for this photo. And it's the project I decided I could take on, by myself, before my husband came home from work one day last week.


So, that didn't exactly work out. I did have it about 90% built by the time the mister rolled up that evening (just needed cross bars and lattice on top and sides), but in my eagerness to get to building, I built it out of place. This presents some challenges I hadn't properly anticipated, like, say, assembling the thing with only one adult present, and moving it, and keeping things square and level. But let's set that aside, and assume that you'll do things the EASIER way: holes first, arbor built in place.


I finished it up the next afternoon (with some help from my kiddo and his toy drill) and started measuring for and digging the holes for the legs.


After the mister helped me finish digging with the post hole digger (approximately 15 inches deep), I put some pea gravel in the bottom of each hole (approximately 3 inches worth) and we finagled the arch into place, working until it was in-line with the roofline of the studio.


The bottoms of the legs are coated with spray-on rubber sealant about 18-inches along the bottom and sides. They are made of Douglas Fir, which needs a little insect and rot resistance. The gravel is for drainage as well as anchoring. I filled around the legs with some more pea gravel, and finally some larger river rocks near the top to disguise the sealant and to keep dirt away.


I also trimmed back the rose and grape vines a ton, which hurt to do. The rose will grow back quickly, but that grape vine takes awhile, and it really only started producing mass amounts of grapes last year. Fingers crossed that it snaps back. 

The next step was to paint. I had some oil-based primer left from ye olden days (maybe we used it on the pickets in the front yard?). Had I used all cedar or all pressure-treated wood, I would have kept it wood-colored, but I used a variety of woods and thought a little paint protection would go a long way.


The original project parameters call for pressure treated wood and store-bought lattice, and estimate the cost at about $100. I have three of these to build (this is the first) so I wanted to bring in my practice arch at closer to $50.

Here in Oregon, 8-foot 4x4 Douglas Fir posts are about $7 apiece. I used a mix of recycled shipping timbers (79 cents) and utility grade 1x2s ($1.50 for an 8-foot length) for the side supports, horizontal lattice,  and crosspieces on the top. The long skinny pieces on the side lattice are 6-foot long cedar garden stakes I already had on-hand.


The front and back pieces at the top are made from 1x6x6 clear grade cedar fence boards for $3 each.


I came in under my $50 target thanks to the river rocks, screws, and paint I already had on hand, as well as using utility grade lumber and a few on-hand and recycled bits. I'm sure that (free) pallet wood could stand in for most of the pieces here, too, so it's entirely possible to build one for even less (in fact, over on my Curb Appeal Pinterest board, there's a link to a plan for a pallet wood arch that's kid-sized).

I'll have more for you later, as the path gets re-done and the garden beds get rebuilt (I'm thinking cement retaining wall blocks this time around), so check back later in the summer!

In the meantime, thanks for reading the latest in my series of posts for the Young House Love / Bower Power Pinterest Challenge! Head on over and link up if you've finished a project inspired by Pinterest, too.

Linking up to: