Showing posts with label easy. Show all posts

Monday, August 10, 2015

fast and easy paper making for kids!

If you have a preschool-aged kid (or older) with an interest in recycling, this is a fun afternoon project! Let's make some paper!

Take scrap paper and, with your kid, tear it up and put it in a blender with some hot water. We used a couple of mis-printed sheets from the printer, a bit of cardboard, two pieces of junk mail, and a sheet of purple construction paper. The trick is: the blender blades have to turn freely, so don't jam-pack the blender and use lots of water.

Blend till pulpy.


Kids can pour into the screen! We actually did the pouring over a catch-basin, then moved it to the table.


Kids can sponge gently to remove excess water. Here, my now-gigantic, soon-to-be-kindergartener kiddo sponges our screened paper.
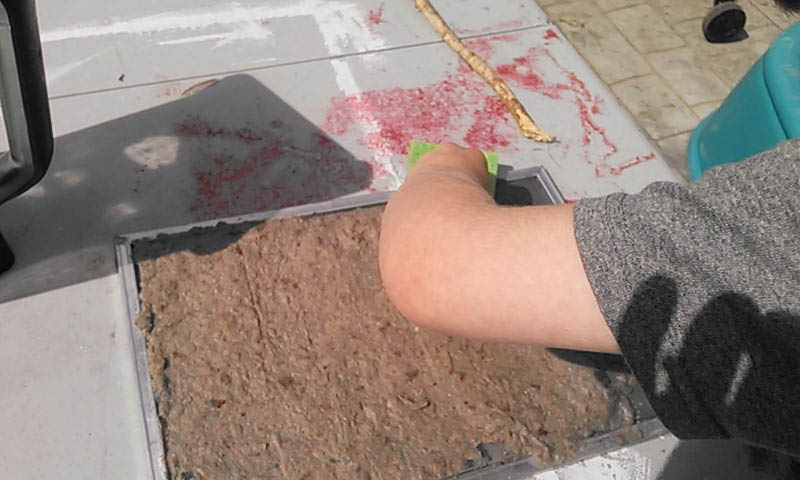


Flip it over on felt, polyester, or polypropylene cloth (heck, linen would probably work, too), then press from the back with a sponge (kids can do this part, too!) (The kiddo is developing his photography skills; these are nicely framed, I think.)


Carefully lift screen, helping paper separate by pulling gently on the corner. Once the  entire screen is separated from the paper, leave it to dry.


And once it's dry, you can cut it into two equal pieces . . . or more.

The resulting paper will vary in thickness and texture, depending on your pour, and color, depending on your source materials. Ours feels a little like egg carton cardboard.

Nice textural quality; the screen leaves crosshatch marks on the surface, which look great when rubbed with a crayon.  

And that's all there is to it! The materials used don't have to be expensive. We used a small window screen from the recycled building materials store (99 cents), some kitchen sponges, and a polypropylene sack.  Serviceable and fun for a summer project! 

We're going to try this at the preschool's day camp this month, too, but using hand mixers; the low-tech kind with a hand crank (go go fine motor skills!). I'll try to remember to post the results for those who want to give it a try!

Thanks for stopping by!

-a

Friday, February 20, 2015

packaged airplane crayon party favors

You last saw these in November, when I was casting them by stove top. Here they are all packaged up! I designed the backers in Illustrator and attached the crayons with glue dots.


Monday, December 15, 2014

evergreen wreath

The kiddo's school has a yearly fundraiser selling locally made (not by us) wreaths. I bought one last year and I bought one this year, and I'm fine with it. The wreaths are pretty and they smell good, and the school gets a nice chunk of the proceeds too, unlike with those magazine and candy sales I did as a kid.

Here's the thing: wreaths are relatively easy to make, and very inexpensive if you have access to evergreens. If you want more than one wreath for your house and school fundraisers are too expensive, give it a go. Here's one I made.


I used rosemary branches, some angry, pokey evergreen branches from a tree out back. and some little cedar twigs that got blown down in a windstorm.


The wire wreath form is from last year's wreath.  It's called a soft clamp wreath frame, if you need to order one. I just used some pliers to pull open the prongs last year, composting the old evergreens and storing the wreath form to recycle this year.


Add branches.
  

Use pliers to cinch everything together.


Tuck additional branches in to cover the wires, and hang it on a nail, ribbon or hook.


My wreaths sometimes look a little asymmetrical, which I like. If you don't, trim yours till it looks right to you.

Okay! That's all from here. Kid's got the flu so I'm off to do another load of laundry. Be well!

Saturday, June 14, 2014

potato print onesies (baby shower project)

Inspired by a similar project from Martha Stewart Living and the potato printing projects of my youth, these are a fun, fast, simple project for a baby shower. We made these at a shower I hosted for one of the moms from our preschool, expecting her second baby. 

Potatoes make good stamps for printing on paper or cloth. Cut them into simple shapes, use foam brushes to apply fabric paint (we used Kid Made Modern fabric paints from Target's selection of kids' art supplies), then stamp shapes to make pictures or scenes. After dry, heat set with an iron, and they're ready to wear!


Linking up to:
I Should Be Mopping the Floor

Sunday, June 1, 2014

chocolate truffle bath fizzies


 We've made bath fizzies before (and let me tell you, preschoolers go nuts over them if you bring them for show-and-tell), but we've never made chocolate bath fizzies before. These smell pretty awesome, and chocolate is maybe good for your skin, too. So, you, know, if you needed another excuse to make these, now you have one.


Stir one cup of baking soda with a half cup each of citric acid and cocoa powder until it's all an even color. Spritz with alcohol-based liquid (not gel) hand sanitizer. Stir and avoid adding so much moisture that the powder fizzes. Add a little food coloring if your kiddo insists. Squeeze periodically to see if your mixture will clump together. When it does, pack firmly into little snowballs and set on a towel to dry. Depending on size, you can make up to a dozen fizzies or so.

Saturday, May 17, 2014

fairy flower surprise gift (giant tissue paper flower)


These make a nifty way to present a tiny gift to someone special, whatever the occasion.  Extra large fairy flowers are an especially nice way to package costume jewelry for kids' birthdays; this one, for example, concealed a comically large metallic ring with a huge purple plastic gemstone for a girl who loves fairies.

I think these flowers make a nice gift in themselves, as well, or pretty awesome party favors. They're also versatile, easy to make, and use materials that are reasonably easy to find.


Start with six squares of tissue paper. To make the largest flower possible, use full-sized sheets of tissue with an end cut off to make a square. For smaller flowers, use smaller squares of paper. I used two sheets each of green, pink, and yellow, but you can alter the colors to match your theme.


Stack them up, and make one-inch wide accordion folds from one end of the stack to the other.


Use scissors to round the ends of the folded stack, then use a green pipe cleaner (aka chenille stem) to cinch the stack at the middle.


Carefully separate the layers of paper, gently pulling and shaping them up and towards the center to look like petals and leaves.


Use a length of 20 gauge steel wire to make a long stem, and use it to follow the green pipe cleaner around the center of the flower.


At the flower's base, twist the pipe cleaner and stem wire together, then wrap the entire stem with patterned washi tape or masking tape. The stem should be sturdy enough to hold the flower upright.


The center will be where you place the bundled present! Wrap your gift in layers of tissue paper and twist the top. Use two short lengths of pink chenille stems to twist around the top of the bundle, curling the ends.


Apply a rolled piece of the patterned masking tape or a piece of double-sided tape to the bottom of the bundle. (Hint: If you're planning on traveling very far or the jewelry is very expensive, I'd attach the bundle with hot glue instead of tape.)
 

Insert the bundle into the flower's center and press hard to secure it in place. Make sure to include a line in an attached card to let the recipient of the gift know to check the center of the flower for a hidden surprise!


If you plan to make a bunch of these as party favors, you can cut up to a dozen sheets of paper into squares at once to save time, and then build the flowers assembly-line style.


Thanks for reading!

Thursday, March 27, 2014

simple animal paw shoes for theater + halloween costumes


I made these shoes for the Cat in the Hat for our preschool's recent production, to match the costume I retrofitted (coming up in a future post). It's funny; I had let the other costume maker borrow my one and only costume shoe pattern and was scrambling to get some shoes made for a dress rehearsal, but this style actually ended up working better than the pattern I'd loaned her.

You'll remember that my computer died? As in DEAD dead. The hard drive and logic board both keeled over at the same time, which means I could only use my phone for internet searches, and my phone won't send anything to my printer. So while I remembered this Martha Stewart felt slippers pattern, I had to improvise and hand-draw rather than printing it. All's well that ends well; these turned out just right.


For the soles, I used two layers of this old rough-backed felt from the stacks of leftover fabric in the theater supplies at school. For the body, I used one layer of the stiff-backed felt and one layer of the hound's tooth flannel I'd used for the Cat's costume. The foot pads are cut from a scrap of red ostrich leather I bought awhile back at a thrift store, zig-zag appliqued into place before assembling the shoes.


To make your own, you can follow Martha's original instructions with the following changes:

1) Instead of a single layer of thick felt, I used one layer of thinner craft felt and one layer of woven fabric, serged together at the edges. Word to the wise: when using thinner felt, using mutiple layers is key. You'll get a lot of stretch and wear-through with single layers.

2) The appliques are used (in addition to the rough-bottomed felt) to make the shoes non-slip, and to add some durability. Highly recommended, whether for Halloween or for theater. In addition to making the shoes less slippery and more sturdy, the pads are an especially nice touch if, at any point, your character shows the bottoms of his or her feet to an audience. This happened in our play, and every time I could feel how much it added to the kids' experience.

3) The original pattern leaves the seams on the outside; I tucked mine inside.

4) As the cuffs are layered with woven fabric + felt, they don't have much stretch, so the wearer will have to spend a minute working them onto his or her feet. It actually makes them fit really securely, and for a seldom-used costume piece it's not too much of an inconvenience.

Like most things, you can adapt these pretty endlessly to a variety of costumes. Switch up the fabric, use faux fur, different color leather, etc.

More to come! Thanks for reading.

Wednesday, March 26, 2014

removing water stains from a dresser

I have a veneered 1928 dresser with Bakelite drawer pulls that I found at a thrift store a really lot of years ago. We were mostly broke at the time, so it was kind of a big deal. It came with a vanity and a headboard, too (which aren't currently in use); I think I carted it home piece by piece in my car? Or maybe I borrowed a truck? It was a lot of years ago. I was really into Bakelite at the time, so I was pretty excited.

Right before we left on our road trip to Montana a year and a half ago, I tipped over a glass of water that had been on top and it splashed and dripped all down the front. The water stains appeared right away. I mopped up all the water, made sure everything in the drawers was dry and in good shape, and hoped that the water stains might dry out and disappear by the time we returned.


But that's not how water stains work, as it turns out. I've just been staring at my ruined treasure since then, wondering whether it was salvageable or whether it'd have to wait until I could pull it out and completely refinish it.

Good news: while cleaning my room, I finally decided to do a little on-line research to see if there was a safe, non-toxic, simple solution that'd tide me over until refinishing. There is!

Denatured alcohol is recommended; as I don't have any of that, I used standard rubbing alcohol from my first aid box. I just poured a little on a wash cloth, and rubbed it on.

I had stared at those water stains for so long, I really didn't expect them to disappear so quickly, but they did. It worked so quickly that I didn't even take the time to run down the hall for my camera; I just snapped some quick photos with my smart phone. (Sorry about that.)


The alcohol took a little of the finish off, too (totally expected), so I followed up with some thorough drying and some paste wax.


Eventually the whole thing needs to be refinished (the shellac, like the shellac on my piano, is starting to crackle), but in the meantime, I don't have to stare at those accusatory water stains anymore. You might be amazed how much that improves the feeling I have when I walk into the bedroom, unless you've got some water stains of your own that you've been staring at for over a year. You will want to try this on your own.

Thanks for stopping in!