

Wednesday, August 10, 2016
Monday, August 1, 2016
adventure! children's museum fairy tale booth at we are bethel festivalpaper
 |
| paper sack flowers |
 |
| toadstools |
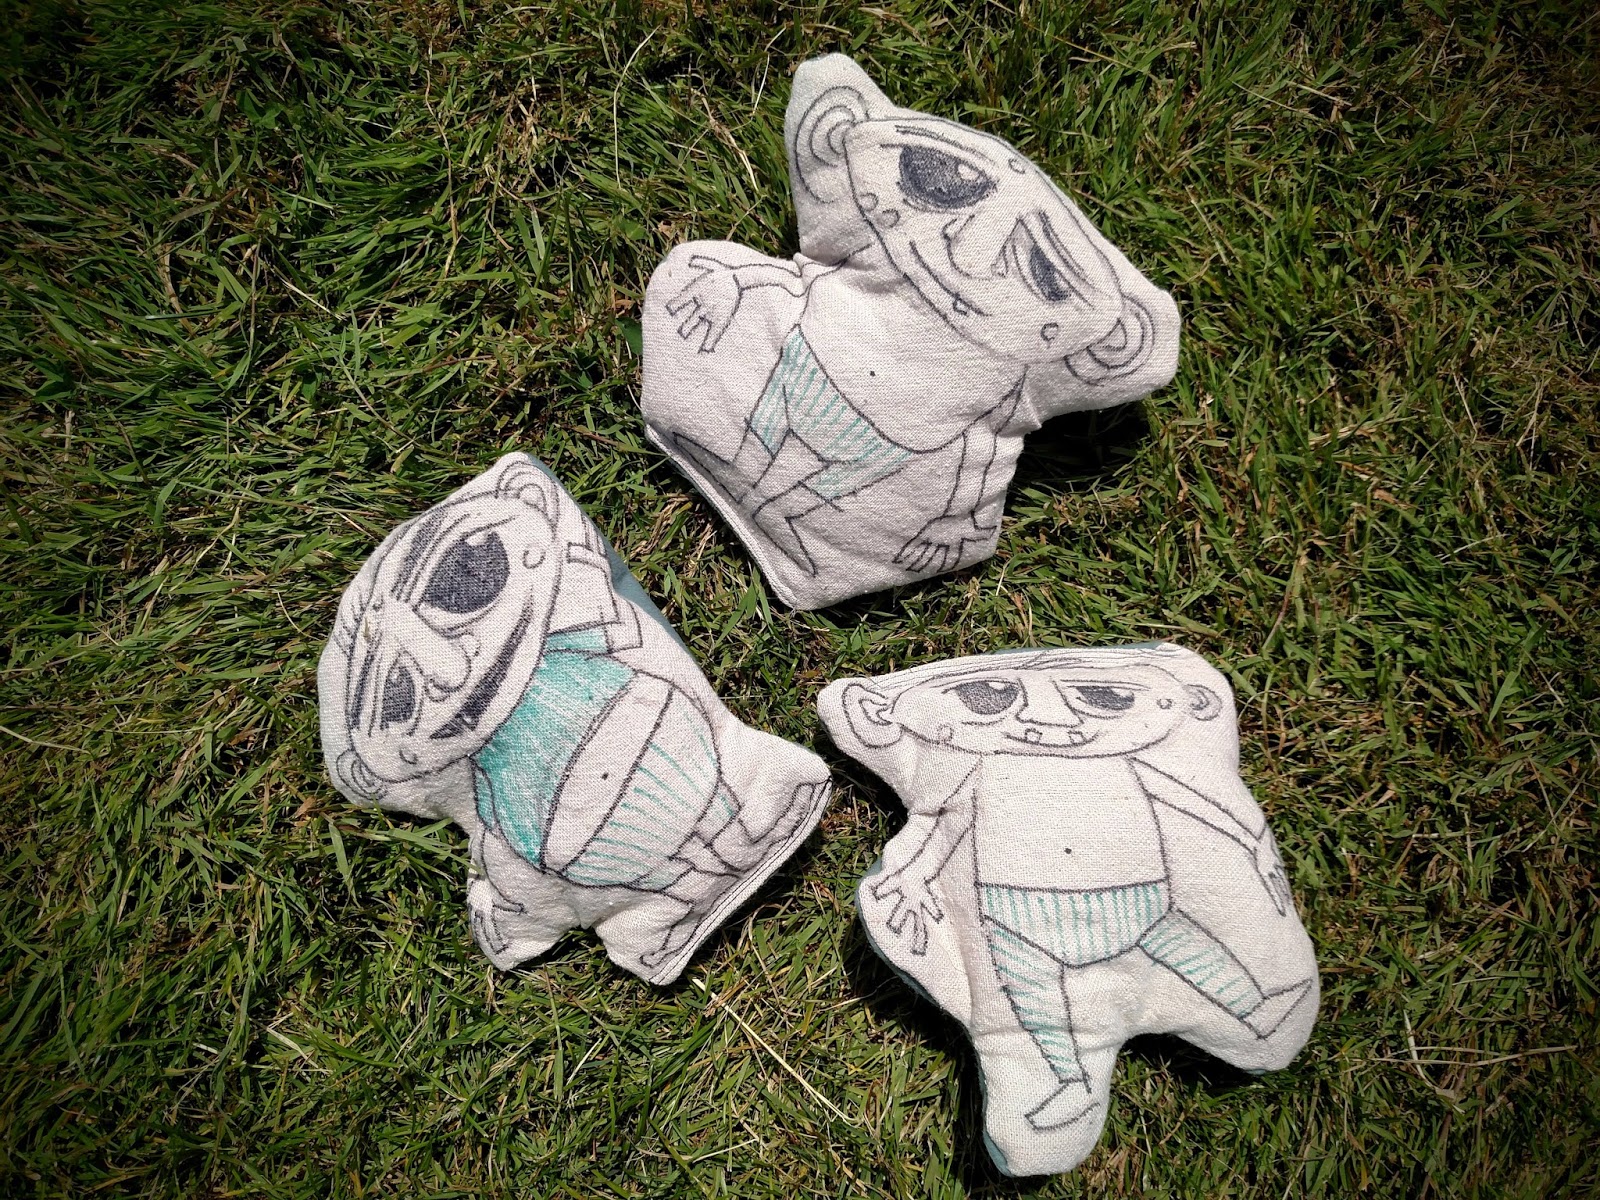 |
| garden gnome bean bags for the gnome toss |
 |
| the booth |
 |
| rock pillows |
 |
| wand making table |
Friday, July 29, 2016

Friday, January 1, 2016


Thursday, December 31, 2015


Tuesday, December 8, 2015


Friday, November 27, 2015


Sunday, October 18, 2015
on motherhood and loss
I was undergoing fertility treatment about a year after losing Alice.
I remembered that, in those early days, when the pregnancy was new and already announced to anyone in hearing distance, I'd said silly things about how I didn't understand how people could have such trouble conceiving; it had been as easy as falling off a log. I remembered being blind to the prevalence of miscarriage; I thought it was rare. And so of course, when the pregnancy failed to progress past week 6, I was ashamed of my pride, my hubris, and angry at myself for not being able to do this thing that Everyone Else did so easily.
I was talking to a friend who'd gone through fertility treatment (successfully), about my worries, my sadness, the days I couldn't focus on anything else for missing the child I thought I'd have, and wanting to hold one in my arms. Only mine; I couldn't look at other babies, couldn't walk by pregnant women without a visceral reaction. I'd made it all the way to the door of a friend's baby shower and then fled. I went to children's birthday parties and play performances and thought about what Alice was missing, how she'd never have a first anything. I cried a lot in those days, at my desk, and my sweet office mate was kind enough not to mention it.
I didn't, until my miscarriage, know how many people I was surrounded by had been through this. It is a secret sisterhood that suddenly welcomes you with empathetic arms. Ten. I know of ten women in my immediate circle who have suffered pregnancy loss. I had thought it was two, at the time. The actual estimates are that between 20 and 25% of pregnancies don't result in live birth. There are more of you out there; please know you are not alone.
"You think that this will make you a perfect mom, but you are still human, you will still make mistakes."
I was still haughty about things I didn't know, even sitting there, talking to someone who'd been through all that I had (and more, honestly; much more); I thought she was crazy. I'd promised myself I'd be the perfect mom, that I would deserve a child, should I get lucky enough to have one. I would do everything right. I believed I had somehow deserved to lose Alice, that I hadn't wanted her badly enough, or that I was being punished for the stupid things I'd said.
Somehow inside me, my whole life, a little egg that would be my son was laying in wait, tiny as a dot. In fact, in those first secret months, we called him Umlaut. I was four months pregnant before we told anyone he existed because I was so afraid if I said it out loud, he wouldn't anymore.
I'm not a perfect mom. I make mistakes like everyone else. Some days, I don't even know the right thing to do, and I worry that some mistake I make is going to ruin my son. Some truths you learn through experience; I am still human. Here are two more: I neither deserved to lose my first pregnancy, nor earned my second through guilt or repentance.
I know how to love, I have learnt it from the strangest moments, unexpectedly. I am imperfect at it, but I keep learning.
You who have lost your little ones, you are not alone. You who are trying to conceive, you have friends here. Feel what you feel, as long as you need. And then find a way to keep going.
And those who have finally welcomed a little one into your home, remember, it's a marathon, not a sprint; birth is a beginning, not the finish line. Be easy on yourself those moments you don't live up to your expectations, and be easy on your children those moments they are imperfect, too. You're learning how to love a whole new way. You can do this.
Thursday, August 27, 2015
springfield art and chalk fest, 2015
 |
| Chalk graffiti in front of Sprout. |
 |
| More veggie-themed chalk art |
 |
| This nice dog named Basil came to help his girls with their Star Trek-inspired art. |

 |
| Artists and the I Scream for Waffles truck. So good. |

 |
| Family fun chalk area with the kiddo. |
 |
| A really nice rendition of a tiger. |
 |
| My chalk tribute to Maurice Sendak. |
 |
| I drew this nearby while waiting for the judges to come by. |
 |
| Western Meadolark. |

 |
| Space octopus? |
 |
| Alphonse Mucha replica in chalk. |


 |
| This piece had really lovely color blending. |

 |
| Simpsons + Escher. |
Subscribe to:
Posts (Atom)