Call me crazy, but the Petersiks from the
Young House Love blog made their paver patio look so easy that when it came time to make a little spot for the bebe's
pirate sandboat to moor, I thought, "I can do that!" (Note: it's hard to tell how hard a project is by looking at photos on a blog.)
Initially, we'd planned to add just a little 5x8' paver patio addition, kind of off to the side of the cast concrete patio we put in about five years ago. After a little more thought about the logistics of digging it all up, compacting everything, and getting the new segment to line up seamlessly with the eventual total patio re-do (not to mention considering the possibility of renting a compacter and a paver saw multiple times), we decided to just do the whole thing all at once.
Sadly, my camera went missing for awhile, so I have no photographs of the prep work. You'll have to trust me that it was EPIC.
PREP STEPS:
* Pulling out the old cast concrete patio
* Piecing the old cast concrete bits together to widen the pathway from the backdoor to the patio
* Tearing up the sod
* Digging everything down to a depth of approximately 6 inches
* Trying to level the dug-out space (a fool's errand in a backyard that isn't level to begin with)
* Laying down weed barrier
* Shoveling, spreading, and compacting gravel
* Shoveling, spreading, and leveling sand
This list took the better part of two weeks during the bebe's nap time and in spare minutes when he felt like playing in his sandbox while his dad and I worked nearby.
I did get this photo of all of the rusty nails and screws I found while I was digging up the sod. These had likely been down there since the house was built in 1961.

This next photo is what you get when a paver company accidentally sells your special order of pavers to another customer from Jerry's hardware store (mistaking the other customer for you), but promises that when a new pallet arrives, it won't happen again because
your name is on the new pallet.
That's right. Instead of hubby's name, they wrote "Jerry's Customer" on the new pallet of pavers. (*Sigh*)

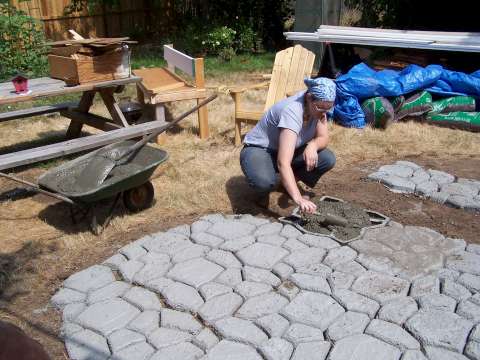
Now, this is where we veered sharply off course from the Young House Love blog. We started by laying a circle.

We made it bigger and bigger.

The "soldier row" was added around the perimeter of the full patio.

We nailed in the Snap-Tight border. A second circle was added, and all of the "pattern" bricks that didn't require cuts were laid in around the circles.

I measured and marked, and hubby made more than a hundred cuts on the paver saw in the course of one afternoon. I can't express enough how glad I am that we rented the paver saw. The rental cost $50, but the alternatives (chiseling them apart or using the tile saw to make shallow cuts on both side, then breaking) would have been really time consuming, and the edges would not have been so clean.


We compacted the pavers with a rented gasoline-powered plate compacter (another time-saving tool I wouldn't have wanted to tackle this project without, though we did make sure to use an old piece of carpet to keep the compacter from chipping the pavers), and added layers of polymeric sand (compacting between each layer), then misted, and voila!
Here are some close-ups of the finished pattern of pavers. As you might be able to tell, the sanding is a really important step. It disguises all the gaps and helps the patio look uniform and cohesive.


We're still working on adding a garden bed and making the path meet the edge of the patio, so there'll be a few more photos between now and "DONE"; in the meantime, here's a photo of me putting in the original cast concrete patio way back in 2006.

I'm determined to make this the last patio I put in for quite awhile, but as I remember, I swore the same oath the last time, and we all know how that turned out.
Pin It