Showing posts with label DIY. Show all posts

Monday, August 10, 2015

fast and easy paper making for kids!

If you have a preschool-aged kid (or older) with an interest in recycling, this is a fun afternoon project! Let's make some paper!

Take scrap paper and, with your kid, tear it up and put it in a blender with some hot water. We used a couple of mis-printed sheets from the printer, a bit of cardboard, two pieces of junk mail, and a sheet of purple construction paper. The trick is: the blender blades have to turn freely, so don't jam-pack the blender and use lots of water.

Blend till pulpy.


Kids can pour into the screen! We actually did the pouring over a catch-basin, then moved it to the table.


Kids can sponge gently to remove excess water. Here, my now-gigantic, soon-to-be-kindergartener kiddo sponges our screened paper.


Flip it over on felt, polyester, or polypropylene cloth (heck, linen would probably work, too), then press from the back with a sponge (kids can do this part, too!) (The kiddo is developing his photography skills; these are nicely framed, I think.)


Carefully lift screen, helping paper separate by pulling gently on the corner. Once the  entire screen is separated from the paper, leave it to dry.


And once it's dry, you can cut it into two equal pieces . . . or more.

The resulting paper will vary in thickness and texture, depending on your pour, and color, depending on your source materials. Ours feels a little like egg carton cardboard.

Nice textural quality; the screen leaves crosshatch marks on the surface, which look great when rubbed with a crayon.  

And that's all there is to it! The materials used don't have to be expensive. We used a small window screen from the recycled building materials store (99 cents), some kitchen sponges, and a polypropylene sack.  Serviceable and fun for a summer project! 

We're going to try this at the preschool's day camp this month, too, but using hand mixers; the low-tech kind with a hand crank (go go fine motor skills!). I'll try to remember to post the results for those who want to give it a try!

Thanks for stopping by!

-a

Thursday, September 25, 2014

counting on it!

Well hey there! It's been awhile, right? It was an amazing and busy summer. The kiddo and I made a lot of stuff, went on a lot of adventures, and generally kept ourselves occupied from the day preschool let out until the day preschool started. And I'm on the board this year, so things have gotten even crazier.

I'm stopping in today to share one of the big projects we finished this summer. It's a book.


About halfway through the school year, the kiddo's teacher started having the kids make one or two alphabet letters per week as part of a daily series of arts and crafts projects.
E is for Eagle


F is for Flower
X is for X-ray
If the kiddo was sick on a day a letter was introduced, we made our own version at home. Adding to the fun was putting each letter in a black portfolio book, one after another, until finally we had the whole alphabet.
P is for Pirate
Q is for Quilt
"But wait, Mama!"

There were so many blank pages left! I suggested we take on as many numbers as possible until the book was filled, and the kiddo was game. We managed to fit zero through twenty in the book before we ran out of space.

One red apple / Two pretty flowers

Six crunchy carrots

Aside from cut paper, we used a little of every material in our arsenal, from googly eyes and multi-color pipe cleaners to bingo daubers, glitter glue, and stamps.

Eight wiggly spider legs

Seven spangly fireworks

Ten flying keys

He even stitched through the buttons using a tapestry needle and yarn!

Nine colorful buttons

Towards the end, when things were getting crowded and the projects a little lengthy, we got extra inventive.
Eleven apple trees

Thirteen sugary donuts

Fourteen fuzzy bunnies

I love the sweet little faces he drew. Love them to bits.

Sixteen glittery jewels

Seventeen black zebra stripes


Eighteen wiggly hairy eyeballs

Nineteen peppermint candies

Twenty pink carnations


Whew! We made it through the whole thing. I tried to let the kiddo do most of the work on the gluing, drawing, punching, stamping and coloring (although I got a little bossy with the zebra). I stuck mainly to cutting, although he's getting so good with the scissors now that I'm going to be pawning more and more of that work off onto him, too. We're planning to tackle the lowercase letters next, unless the new preschool teacher gets to them first.

What about you? Did you tackle any arts and crafts projects this summer too?

Thanks for reading!

--a

Monday, July 28, 2014

sun printing on fabric (seriously the best surface design project of the summer)


 I spent several years at the university earning my BA in art. The last couple of years that I was in school, I was especially drawn in by the fiber arts program. I spent an entire summer term dyeing with indigo vats, for example, and another term learning natural dyeing techniques (with plants and things). I learned to carve stamps and print with acrylic paint, screen print with a Thermofax, photocopy directly on fabric. I learned about resists and cyanotype. I designed costumes and learned the art of sashiko. I tie dyed and sewed and painted and printed and felted and spun . . . and somehow, in all those years of art and fiber classes, I never learned how to sun print on fabric using only acrylic paint, water, and leaves.


It's amazing, really, the many varied ways there are to apply color to surfaces. This effect, in particular, can be obtained a number of ways. I once made an umbrella into a tree canopy for a play, for example, by holding branches and leaves against the umbrella and lightly spraying with spray paint. Cyanotype paper and cyanotype ink can each be used to make sun prints. You can also make simple sun prints on construction paper just by leaving the leaf-covered paper in the sun for a few hours.

This project, though, is astounding in its simplicity. I had all the materials on hand (you can use any fabric paint or acrylic craft paint; the paint shown is Kid Made Modern fabric paint from Target, the same stuff we used on the baby shower onesies awhile back), the set up is simple enough for kids and grown-ups alike, and the results are stunning.


Seriously Easy Sun Printing Tutorial


1) Take a piece of fabric (muslin, canvas, etc., with at least 50% cotton content) and get it wet.


2) Squeeze out the excess water.

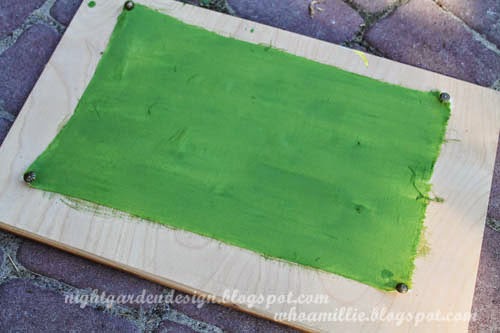
3) Stretch and pin to a board.


4) Pour a little paint and water into a container, and stir to mix.


5) Cover the surface of your fabric with thinned paint solution.


6) Cover the wet, painted surface with leaves, twigs, berries, etc.


7) Leave it in the bright sun, then check on it in about an hour. If the sun is weaker, leave it longer.


And that's it.


The capillary action draws the paint from the shaded portions (under the leaves) into the drier, unshaded portions, leaving lightly colored leaves on a darker colored background.


After your fabric has dried completely, put it in the dryer for a few minutes to heat set the paint, or iron with a cloth. It'll be safe to incorporate into a project and wash.


I'll never be done learning new things, it seems. Isn't that fantastic?


Thanks for reading!

Monday, July 21, 2014

a little bit of summer

Here are a few things we've been working on so far this summer. I hope to go into a bit more detail on some of them in future posts, but with all the play dates and swim lessons and backyard quicksand making, I'm having a hard time settling down to update the blog. The weather's too nice, the days (as long as they are) are too short. We're filling them full.

I hope you're enjoying your summer too!


My booth at the Eugene Mini-Maker Faire in June.

Getting good use out of the studio; the kiddo tells me this is a picture of a queen.

We're going to have so many grapes this year. So many!

Tie dyeing with fabric paint for a special quilt project.

Watching a juggler on the library plaza at the Summer Reading kick-off.

A booth at Black Sheep Gathering where the kind people told me how to fix my spinning wheel.

These b&w dragonflies are all over the place this summer. I love them.

Mashing up the u-pick strawberries from the organic farm to make jam.

Sunset roses.

Sun printing on fabric (it's really easy).

W is for watermelon, if you're eating the alphabet.

Red flowers and pool blue chairs.

Hanging up the ride-on toys on the back of the shed.

A peanut plant.

Yup. We're growing peanuts as a science experiment this summer.

Croquet cart from the thrift store . . .

. . . with some new stain and tightened screws for long life.

Painting the patio bricks with washable tempera paint is fun with kiddos.

Did I mention we also camped out at the beach for a few days, and spent some time at the ballpark, and played mini golf, and have been to the pool like a dozen times (at least)? Yeah. We're totally summering it up over here in the PNW.


Thanks for reading! I'll be back soon with a little post to explain sun printing in six easy steps, because now is the time, people! You crafty folks out there probably already have what you need on hand.