Showing posts with label summer. Show all posts

Monday, July 28, 2014

sun printing on fabric (seriously the best surface design project of the summer)


 I spent several years at the university earning my BA in art. The last couple of years that I was in school, I was especially drawn in by the fiber arts program. I spent an entire summer term dyeing with indigo vats, for example, and another term learning natural dyeing techniques (with plants and things). I learned to carve stamps and print with acrylic paint, screen print with a Thermofax, photocopy directly on fabric. I learned about resists and cyanotype. I designed costumes and learned the art of sashiko. I tie dyed and sewed and painted and printed and felted and spun . . . and somehow, in all those years of art and fiber classes, I never learned how to sun print on fabric using only acrylic paint, water, and leaves.


It's amazing, really, the many varied ways there are to apply color to surfaces. This effect, in particular, can be obtained a number of ways. I once made an umbrella into a tree canopy for a play, for example, by holding branches and leaves against the umbrella and lightly spraying with spray paint. Cyanotype paper and cyanotype ink can each be used to make sun prints. You can also make simple sun prints on construction paper just by leaving the leaf-covered paper in the sun for a few hours.

This project, though, is astounding in its simplicity. I had all the materials on hand (you can use any fabric paint or acrylic craft paint; the paint shown is Kid Made Modern fabric paint from Target, the same stuff we used on the baby shower onesies awhile back), the set up is simple enough for kids and grown-ups alike, and the results are stunning.


Seriously Easy Sun Printing Tutorial


1) Take a piece of fabric (muslin, canvas, etc., with at least 50% cotton content) and get it wet.


2) Squeeze out the excess water.

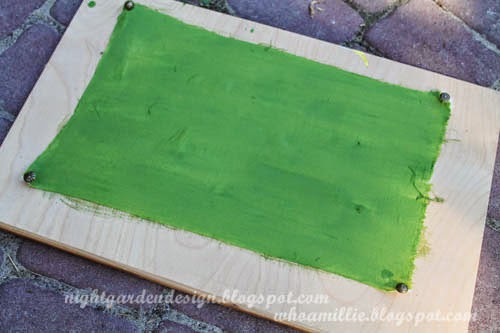
3) Stretch and pin to a board.


4) Pour a little paint and water into a container, and stir to mix.


5) Cover the surface of your fabric with thinned paint solution.


6) Cover the wet, painted surface with leaves, twigs, berries, etc.


7) Leave it in the bright sun, then check on it in about an hour. If the sun is weaker, leave it longer.


And that's it.


The capillary action draws the paint from the shaded portions (under the leaves) into the drier, unshaded portions, leaving lightly colored leaves on a darker colored background.


After your fabric has dried completely, put it in the dryer for a few minutes to heat set the paint, or iron with a cloth. It'll be safe to incorporate into a project and wash.


I'll never be done learning new things, it seems. Isn't that fantastic?


Thanks for reading!

Monday, July 21, 2014

a little bit of summer

Here are a few things we've been working on so far this summer. I hope to go into a bit more detail on some of them in future posts, but with all the play dates and swim lessons and backyard quicksand making, I'm having a hard time settling down to update the blog. The weather's too nice, the days (as long as they are) are too short. We're filling them full.

I hope you're enjoying your summer too!


My booth at the Eugene Mini-Maker Faire in June.

Getting good use out of the studio; the kiddo tells me this is a picture of a queen.

We're going to have so many grapes this year. So many!

Tie dyeing with fabric paint for a special quilt project.

Watching a juggler on the library plaza at the Summer Reading kick-off.

A booth at Black Sheep Gathering where the kind people told me how to fix my spinning wheel.

These b&w dragonflies are all over the place this summer. I love them.

Mashing up the u-pick strawberries from the organic farm to make jam.

Sunset roses.

Sun printing on fabric (it's really easy).

W is for watermelon, if you're eating the alphabet.

Red flowers and pool blue chairs.

Hanging up the ride-on toys on the back of the shed.

A peanut plant.

Yup. We're growing peanuts as a science experiment this summer.

Croquet cart from the thrift store . . .

. . . with some new stain and tightened screws for long life.

Painting the patio bricks with washable tempera paint is fun with kiddos.

Did I mention we also camped out at the beach for a few days, and spent some time at the ballpark, and played mini golf, and have been to the pool like a dozen times (at least)? Yeah. We're totally summering it up over here in the PNW.


Thanks for reading! I'll be back soon with a little post to explain sun printing in six easy steps, because now is the time, people! You crafty folks out there probably already have what you need on hand.

Sunday, October 20, 2013

thrift store finds: raspberry patch

I can't tell you much about Grace Paull, except that she was an extremely prolific children's author and illustrator. I found this book (Raspberry Patch) downtown at the Assistance League Thrift Shop for $1. 


The copyright date is 1941, and the illustrations alternate between b&w and color lithographs.


It tells the story of a bright, curious little girl and her mother who go to pick raspberries one July day, and discover various creatures (daddy long-legs, bee, butterfly, grasshopper, etc.) hiding in the bushes. 


I like it for a lot of reasons. The storytelling is sweet and nostalgic, all of the illustrations are nicely composed, and the limited color palette in the color lithographs is all about summer and light and discovery.


Copies are available reasonably priced on Alibris if you'd like a copy of your own. I'm hanging on to this one for now; it feels like a treasure so it must be one, a bit like the leaves and fir cones my kid keeps collecting.

Thanks for reading!

p.s. you can make these photos larger just by clicking on them, but you probably already knew that, clever you!

Linking up to:

Wednesday, May 9, 2012

teepee hideout, warm spring day

We made this teepee late last summer; the weather's been so beautiful this week, we finally got to set it up again. And it was fantastic. A light breeze was blowing, the sun was shining, and we were tucked into the canvas teepee in the sun-dappled area under one of the trees.

The frame is made of five suckers from our hazelnut tree (between eight and ten feet long) lashed together with twine, and we actually left it up all winter. Good news: I didn't have much work to do to put the teepee up quickly. Bad news: the twine's a little the worse for wear, and the poles should probably be swapped out for longer ones (I'll explain why in a minute).


You could use bamboo garden stakes or any long pole-type things without sharp bits, if you don't have a hazelnut tree sending long shoots up from its roots. When I was a kid we used mops and brooms and shovels, and draped them with blankets. And you know, that was kind of awesome, too, so don't be afraid to be creative.

The body of this teepee I sewed together from six triangular sections of a canvas drop cloth.


Set up your frame first, then measure the length of the legs from the twine lashing to the ground.

Next, measure the distance between two legs. Using these measurements (plus a seam allowance), cut six triangular panels from a large drop cloth (two will overlap to make the door flap). Cut a few inches off the top for the skylight. (This photo isn't really an illustration of technique, so much as a visual guide to what you're aiming for as a final product.)


Stitch all the panels together along the long sides to make one long, open panel. Then, fold over and hem the edge of the whole thing. I double stitched my seams flat with two rows of yellow stitches (pretty quickly, which is why the rows aren't perfect. I think it makes it look more "authentic". Ha!).


Cut strips of an old t-shirt to use as ties. Knot the ends and tack down the centers along the seam lines at the top, bottom, and middle of each seam, on what will be the inside of the structure. These will tie to the five poles to keep the teepee cover in place.


Overlap the two end panels and stitch along the top to form the door flap. I stitched down about a foot from the top, too, and added a star of stitches to really hold this vital part of the the fabric strongly. Trust me: it's not ripping, no matter how hard the kiddo plays.


It's kinda pretty, too!


I left too much seam allowance on ours; it drapes somewhat on the frame. Learn from my mistakes! If you give yourself a half-inch seam allowance when you're cutting, sew a half-inch in from the edge. I think this summer I'll make a larger frame or take in the seams a bit to make a snugger fit.


In the meantime, I can't think of much to beat the view of a tree through the top of a teepee.


Except maybe my kiddo, about to get me with the squirt bottle. Most fun ever, right?


So, are you building a teepee in your yard this summer, or do you have a more permanent play house? Let me know in the comments below, if you like! I love following your (non-spam) links!


p.s. You can view larger versions of these images by clicking on them, but you probably already knew that!


Linking up to:
mop it up mondays