Showing posts with label print. Show all posts
Monday, July 28, 2014
sun printing on fabric (seriously the best surface design project of the summer)
I spent several years at the university earning my BA in art. The last couple of years that I was in school, I was especially drawn in by the fiber arts program. I spent an entire summer term dyeing with indigo vats, for example, and another term learning natural dyeing techniques (with plants and things). I learned to carve stamps and print with acrylic paint, screen print with a Thermofax, photocopy directly on fabric. I learned about resists and cyanotype. I designed costumes and learned the art of sashiko. I tie dyed and sewed and painted and printed and felted and spun . . . and somehow, in all those years of art and fiber classes, I never learned how to sun print on fabric using only acrylic paint, water, and leaves.
It's amazing, really, the many varied ways there are to apply color to surfaces. This effect, in particular, can be obtained a number of ways. I once made an umbrella into a tree canopy for a play, for example, by holding branches and leaves against the umbrella and lightly spraying with spray paint. Cyanotype paper and cyanotype ink can each be used to make sun prints. You can also make simple sun prints on construction paper just by leaving the leaf-covered paper in the sun for a few hours.
This project, though, is astounding in its simplicity. I had all the materials on hand (you can use any fabric paint or acrylic craft paint; the paint shown is Kid Made Modern fabric paint from Target, the same stuff we used on the baby shower onesies awhile back), the set up is simple enough for kids and grown-ups alike, and the results are stunning.
Seriously Easy Sun Printing Tutorial
1) Take a piece of fabric (muslin, canvas, etc., with at least 50% cotton content) and get it wet.
2) Squeeze out the excess water.
3) Stretch and pin to a board.
4) Pour a little paint and water into a container, and stir to mix.
5) Cover the surface of your fabric with thinned paint solution.
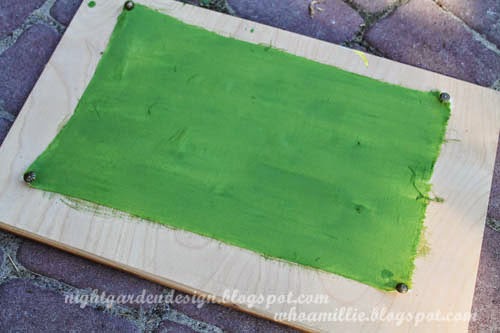
6) Cover the wet, painted surface with leaves, twigs, berries, etc.
7) Leave it in the bright sun, then check on it in about an hour. If the sun is weaker, leave it longer.
And that's it.
The capillary action draws the paint from the shaded portions (under the leaves) into the drier, unshaded portions, leaving lightly colored leaves on a darker colored background.
After your fabric has dried completely, put it in the dryer for a few minutes to heat set the paint, or iron with a cloth. It'll be safe to incorporate into a project and wash.
I'll never be done learning new things, it seems. Isn't that fantastic?
Thanks for reading!
Monday, July 21, 2014
a little bit of summer
I hope you're enjoying your summer too!
![]() |
| My booth at the Eugene Mini-Maker Faire in June. |
![]() |
| Getting good use out of the studio; the kiddo tells me this is a picture of a queen. |
![]() |
| We're going to have so many grapes this year. So many! |
![]() |
| Tie dyeing with fabric paint for a special quilt project. |
![]() |
| Watching a juggler on the library plaza at the Summer Reading kick-off. |
![]() |
| A booth at Black Sheep Gathering where the kind people told me how to fix my spinning wheel. |
![]() |
| These b&w dragonflies are all over the place this summer. I love them. |
![]() |
| Mashing up the u-pick strawberries from the organic farm to make jam. |
![]() |
| Sunset roses. |
![]() |
| Sun printing on fabric (it's really easy). |
![]() |
| W is for watermelon, if you're eating the alphabet. |
![]() |
| Red flowers and pool blue chairs. |
![]() |
| Hanging up the ride-on toys on the back of the shed. |
![]() |
| A peanut plant. |
![]() |
| Yup. We're growing peanuts as a science experiment this summer. |
![]() |
| Croquet cart from the thrift store . . . |
![]() |
| . . . with some new stain and tightened screws for long life. |
![]() |
| Painting the patio bricks with washable tempera paint is fun with kiddos. |
Did I mention we also camped out at the beach for a few days, and spent some time at the ballpark, and played mini golf, and have been to the pool like a dozen times (at least)? Yeah. We're totally summering it up over here in the PNW.
Thanks for reading! I'll be back soon with a little post to explain sun printing in six easy steps, because now is the time, people! You crafty folks out there probably already have what you need on hand.
Saturday, June 14, 2014
potato print onesies (baby shower project)
Inspired by a similar project from Martha Stewart Living and the potato printing projects of my youth, these are a fun, fast, simple project for a baby shower. We made these at a shower I hosted for one of the moms from our preschool, expecting her second baby.
Potatoes make good stamps for printing on paper or cloth. Cut them into simple shapes, use foam brushes to apply fabric paint (we used Kid Made Modern fabric paints from Target's selection of kids' art supplies), then stamp shapes to make pictures or scenes. After dry, heat set with an iron, and they're ready to wear!
Linking up to:
I Should Be Mopping the Floor
Tuesday, October 22, 2013
rubber eraser wrapping paper printing
For the dinosaur-themed birthday presents I mentioned back in the chasmosaurus t-shirt post, we wanted a little dino-themed paper for wrapping.
Among the many craft supplies I had laying about were some Pink Pearl erasers and some accounting-style graph paper from the Goodwill. Combined, they made some Jurass-tastic gift wrap!
I used an X-acto knife to cut one side of the eraser to look like a brachiosaurus . . .
Among the many craft supplies I had laying about were some Pink Pearl erasers and some accounting-style graph paper from the Goodwill. Combined, they made some Jurass-tastic gift wrap!
I used an X-acto knife to cut one side of the eraser to look like a brachiosaurus . . .
. . . and cut a prehistoric palm tree onto the other.
Then the kiddo and I got out the washable stamp pads and stamped blue dinosaurs and green trees all over the graph paper. I guided his hand a bit to keep a pattern going, but a couple of randomly printed sheets turned out pretty nice too.
I accented with some pens and wrapped up the gifts (a t-shirt, as previously mentioned, and a hat I'll be blogging about soon). I also drew some little tags to go with each gift. One of these days I'll remember to photograph every part of a process; that day is not today.
And there you have it! Some fancy wrapping paper you can whip up for any occasion with stuff you probably already have.
Thanks for reading!
Monday, March 26, 2012
new batch of coffee bean sacks in my etsy supplies shop
I have a new batch of coffee bean sacks in my Etsy supplies shop. There are some really lovely screen-printed patterns in this batch; here are a few highlights.


You can use these for making tote bags or messenger bags, Christmas stockings, pillows, or cushion covers, like the one I blogged about here.
Price on most is $8 + shipping.
(p.s. you can make these photos bigger by clicking on them . . . but you probably knew that!)


You can use these for making tote bags or messenger bags, Christmas stockings, pillows, or cushion covers, like the one I blogged about here.
Price on most is $8 + shipping.
(p.s. you can make these photos bigger by clicking on them . . . but you probably knew that!)
Subscribe to:
Posts (Atom)


