Friday, June 29, 2012

hometown tourist : silver falls state park

"Hometown Tourist" is an occasional series in which I tell tales about our adventures around town, and actually, the whole state of Oregon. Take a peek and come exploring with us!

For Mother's Day weekend, we drove up to Silver Falls State Park. Despite being a life-long Oregonian, I'd never been, though Silver Falls is the largest state park in Oregon and incredibly beautiful. More than 9000 acres in size, it features approximately 25 miles of trails for hikers, bicyclists, and horseback riders (though not all on the same trail).

It also offers clean campgrounds and cabins for campers. Here's where we stayed.


Cabins are divided into two rooms, with a living area in front (with fold-down futon) and a bedroom in back (with built-in bunk beds and a queen bed, all with vinyl-covered mattresses). You could easily sleep six people here, but we'd recommend you bring a drill or screwdriver, as all but the built-in bunk beds are super-squeaky due to loose screws.


Our picnic area, complete with long picnic table and metal fire hoop.


The old red water pump (shared between cabins).


There's a shared bathroom/shower building nearby, too, so there's no woods-squatting required, and hikers can get cleaned up at the end of the day.

We were surrounded on all sides (as is usual in Oregon's boreal forests) by tall cedars and douglas firs, and shrubs in a thousand colors of green.


The park was established in the 1930s thanks to the work of photographer June Drake; the lodge (shown here from behind) was built as part of President FDR's Works Progress Administration's Civilian Conservation Corps. It no longer hosts overnight guests.


Inside the dining room, the original myrtle wood tables are still extant. The only food served at the lodge anymore, though, is summer snack stand food; burgers, fries, ice cream bars, etc. Mother's Day weekend hosts a plant and bird show so the tables weren't useable for dining while we were there, but may be usually.


Photographs of and by photographer June Drake feature prominently on the wall by the snack bar.


Spring fiddleheads on ferns outside the lodge.


Ah! At last! A waterfall! The North and South Forks of Silver Creek feed the falls, of which there are ten (major) within the bounds of the park (and you can reach them all by following the Trail of Ten Falls on an 8+ mile hike).

The first, right off the parking area by the lodge (and the separate 1930s gift shop called the Nature Store), is South Falls.


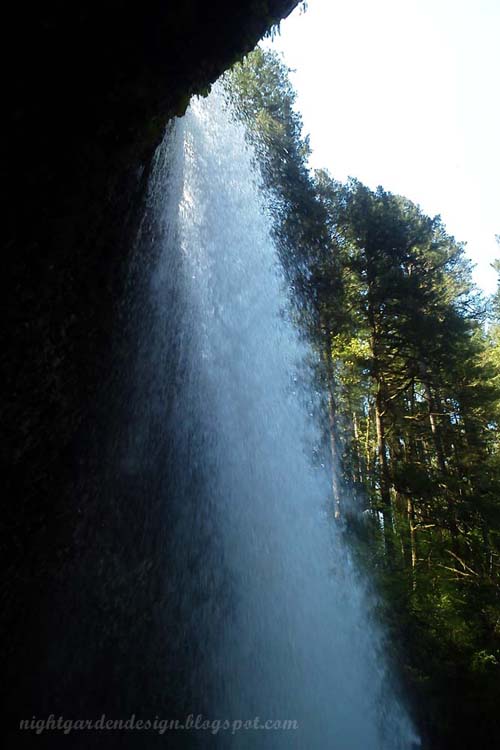
It's a spectacular introduction to Silver Falls State Park, falling 177 feet to a pool beneath. The trail starts at the top of the vertigo-inducing descent . . .


. . . then winds down the side of the gorge and leads behind the falls.


You pass behind a massive curtain of water, protected by a metal rail (hold tight to your bebes!). The overhanging cliff drips and sweats overhead.


The trail is narrow and not passable by stroller, wheelchair, bike, or horse at this point, although many of the falls are viewable from overlooks along the road, or along other trails. Here's a link to a pdf brochure that can help you plan.


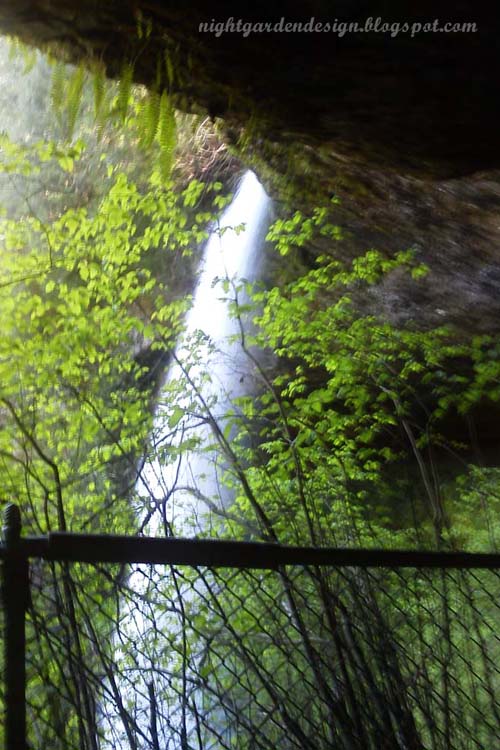
A little more than a mile away along the trail is Lower South Falls.


Lower South Falls is shorter (at 93 feet), but the trail is more treacherous; the path suddenly leads down a steep, lightly-maintained staircase of stone steps (probably also built in the 1930s), edged by a railing of varying degrees of undependability. Seriously, hold tight to your bebes, and don't lean against the railing. (Make these photographs larger by clicking on them, and you can see part of the staircase in the previous photograph) The trail also leads behind Lower South Falls, the second of three falls along the trail with this feature.


Shortly after we passed Lower South Falls, my nearly-forty-pound two-year-old fell asleep in my arms, and became a dead weight I carried up the steeply sloping Maple Ridge Trail. This "shortcut" back to the trailhead and lodge seems interminable though only about a mile, because of the 30-45 degree slope. The kiddo woke up at the top of the hill, of course, and wouldn't nap again. We crossed a short bridge over Silver Creek and spotted this picnic shelter.


Upriver near the campground, close to the swimming area and a small playground, I photographed the exterior of the WPA lodge-style bathrooms in the late afternoon sun.


The next day, we scrapped the idea of starting over and walking the entire trail, and drove up the main road a little ways till we found the Winter Trail trailhead near Winter Falls.


After geeking out a little over the similarity to Winterfell (the name of the castle of the Stark family in Game of Thrones . . . yeah, we're nerds), we hiked down a zig-zagging trail to the bottom of the fall, which is approximately 134 feet down . . .


. . . and took a family portrait with my Commando phone near the pool at the base.


We hiked back up (except for one of us, who was carried aloft like a tiny, lazy prince) to the top, and drove a little ways further up the road to the parking area near the North Falls trailhead.

There was a bit of a hike to North Falls, and the narrow trail closely hugs the overhanging cliff. The scenery is mostly green, and the water gushes close by at all times.


Again, the trail is bordered by a railing of questionable stability and, along one length, a bit of chain link fencing. It spits out suddenly over a deep overhang. Yes, North Falls is the third and final waterfall that the trail passes behind. But . . .


. . . at the bottom of another old staircase and down a slippery mud trail, you'll notice in this photo that there's no railing here. The trail is narrow and slippery at the top of a steep, muddy slope. Though there is a bench there (labelled; click the photo to zoom), the kiddo and I didn't brave this one. We stayed back while the Mister went to check it out . . . and reported back that it was a freaky as it looked.


Still, it was pretty enough behind the chain link, from our perspective. We hiked back up the staircase and back to the car.


I was unable to convince the guys to follow me on another mini-hike, so I begged off for a quick, short, quarter-mile hike from the car to Upper North Falls. This was the easiest bit of trail yet, and yielded a secluded 65-foot waterfall and a large, calm pool.


Yes, Upper North Falls is 65-feet tall, which means the fallen timber on the left side is taller than that. It's probably hard to get the right perspective from photographs. Imagine ten tall men standing on top of one another; that's how tall Upper North Falls is.


Sans baby and husband to make me look legit, the vacationing family posing by a smaller, unnamed waterfall wouldn't accept my offer to take a photo of all three of them together. Or rather, the father wouldn't. The mom totally wanted to be in the photo with her husband and daughter, but it was probably too expensive a camera to hand over to a stranger. Even on a dead-end trail. I contented myself with more fiddleheads.


And then we were on our way home. We passed by a glaring yellow field on the way towards Salem, and just like that, we were away!


So we checked five of the ten waterfalls off our list, and I plan to go back when I can count on my kiddo to walk most of the way, and not go sliding off the side of the trail. (I can literally worry about anything. Try me.)

I definitely recommend Silver Falls State Park as a day trip; even better if you're into hiking and can snag a campsite or cabin before they fill up (hint: make reservations waaaaay in advance). Keep a close eye (and a pair of strong hands) on your kiddo at all times, though, as there are lots of steep drops and difficult bits of trail.

Have you been playing hometown tourist in your neck of the woods lately? I'd love to follow your (non-spam) links in the comments section below. Thanks for reading!

p.s. you can make these photos larger just by clicking on them, but you probably already knew that.)


Wednesday, June 27, 2012

butterfly specimen placeholder art


These frames are the best option we found for framing our monthly photo booth strips (something we started doing regularly about the time of the kiddo's first birthday, but only occasionally before then).

Afraid they'd stop carrying these glass-backed frames, I bought ahead and ended up with an empty frame on my wall. I decided to fill the empty one with some placeholder art until we have photo strips to fill that frame as well. (The glass-backed frames I used for this project are available from Target.)


This is a deceptively easy project. Find some butterfly art in a magazine or as a copyright-free image on-line. Print it out.


Cut carefully. Make sure your cuts aren't too straight or choppy, for the most naturalistic appearance possible. Go ahead and cut off the antennae.


Gather a spool of heavy thread, some double-sided tape, and your butterfly.


Cut a length of thread. Bend and twist at the center, and attach to the back of your cut-out butterfly using a tiny piece of the tape (this will also loosely hold the butterfly to the back pane of glass to help avoid slippage).


Flip over and check placement. Adjust if necessary.


Place in frame, sandwiching the butterflies between two pieces of glass.


I used three different butterflies to mimic the look of a specimen collection; you could switch it up even more and use three different colors of butterflies, or a dozen in different shapes and sizes.


The thread antennae give these a very realistic appearance, especially if you just let them lay, rather than adjusting them until they're perfectly symmetrical.


And in less than a typical nap period, it's done, and ready to hang on your wall . . . permanently, or until something better comes along!

Thanks for reading!

p.s. you can make these pictures larger just by clicking on them, but you probably already knew that.


Linking up to:

Handy Man, Crafty Woman

Tip Me Tuesday at Tip Junkie

A Bowl Full of Lemons

Mommy by Day, Crafter by Night

Today's Creative Blog

DIY Show Off

The Stuff of Success

Mop it Up Mondays at I Should Be Mopping the Floor

Open House Party at No Minimalist Here

Catch as Catch Can at My Repurposed Life

Tuesday, June 26, 2012

all-time top and bottom five posts -- part two

This is a continuation (two months later!) of part one from April, in which I did a quick run-down of my all-time top five blog posts. That post was easier to write, mostly, I suppose, because it's always easier to talk about things that can be considered successful (which here can mean "popular") than it is to talk about things that weren't as well liked. Which is why I don't talk much about junior high school, frankly. ;)

Here's the thing: most of my seldom-viewed posts come from a couple of years ago, before I was blogging regularly. I think that's the main reason they haven't been very far up on my "most-read" list. Here are a few of my favorites, then, from those tied for last place in terms of readership, together with what I would do differently were I to rewrite the blog post.

#1: Vintage Signs


I love going on trips to the Oregon coast and driving through all the towns along 101 (the Coast Highway). Some of the businesses have been there for decades and decades, and still have their original mid-century (or earlier) signage. And I love that. I love old typography and graphics and how they're married on the signs I photographed.

Unfortunately, a new blogger, I took the photos out the car window while stopped in traffic (so they're not awesome), and then made everything just too, too small. Which is a bummer, because that stuff really means something to me.


#2: A Trip to the Pumpkin Farm and Another Beautiful Thing


This should clearly have been two posts. I was really proud of the way those cedar shingles came out on the side of my backyard art studio, and if I'd taken the time to write a whole post about that, I would be a happy camper looking back on it now. It was a whole day (pre-baby) of me on a ladder. I was marking each of the edge shingles and passing them to my husband to cut, then hammer-tacking them onto the wall. And the effect was exactly the old craftsman look I wanted. It was great, and deserved its own post.

The pumpkin farm deserved its own post, too. The Mister and I started a tradition (probably eight years ago now) of going on a pumpkin patch hayride every October, something we never did as kids.

That year (2008) was a big one for our little two-person-family traditions since health-wise, the end of 2007 / beginning of 2008 had been rough for both of us. Times like that test your mettle as a couple; I think we were driven closer together through those experiences because we already thought of ourselves as a family.

Plus, pumpkins are big, beautiful, fat, happy orange things, and there should have been more photos that featured them.


#3: First Round is on Display!


This post features some of the projects I'd put up in my Etsy shop in the early spring that year. The projects and photography are among my favorites; I took a load of stuff to the coast with us and photographed them in the early morning, alone on miles of empty beach. The quality of light was perfect, and the storm-swept textures of the sand and driftwood make me happy to look at now.

The projects are some of my favorites, too. I'd love to do a DIY post on one of the bookbinding projects sometime soon. I really miss having the time to spend on bookbinding.


#4: Peter Pan-sies!


One of my two favorite poster design projects, ever. I really wish I'd spent a whole post talking about the design process a bit more, and showing the poster in various stages of design. Instead, this post is pretty short and the follow-up blog post showing the final poster (sans much of the color, at the director's request) is even shorter. In my defense, I was tackling about 50 other projects for Peter Pan at the time and also working full-time (as well as playing Nana in the play), so blogging didn't make my "high-priority" list.


#5: Desert Photography


I went to Arizona with the Mister not really expecting to find it as beautiful as I did. We were there for the wedding of an old friend of mine (someone I was very close to as a teenager) and to visit the desert where my husband grew up.

I'm from a place where everything is green and wet and I'm a big lover of the ocean, so my first visit to the desert was a revelation of sorts. So different from anything I am used to, but also lovely. Prickly and lovely. I did two posts chock full of photos, but sometimes, a little text is nice too.


And there you have 'em! Some of my favorite low-ranking posts. Take a look if you have a minute; I'd love to have some more people stop by and take a glance at my little world. So; what have you written or made that you want more people to take a look at? You can leave your (non-spam) links in the comments section below.

p.s. you can make these photos larger just by clicking on them, but you probably already knew that.


Tuesday, June 19, 2012

cut "glass" 5-cent pendant shade


I promise, you're going to laugh.


Partially, because yes, I've made another light fixture. And I'm filling up this post with lots of photos of it finished.


The tutorial is just too easy.


The other reason you're going to get a giggle is that this cut "glass" pendant is made from a plastic 2-liter soda bottle.

We don't drink much soda (this is actually a 2-liter sparkling water bottle), so this pendant is pretty much a one-off in our house. Until the next time I need some sparkling water, that is. And because it was a "test" project, I didn't take photos of it in-process. But I really should have. Obviously. Because it actually turned out. Against all odds.


If I make another one, I'll update this post with a step-by-step photo tutorial, but honestly, you can replicate this really easily.


Supplies:

1) clean 2-liter plastic bottle, with label and sticky stuff removed
2) hanging lamp cord kit from the hardware store (mine came from one of the paper lanterns I used to have in the other corner of the living room)
3) low-wattage LED light bulb (DO NOT use a standard heat-producing bulb)


Tools:

1) sharp utility scissors
2) ruler
3) pen
4) rubber band
5) palm sander


Steps:

1) Sand down the surface of the bottle to help diffuse the light and to make your pendant look cool. Wear gloves to protect your hands and work outside.

2) Cut the bottle neck off of the plastic bottle, as close to the top as possible, so that the plug end of your light kit will fit through the resulting hole.

3) Using the rubber band and the ruler to guide your pen, mark a line on the bottle and cut along the line with your sharp scissors. The bottle should be cut long enough to disguise the bulb inside the fixture.

4) Assemble and hang.

And there you have it! No, literally, you can have one. They're really easy and inexpensive.


Other Lighting Projects:

Another Paper Lighting Fixture (Design*Sponge-inspired cupcake liner paper lantern)

The Fanciest Thing in My House (faux capiz shell chandelier)

Lampshade Re-Do with Upcycled Milk Jug (milk jug flower petal lamp shade)

Progress (lamp made from an old cedar stump and thrift store lampshade)


Linking up to:

Handy Man, Crafty Woman

Tip Me Tuesday at Tip Junkie

A Bowl Full of Lemons

Mommy by Day, Crafter by Night

Today's Creative Blog

DIY Show Off

The Stuff of Success


Open House Party at No Minimalist Here

Catch as Catch Can at My Repurposed Life