Monday, December 15, 2014

evergreen wreath

The kiddo's school has a yearly fundraiser selling locally made (not by us) wreaths. I bought one last year and I bought one this year, and I'm fine with it. The wreaths are pretty and they smell good, and the school gets a nice chunk of the proceeds too, unlike with those magazine and candy sales I did as a kid.

Here's the thing: wreaths are relatively easy to make, and very inexpensive if you have access to evergreens. If you want more than one wreath for your house and school fundraisers are too expensive, give it a go. Here's one I made.


I used rosemary branches, some angry, pokey evergreen branches from a tree out back. and some little cedar twigs that got blown down in a windstorm.


The wire wreath form is from last year's wreath.  It's called a soft clamp wreath frame, if you need to order one. I just used some pliers to pull open the prongs last year, composting the old evergreens and storing the wreath form to recycle this year.


Add branches.
  

Use pliers to cinch everything together.


Tuck additional branches in to cover the wires, and hang it on a nail, ribbon or hook.


My wreaths sometimes look a little asymmetrical, which I like. If you don't, trim yours till it looks right to you.

Okay! That's all from here. Kid's got the flu so I'm off to do another load of laundry. Be well!

Thursday, December 4, 2014

dyeing paper

Hey there campers; it's been awhile!

I thought I'd test the waters with a brief post about dyeing paper for special projects like wedding invitations, book binding or Christmas cards.

I dyed this fuchsia paper for wedding invitation inserts this summer.


You can dye any paper; it's made of plant fiber most of the time, like cotton clothing. High cotton-content paper and paper with linen fiber get the best color, but even regular newsprint or drawing paper can be dyed using Rit Dye or Dylon. (Dylon is my preference.) This color is called Flamingo Pink.

I used a 110 lb arches cold press watercolor paper trimmed to A4 size, then pre-soaked it in a bath of hot water with just a dash of dish soap. I use the dish soap as a nod to my method of dyeing clothes; I always pre-soak and wash to achieve even dyeing by saturating the fabric and removing any waxes, oils, or fixatives. With paper, the saturation is key and the soap, while probably not completely necessary, is just a little bonus to help assure that the saturation is allowed to happen.

I dye paper in my stainless steel kitchen sink. It's easy, large, readily available and unlikely to stain. I boil water and pour it into the plugged sink; just until I have 2 or 3 inches of water in the sink. I add 3 or 4 times the recommended amount of salt and stir until dissolved.


I add the dye before I add the paper, and stir till dissolved. A quarter of a package is a good place to start, since I dye paper in batches. Paper into dye, saturating one side and then the other, eight or ten sheets in the bath at a time. Keep track of how many, as you'll be turning and repositioning the sheets in the bath every ten minutes or so for relatively even dyeing. And repeat until the dye cools or you get a color a couple of shades deeper than your desired result (dyed paper and fabric tend to lighten as the dry).

Of course, the idiosyncrasies of hand-dyeing are often desirable. I like to sprinkle a little dye powder in the bath to add speckles sometimes.


Rinse in cool water, then press gently in a towel,  hang with pipe cleaners ("chenille stems") and clips, and let air dry.

Paper will warp a little as it dries, so ironing will be necessary to run dyed paper through a printer or a printing press. Use a press cloth and turn your iron on the cotton setting, no steam.

Thanks for dropping in as I attempt to get my sea legs back! I hope you'll stop by again soon. I aim to.

Thursday, September 25, 2014

counting on it!

Well hey there! It's been awhile, right? It was an amazing and busy summer. The kiddo and I made a lot of stuff, went on a lot of adventures, and generally kept ourselves occupied from the day preschool let out until the day preschool started. And I'm on the board this year, so things have gotten even crazier.

I'm stopping in today to share one of the big projects we finished this summer. It's a book.


About halfway through the school year, the kiddo's teacher started having the kids make one or two alphabet letters per week as part of a daily series of arts and crafts projects.
E is for Eagle


F is for Flower
X is for X-ray
If the kiddo was sick on a day a letter was introduced, we made our own version at home. Adding to the fun was putting each letter in a black portfolio book, one after another, until finally we had the whole alphabet.
P is for Pirate
Q is for Quilt
"But wait, Mama!"

There were so many blank pages left! I suggested we take on as many numbers as possible until the book was filled, and the kiddo was game. We managed to fit zero through twenty in the book before we ran out of space.

One red apple / Two pretty flowers

Six crunchy carrots

Aside from cut paper, we used a little of every material in our arsenal, from googly eyes and multi-color pipe cleaners to bingo daubers, glitter glue, and stamps.

Eight wiggly spider legs

Seven spangly fireworks

Ten flying keys

He even stitched through the buttons using a tapestry needle and yarn!

Nine colorful buttons

Towards the end, when things were getting crowded and the projects a little lengthy, we got extra inventive.
Eleven apple trees

Thirteen sugary donuts

Fourteen fuzzy bunnies

I love the sweet little faces he drew. Love them to bits.

Sixteen glittery jewels

Seventeen black zebra stripes


Eighteen wiggly hairy eyeballs

Nineteen peppermint candies

Twenty pink carnations


Whew! We made it through the whole thing. I tried to let the kiddo do most of the work on the gluing, drawing, punching, stamping and coloring (although I got a little bossy with the zebra). I stuck mainly to cutting, although he's getting so good with the scissors now that I'm going to be pawning more and more of that work off onto him, too. We're planning to tackle the lowercase letters next, unless the new preschool teacher gets to them first.

What about you? Did you tackle any arts and crafts projects this summer too?

Thanks for reading!

--a

Wednesday, August 13, 2014

hometown tourist: chalk fest 2014


"That's me in the corner . . ."

Probably the nerdiest entry; I included Dr. Who eating fish sticks with custard, the TARDIS, the Cat in the Hat, Truffula Trees, and one of the bear kids from Hop on Pop hopping on a Dalek.
Awhile back, some folks started a local organization dedicated to displaying art in the windows of empty office buildings and retail spaces. It paid off big time, aiding in the downtown revitalization effort in downtown Eugene. Honestly, if you haven't been in this area in a few years, you will absolutely not recognize it today. Voodoo Donuts, the Barn Light, Sizzle Pie, Bijou Metro, Off the Waffle, First National Taphouse, food carts on Kesey Square . . . all within a couple of blocks, where buildings stood empty for years.


So the group responsible for helping to get the ball rolling by beautifying windows with local art went through a name change. Originally the Eugene Storefront Art Project, they are now the Eugene Springfield Art Project, keeping the acronym but expanding their scope. And this past Friday, they hosted the first ever Chalk Fest in downtown Springfield.

This artist worked quickly. I don't think this took her more than three or four hours.

Abstract fields of color, a portrait, and some math that doesn't add up.

Springfield, Eugene's conjoined sister-city, has been undergoing its own downtown renaissance in recent years, and things are definitely looking up. I feel like anytime Willamalane Parks and Recreation hosts an event downtown, for example, people are being encouraged to venture out, and the arrivals of a local arts charter high school, Sprout Food Hub (a farmer's market in an abandoned church), a state-of-the-art performing arts center (the Wildish Theater) , Plank Town Brewery, and the Washburne Café are excellent starts. If someone will just (please, please) buy the defunct Jim's Landing and do something amazing with it, the area could really be a destination. (I'd buy it myself, but $630,000 is a little out of my range, even with the apartment rentals on the top floor.)

The woman next to me wetted her chalk and was very painterly in her approach.

Kids got in on the action, too!

ESAP is pretty new at event hosting, so there were a few confusing scheduling changes. In the end, though, we made it to the right place at the right time, and some fantastic chalk art came out of it.

Third Prize Winner

First Prize Winner

If you're in the area and want to drive by, the art will be there until it washes away in the rain or gets rubbed away by tires. Find it on Main Street in Springfield in the public parking area between the Emerald Art Center and the Springfield Museum. And if you want more information about any of the artists, you can contact ESAP. You can also hop over to their Facebook page to see more photos from this event, as the Mr. and I didn't manage to photograph all of them.

One of two bee-themed pieces.

Adventure Time!

Monday, July 28, 2014

sun printing on fabric (seriously the best surface design project of the summer)


 I spent several years at the university earning my BA in art. The last couple of years that I was in school, I was especially drawn in by the fiber arts program. I spent an entire summer term dyeing with indigo vats, for example, and another term learning natural dyeing techniques (with plants and things). I learned to carve stamps and print with acrylic paint, screen print with a Thermofax, photocopy directly on fabric. I learned about resists and cyanotype. I designed costumes and learned the art of sashiko. I tie dyed and sewed and painted and printed and felted and spun . . . and somehow, in all those years of art and fiber classes, I never learned how to sun print on fabric using only acrylic paint, water, and leaves.


It's amazing, really, the many varied ways there are to apply color to surfaces. This effect, in particular, can be obtained a number of ways. I once made an umbrella into a tree canopy for a play, for example, by holding branches and leaves against the umbrella and lightly spraying with spray paint. Cyanotype paper and cyanotype ink can each be used to make sun prints. You can also make simple sun prints on construction paper just by leaving the leaf-covered paper in the sun for a few hours.

This project, though, is astounding in its simplicity. I had all the materials on hand (you can use any fabric paint or acrylic craft paint; the paint shown is Kid Made Modern fabric paint from Target, the same stuff we used on the baby shower onesies awhile back), the set up is simple enough for kids and grown-ups alike, and the results are stunning.


Seriously Easy Sun Printing Tutorial


1) Take a piece of fabric (muslin, canvas, etc., with at least 50% cotton content) and get it wet.


2) Squeeze out the excess water.

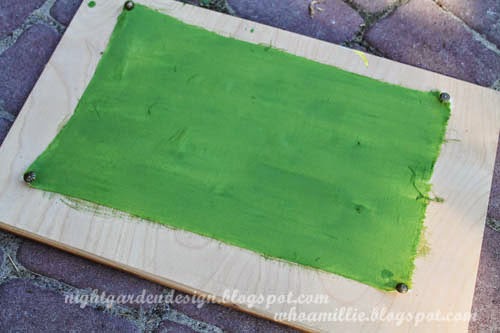
3) Stretch and pin to a board.


4) Pour a little paint and water into a container, and stir to mix.


5) Cover the surface of your fabric with thinned paint solution.


6) Cover the wet, painted surface with leaves, twigs, berries, etc.


7) Leave it in the bright sun, then check on it in about an hour. If the sun is weaker, leave it longer.


And that's it.


The capillary action draws the paint from the shaded portions (under the leaves) into the drier, unshaded portions, leaving lightly colored leaves on a darker colored background.


After your fabric has dried completely, put it in the dryer for a few minutes to heat set the paint, or iron with a cloth. It'll be safe to incorporate into a project and wash.


I'll never be done learning new things, it seems. Isn't that fantastic?


Thanks for reading!