Wednesday, May 29, 2013

thrift store finds: bike basket repair and storage

I started out with a cute wicker bike basket from the rebuilding store (Bring) and an intention to turn it into a little extra bathroom storage in our tiny bathroom. It's from the Nantucket Bike Basket Company. 

These baskets are pretty readily available through places like REI and After School if you have the money to spend. The one I bought was $3 and was sold "As-Is", which in this case meant that the caning at the back (where the basket attaches to the bike) had come loose. Someone attempted to fix it with zip ties and further ruined it by separating several rows of the wicker. You can see that separation in the photo below, after I covered it with clear duct tape.


I know that it's possible to fix these baskets by undoing the twining and caning, reinserting the wicker, and then gluing and rebinding the top, but I'm not an expert, and jobs like that require knowledge and skilled hands to make it look right. I wanted a strong repair that would look decent and use my current tools and skill set. You know: duct tape.

I used the tape to go all around the basket, just to stop any further damage from occurring and strongly hold everything together. It's not super-attractive, so I knew this wouldn't be my final step.


I used a printed coffee sack remnant to go over the tape, and used hot glue to make sure it was firmly attached to both the taped top and the wicker for a sturdy repair without vulnerable stress points.


The raveled edge is kept from fraying by being pressed into the hot glue (which is, luckily, invisible if you're really, really careful about how much you use and where it goes. And you don't use the yellow-y extra-strength glue sticks).


Just right for holding a couple of spare rolls of toilet paper up and out of the way.


This kind of repair will work on other kinds of wicker baskets, too, although I'd recommend finding someone to professionally fix really nice, heirloom-quality baskets.

Thanks for reading!

Linking up to:


Thursday, May 23, 2013

ode to turquoise (via an old door)

This is how I left you at the end of my arbor post, with the new white arbor, and primed door trim . . . and the antique door of the studio looking shabby in some reject paint from the hardware store from several years ago. 


Our Adirondack chairs, on the other hand, are painted in this friendly shade of turquoise, or pool blue. It looks happy and intentional, wheras that old door looked pretty sad and unwelcoming. Worse, I'd say, than when my brother brought me the old door in the first place, with peeling white paint.


We can mark the door off of our never-ending to-do list; I took advantage of the nice weather to prime and spray it, and now it's just as happy and friendly as our chairs. It gives the whole building a different character. (The color is Rustoleum's Aqua.)


Of course, it helps that the sun was shining that day, which always makes things look brighter and happier than on a cloudy day, but I'm giving the new paint an equal share of the credit.

Okay, just that quick update for now, but I've been weeding and planting and working on the yard a bit more since painting the door. You can bet I'll be posting about those adventures very soon.

In the meantime, thanks for reading!


Wednesday, May 22, 2013

where the wild things are growing at an incredible rate

The Halloween before my kiddo turned two, he and the mister dressed up like this for Halloween:


Max in his wolf suit and his Wild Thing papa, from Where the Wild Things Are were a big hit at the library's Halloween story time that year. And the little Max costume was so soft and comfy and fun to wear that my kiddo didn't want to stop wearing it. 

That was a year and a half ago. He was Max quite a bit in the months following Halloween . . . and then he got distracted, and wore it less and less frequently.

When I cleaned out his closet six months ago, coincidentally right around this most recent Halloween (we went as Muppets this year; he was Kermie), he excitedly pulled it out and wore it around the backyard like a hooded jacket because his legs wouldn't fit. 

And he kept growing, and the next time he tried to put it on, his arms wouldn't fit either, so he wore it like a hooded cape. And then I wised up and pulled out the leftover fabric and the old pattern (for shape reference) and a shirt one size up (to use as a size reference) and stitched up a hoodie he'll be able to wear for another year or so. Luckily, the tail is a pin-on, and so we just transferred it from the old Max suit to the new Max hoodie.


Because childhood is too short, and Halloweens are too far in between, and because . . . reasons.

*****


And thanks for reading.


p.s. The original toddler-sized pattern has been removed from the Burda Style website; e-mail me or message in the comments below, and I can send you a PDF of my reworked, resized hoodie pattern (it's a 6-7 I'd estimate). If there's enough interest, I'll just post a tutorial.

Friday, May 17, 2013

climbing structure for a climbing climber

I said my last post ended in a cliff-hanger; well, I guess this is more of a climbing wall than a cliff, but I'm going to pretend it counts.


My kid is an enigma. Climbing thrills him. And I mean climbing anything, from stacks of unstable patio chairs to the furniture I pulled out of the shed to donate, to crawling into the hammock or up a set of stairs or on top of the sail / awning on the top of his pirate sandbox. But slides: slides make him nervous most of the time. He'd rather clamber over a pile of something certain to shift than slide down a nice, safe playground slide any longer than 3 or 4 feet.

As a deterrent to climbing stacks of unsafe stuff, we decided to build him a climbing structure, something on the small side (so if the daredevil launches himself off the side, odds are he'll escape without serious injury) with steps of varying sizes and some climbing rocks. Also on our wish list was something we could fold up and store during the winter months. (There are enough tarps in our backyard at that time of year already, thanks.)


I found a similar structure on Pinterest before starting this project (and we used it to guide our design), but I apparently didn't actually pin it, and now I can't find it. If this was originally your idea, please send me a link!

As far as building one  goes, it's pretty straightforward. I will say, though, that we aren't professional builders of children's play equipment, and it's possible that something we've done here isn't up to current safety standards. We plan to be in the yard with him every time he's playing on it, so we're not too worried. Stay tuned for the end of this post, where I'll talk a little about things I have planned or might change later, FYI.


We bought cedar for this project rather than pressure-treated wood, to limit exposure to toxins.

We used: 
  • six 8-foot 2x4s (cut to eleven 4-foot lengths and two 2-foot lengths)
  • a 3x4-foot scrap of plywood
  • a used set of three door hinges
  • exterior paint
  • a 4-pack of climbing rocks
  • exterior screws in 3-inch and 2-inch lengths
As you can see in the photos, we have three vertical supports on each slope. On side 1 (the "ladder" side), we also have three full-length horizontal supports (4-feet long) and two 2-foot ladder supports. We left about a foot of space at the bottom, because the kiddo doesn't need a step there.

On side 2 (the "climbing rock" side), we have only one horizontal support at the top, and the painted plywood provides the rest of the support when attached directly below.

We made sure that the vertical supports on each side line up, so that we were able to attach it at the top with hinges.

Though probably not necessary in the grass, we used the leftover 4-foot 2x4 as a support to keep the structure solidly supported at the desired angle. You can see that support, and a hinge, in this next photo.


We still need to get the sander out to knock down some roughness and edges, and I think a top piece of some sort is going to be necessary for the gap at the top (the kiddo thinks it's funny to stick his leg in there. I do not), so that'll be happening soon. And maybe some stain for the cedar?

I'm also aware of the possibility that the 4.5-inch space between the ladder steps on side 1 might be too narrow, so it might get altered if we notice any issues with it. I'll do a future post with updates soon to let you see the FINAL final product.

We've also got our eye on one of those tire climbers, but we'll have to see if it fits into our plans. It looks really cool though, right?

So: what kind of crazy outdoor projects are you planning or working on? Here in the northwest, we've been spoiled with a ton of sunshine the past couple of weeks, so projects like this climbing structure and the arbor have been possible and necessary. Have you been having an early summer where you are, too?

Thanks for reading!

p.s. to make these photos larger, just click!


Linking up to:


Sunday, May 12, 2013

giveaway winners + discount code


Happy Mother's Day to all of you awesome mamas out there! I had 42 entries in my contest by midnight Friday, which made your odds of winning one of the two pieces of measuring tape fabric pretty darned good . . . and yet, only two people won this time around, and I'm always left wishing everyone could win.

Here are the two folks I'll be sending fabric to this week:

Jenny (comment: "I have to say: DOLL FACED PILLOW. I wish I could say WTH??? But really and truly, I have an aunt who used to make that stuff for me when I was a little girl. 
I like your blog and this tape measure fabric is wonderful!! Thank you so much for the chance.")

KRubin (comment: "This is perfect timing! My best friend just found out that she is expecting a little girl and will begin working on the nursery soon! I think it would make a great addition. This may be cheating, but I'm really proud of myself! Last week, I completed my first year of graduate school!"


I've already sent out e-mails to these two ladies, but if I don't hear from one or the other (or both) of them by May 17th, I'll be picking someone new. UPDATE 5/13/2013: both people have been in contact, so I'll be shipping fabric to them today! The rest of you can take advantage of the following:

Being that it's Mother's Day and I really like hearing from readers new and old, I'm giving the rest of you an exclusive coupon code for 50% off the measuring tape fabric in my Etsy supplies shop. This will expire on May 18th, so order up!

Head on over, put the fabric in your cart, and when you're prompted for the coupon code at checkout, enter SEWMAMA. That's it!

Thanks again, everyone, for another successful Sew Mama Sew Giveaway Day! I was a little late (3 days) getting my giveaway post up this time around, so the amount of responses was impressive. Welcome to all of you new blog followers; I hope you'll like the post I've got planned for next week . . . CLIFFHANGER ENDING!


Thursday, May 9, 2013

giveaway day may 6th: win measuring tape growth chart fabric!

Update: winners announced! Click here!


Sew Mama Sew's Giveaway Day has inspired me to give away 2 pieces of my measuring tape fabric to  blog readers! Want to win one? Just add a comment below letting me know one other blog post you've liked on my blog -OR- add a comment below letting me know one way you feel you've really measured up to a challenge this week. Deadline is midnight, PST May 10th 2013.


Two lucky winners will each walk away with enough measuring tape fabric to make his or her own measuring tape growth chart. Note: this is not a finished product, but the fabric you can use to make your own. With free shipping, this is a $14 value.

Sorry; free U.S. shipping only. Others can buy the fabric in my Etsy Shop or on my Spoonflower page.


Winners will be announced on May 12th, and notified by e-mail if possible (I'll click the name by your comment, and follow any e-mail link available; otherwise, just check back on the 12th to see if you've won). After five days, non-responsive winners will miss out, and new winners will be selected from the pool of entrants.


Want to know how to put one of these growth charts together? I did an earlier blog with step-by-step instructions.


Okay! Get to entering! Thanks for reading, and good luck!


Wednesday, May 8, 2013

pinterest challenge: a backyard arbor

At last, it's time to show you a little more about this teaser photo I showed at the end of my last post:


Of the many pins on my Curb Appeal Pinterest board, most are variations on the pergola/arbor/garden arch theme. I've been collecting ideas for nearly two years now. 


In front of my house, I have two random metal garden arches (in different styles) that came to me on sale from a couple of different places. In the backyard, the "arch" in front of the studio building (which is now mostly sided! Hooray!) looked like this:


Urgh. The green metal arch (can you even see it?) is a leftover craft store "wedding arch" from our wedding ten years ago. It was clearly not meant for heavy labor.

I had it pretty neatly disguised for awhile with twigs and branches woven in. A windstorm collapsed the whole thing last year. 

I then had it supported by the side supports of a pergola that had also collapsed in the windstorm . . . total eyesore. That part had been removed by the time I thought to take this photo, along with a lot of the sticks and weeds.


Yes, I'm embarrassed that things got to this neglected, overgrown state. That's life in a fixer-upper, folks. Some things get fixed-up faster than others.

Which explains all of those arbor pins on my pin board, and my burning desire to take care of the issue.

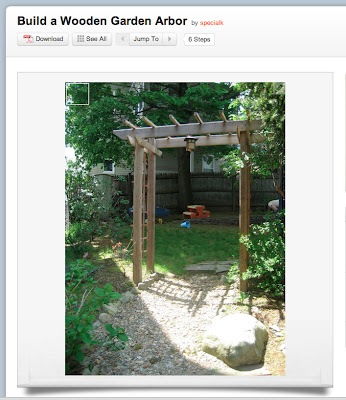
This project was uploaded to Instructables by someone calling himself/herself SpecialK, who deserves the credit for this photo. And it's the project I decided I could take on, by myself, before my husband came home from work one day last week.


So, that didn't exactly work out. I did have it about 90% built by the time the mister rolled up that evening (just needed cross bars and lattice on top and sides), but in my eagerness to get to building, I built it out of place. This presents some challenges I hadn't properly anticipated, like, say, assembling the thing with only one adult present, and moving it, and keeping things square and level. But let's set that aside, and assume that you'll do things the EASIER way: holes first, arbor built in place.


I finished it up the next afternoon (with some help from my kiddo and his toy drill) and started measuring for and digging the holes for the legs.


After the mister helped me finish digging with the post hole digger (approximately 15 inches deep), I put some pea gravel in the bottom of each hole (approximately 3 inches worth) and we finagled the arch into place, working until it was in-line with the roofline of the studio.


The bottoms of the legs are coated with spray-on rubber sealant about 18-inches along the bottom and sides. They are made of Douglas Fir, which needs a little insect and rot resistance. The gravel is for drainage as well as anchoring. I filled around the legs with some more pea gravel, and finally some larger river rocks near the top to disguise the sealant and to keep dirt away.


I also trimmed back the rose and grape vines a ton, which hurt to do. The rose will grow back quickly, but that grape vine takes awhile, and it really only started producing mass amounts of grapes last year. Fingers crossed that it snaps back. 

The next step was to paint. I had some oil-based primer left from ye olden days (maybe we used it on the pickets in the front yard?). Had I used all cedar or all pressure-treated wood, I would have kept it wood-colored, but I used a variety of woods and thought a little paint protection would go a long way.


The original project parameters call for pressure treated wood and store-bought lattice, and estimate the cost at about $100. I have three of these to build (this is the first) so I wanted to bring in my practice arch at closer to $50.

Here in Oregon, 8-foot 4x4 Douglas Fir posts are about $7 apiece. I used a mix of recycled shipping timbers (79 cents) and utility grade 1x2s ($1.50 for an 8-foot length) for the side supports, horizontal lattice,  and crosspieces on the top. The long skinny pieces on the side lattice are 6-foot long cedar garden stakes I already had on-hand.


The front and back pieces at the top are made from 1x6x6 clear grade cedar fence boards for $3 each.


I came in under my $50 target thanks to the river rocks, screws, and paint I already had on hand, as well as using utility grade lumber and a few on-hand and recycled bits. I'm sure that (free) pallet wood could stand in for most of the pieces here, too, so it's entirely possible to build one for even less (in fact, over on my Curb Appeal Pinterest board, there's a link to a plan for a pallet wood arch that's kid-sized).

I'll have more for you later, as the path gets re-done and the garden beds get rebuilt (I'm thinking cement retaining wall blocks this time around), so check back later in the summer!

In the meantime, thanks for reading the latest in my series of posts for the Young House Love / Bower Power Pinterest Challenge! Head on over and link up if you've finished a project inspired by Pinterest, too.

Linking up to:


Wednesday, May 1, 2013

out in the yard

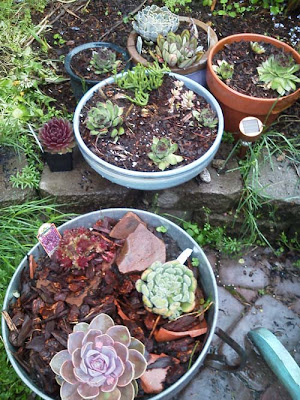
We've been planting up a bunch of succulents in a collection of random planters out back. I like their drought tolerance, although the no-rain season here in the Northwest always comes kinda late. When it hits, I always lose plants, especially when I plant in planters. Hopefully, planting these guys will cure that problem.


The grass is a little long here; I photographed this area before the first mow of the season (I don't like to mow when the grass is wet because it dulls the blade more quickly and clogs the underside of the mower). Also, a lot of the grass isn't grass anymore; we seeded a bunch of clover and, as happens every year, the dandelions just volunteer.


You can spy a little of our next planting project in this one; the little nursery pots in the background are seeded with grey stripe sunflower seeds and rouge vif d'etampes pumpkins (the Cinderella-looking ones found here).


And, because we've had a spate of decent weather lately, we actually got out and resumed our siding project on the studio walls. I doubt you'll remember this entry from 2008, when we did the cedar shingles at the peak. Yeah, so the studio's just been sitting there in all its tar-papered glory, looking more and more stupid as we've sided and painted the house, and put in the patio, and built the garden beds . . .  I'm super-excited to have gotten this side, plus the entire back and most of the other side done in one weekend. Since this time, we've also finished more than half of the front. Just a little more work to do, and it'll finally match the house and the shed! I'm pretty happy to be able to get this crossed off our list. It's been a long time coming.


Again, the lawn hadn't been mowed yet, and the raised beds hadn't been weeded, but I'm going to wait to show you those updates when I show you more of this in a couple of days . . . 


Because by some luck, I built the whole thing in a couple of afternoons in the backyard, just in time for the spring Pinterest Challenge over at Young House Love and Bower Power. And I'm looking forward to sharing it with you.


This spring is a strange one. Outside, so many things are just beginning, springing to new life. Yesterday, though, a friend and adviser passed away suddenly. It feels out of sync, and unreal in such a green season. He's already so missed from this world.


Thanks for reading.