Showing posts with label park. Show all posts

Monday, March 18, 2013

thrift store finds: campaign dresser + yellowstone pennant

The bedroom is in a transitional stage (urgh, the walls . . . look away . . . LOOK AWAY!), but I wanted to share this vintage campaign-style dresser and Yellowstone National Park pennant I picked up at an estate sale a couple of weeks back. The dresser came with a mirror, too, though I haven't found a place to put it yet.


The dresser set somehow survived until Sunday and I put in a bid on it, since there were no other takers. To my surprise I won (it was too low for what the dresser is worth, but I couldn't justify budgeting more), and eventually we made the decision to get rid of my husband's old 1990s oak veneer dresser and put this one in its place. 


I cleaned up the dresser and papered the drawer bottoms with old nautical charts, but otherwise, I'm waiting on making changes or updates.


I've seen a lot of painted or refinished campaign furniture on Etsy and Pinterest, but I kinda like the speckled wood stain. Link up in the comments section below if you've seen a campaign furniture makeover I need to see before making up my mind.


I love the pennant a ton. It's screen-printed wool felt and probably dates to the 1940s. The only way it could be better is if it were from Glacier (where we visited this summer).


Eventually, I'll get the walls replastered, primed, and painted and I'll give you a look at the finished room . . . but honestly, a foot on all sides of these photos is kind of a disaster area right now, so it'll probably be awhile.


Thanks for reading! Any unexpected thrift scores of your own lately? Do tell! I love following your (non-spam) links to look at pretty stuff.


p.s. you can make these photos larger simply by clicking on them, but you probably already knew that, clever you!

Linking up to:

Junkin Joe's Vintage and Thrifty Finds

The Shabby Nest

Mod Mix Monday

Thrift Share Monday

The Thrifty Groove

The Bright Green Door Blog


Friday, June 29, 2012

hometown tourist : silver falls state park

"Hometown Tourist" is an occasional series in which I tell tales about our adventures around town, and actually, the whole state of Oregon. Take a peek and come exploring with us!

For Mother's Day weekend, we drove up to Silver Falls State Park. Despite being a life-long Oregonian, I'd never been, though Silver Falls is the largest state park in Oregon and incredibly beautiful. More than 9000 acres in size, it features approximately 25 miles of trails for hikers, bicyclists, and horseback riders (though not all on the same trail).

It also offers clean campgrounds and cabins for campers. Here's where we stayed.


Cabins are divided into two rooms, with a living area in front (with fold-down futon) and a bedroom in back (with built-in bunk beds and a queen bed, all with vinyl-covered mattresses). You could easily sleep six people here, but we'd recommend you bring a drill or screwdriver, as all but the built-in bunk beds are super-squeaky due to loose screws.


Our picnic area, complete with long picnic table and metal fire hoop.


The old red water pump (shared between cabins).


There's a shared bathroom/shower building nearby, too, so there's no woods-squatting required, and hikers can get cleaned up at the end of the day.

We were surrounded on all sides (as is usual in Oregon's boreal forests) by tall cedars and douglas firs, and shrubs in a thousand colors of green.


The park was established in the 1930s thanks to the work of photographer June Drake; the lodge (shown here from behind) was built as part of President FDR's Works Progress Administration's Civilian Conservation Corps. It no longer hosts overnight guests.


Inside the dining room, the original myrtle wood tables are still extant. The only food served at the lodge anymore, though, is summer snack stand food; burgers, fries, ice cream bars, etc. Mother's Day weekend hosts a plant and bird show so the tables weren't useable for dining while we were there, but may be usually.


Photographs of and by photographer June Drake feature prominently on the wall by the snack bar.


Spring fiddleheads on ferns outside the lodge.


Ah! At last! A waterfall! The North and South Forks of Silver Creek feed the falls, of which there are ten (major) within the bounds of the park (and you can reach them all by following the Trail of Ten Falls on an 8+ mile hike).

The first, right off the parking area by the lodge (and the separate 1930s gift shop called the Nature Store), is South Falls.


It's a spectacular introduction to Silver Falls State Park, falling 177 feet to a pool beneath. The trail starts at the top of the vertigo-inducing descent . . .


. . . then winds down the side of the gorge and leads behind the falls.


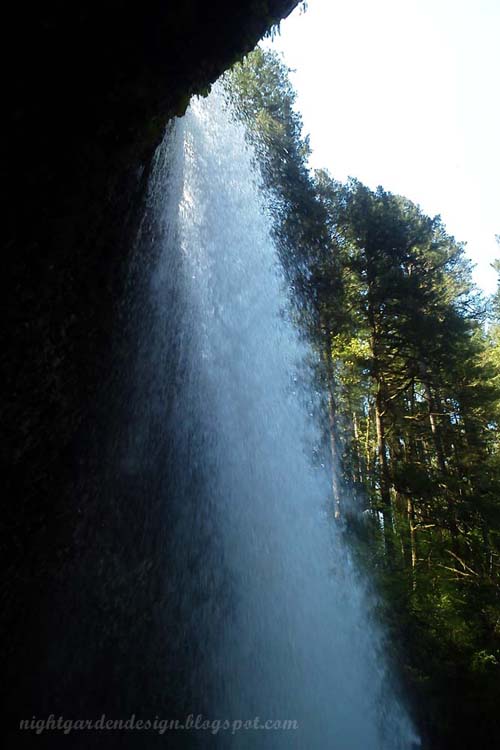
You pass behind a massive curtain of water, protected by a metal rail (hold tight to your bebes!). The overhanging cliff drips and sweats overhead.


The trail is narrow and not passable by stroller, wheelchair, bike, or horse at this point, although many of the falls are viewable from overlooks along the road, or along other trails. Here's a link to a pdf brochure that can help you plan.


A little more than a mile away along the trail is Lower South Falls.


Lower South Falls is shorter (at 93 feet), but the trail is more treacherous; the path suddenly leads down a steep, lightly-maintained staircase of stone steps (probably also built in the 1930s), edged by a railing of varying degrees of undependability. Seriously, hold tight to your bebes, and don't lean against the railing. (Make these photographs larger by clicking on them, and you can see part of the staircase in the previous photograph) The trail also leads behind Lower South Falls, the second of three falls along the trail with this feature.


Shortly after we passed Lower South Falls, my nearly-forty-pound two-year-old fell asleep in my arms, and became a dead weight I carried up the steeply sloping Maple Ridge Trail. This "shortcut" back to the trailhead and lodge seems interminable though only about a mile, because of the 30-45 degree slope. The kiddo woke up at the top of the hill, of course, and wouldn't nap again. We crossed a short bridge over Silver Creek and spotted this picnic shelter.


Upriver near the campground, close to the swimming area and a small playground, I photographed the exterior of the WPA lodge-style bathrooms in the late afternoon sun.


The next day, we scrapped the idea of starting over and walking the entire trail, and drove up the main road a little ways till we found the Winter Trail trailhead near Winter Falls.


After geeking out a little over the similarity to Winterfell (the name of the castle of the Stark family in Game of Thrones . . . yeah, we're nerds), we hiked down a zig-zagging trail to the bottom of the fall, which is approximately 134 feet down . . .


. . . and took a family portrait with my Commando phone near the pool at the base.


We hiked back up (except for one of us, who was carried aloft like a tiny, lazy prince) to the top, and drove a little ways further up the road to the parking area near the North Falls trailhead.

There was a bit of a hike to North Falls, and the narrow trail closely hugs the overhanging cliff. The scenery is mostly green, and the water gushes close by at all times.


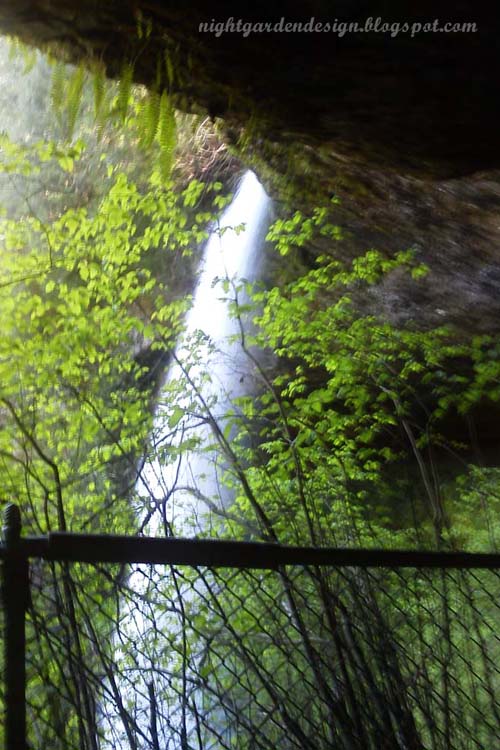
Again, the trail is bordered by a railing of questionable stability and, along one length, a bit of chain link fencing. It spits out suddenly over a deep overhang. Yes, North Falls is the third and final waterfall that the trail passes behind. But . . .


. . . at the bottom of another old staircase and down a slippery mud trail, you'll notice in this photo that there's no railing here. The trail is narrow and slippery at the top of a steep, muddy slope. Though there is a bench there (labelled; click the photo to zoom), the kiddo and I didn't brave this one. We stayed back while the Mister went to check it out . . . and reported back that it was a freaky as it looked.


Still, it was pretty enough behind the chain link, from our perspective. We hiked back up the staircase and back to the car.


I was unable to convince the guys to follow me on another mini-hike, so I begged off for a quick, short, quarter-mile hike from the car to Upper North Falls. This was the easiest bit of trail yet, and yielded a secluded 65-foot waterfall and a large, calm pool.


Yes, Upper North Falls is 65-feet tall, which means the fallen timber on the left side is taller than that. It's probably hard to get the right perspective from photographs. Imagine ten tall men standing on top of one another; that's how tall Upper North Falls is.


Sans baby and husband to make me look legit, the vacationing family posing by a smaller, unnamed waterfall wouldn't accept my offer to take a photo of all three of them together. Or rather, the father wouldn't. The mom totally wanted to be in the photo with her husband and daughter, but it was probably too expensive a camera to hand over to a stranger. Even on a dead-end trail. I contented myself with more fiddleheads.


And then we were on our way home. We passed by a glaring yellow field on the way towards Salem, and just like that, we were away!


So we checked five of the ten waterfalls off our list, and I plan to go back when I can count on my kiddo to walk most of the way, and not go sliding off the side of the trail. (I can literally worry about anything. Try me.)

I definitely recommend Silver Falls State Park as a day trip; even better if you're into hiking and can snag a campsite or cabin before they fill up (hint: make reservations waaaaay in advance). Keep a close eye (and a pair of strong hands) on your kiddo at all times, though, as there are lots of steep drops and difficult bits of trail.

Have you been playing hometown tourist in your neck of the woods lately? I'd love to follow your (non-spam) links in the comments section below. Thanks for reading!

p.s. you can make these photos larger just by clicking on them, but you probably already knew that.)


Tuesday, October 18, 2011

wonderland part 8 — summer 2010

In which the blogger adds a glut of photos never-before-shared from the Roving Park Players production of Alice in Wonderland, summer 2010.

I wish I had taken more photos of a bunch of this stuff; in the time crunch leading up to the production, I didn't pause often enough to take photos of completed projects. I'm regretting it now, because some of the props and costumes really did turn out beautifully. Also, it's my policy not to publish photos of other people's children to the blog without permission, and since most of the cast was under age 18, I can't currently show many photos of finished costumes. Here's a link, though, to the Roving Park Players website, where you can see a few more photos of some of the costumes and props we all made, including a turtle shell from a garbage can lid, several nifty pairs of animal ears, the Queen of Hearts' laboriously constructed beauty of a dress, and Alice's dress, stitched from a button down shirt and some white muslin by Stacie W (who actually did a whole lot of really nice sewing on several of the kids' costumes).

Here we have wo different horse heads I made of foam, spray paint, faux fur and plastic animal eyes. These were worn on top of the girls' heads like hats. The foam, purchased in sheet form, has one side with a smooth "skin" on it, which is the side I spray painted.


This next set are images of the Queen of Hearts' deck of cards tabbards. I cut a large stencil from waterproof poster board for the card backs, based on a drawing of the red queen from the original publication of Alice. I applied the stencil to some plain painters' canvas (drop cloths = cheap!) using red spray paint. The fronts are hand-appliqued felt that Lisa S-B painstakingly stitched onto separate sheets of canvas.


The tree in the garden was portrayed by an actor in brown clothing. His canopy is something I made from an old umbrella. Using several shades and coats of spray, I stenciled several different kinds of real leaves onto the umbrella to make an easy-to-transport tree canopy.


These next shots show two pocket watches (one for the Mad Hatter, and one for the White Rabbit) in the early stages. These are Trader Joe's chocolate tins with little plastic windows (still taped off, in these photos). I drilled holes and attached hook-eyes for chain attachment, then spray painted the tins using a hammered metal and antique bronze spray. You can see what a nice texture the hammered metal gives the watches, while nicely hiding text, scratches, and dents. I later filled the tins with all sorts of gears and watch hands and charms, and attached them with some simple hardware chain.


You can see here, across the Mad Hatter's vest near the bottom, the chain of his watch. The coat is the same one I made for Captain Hook in the previous season's production of Peter Pan (and it was used this past summer as the Wizard's coat in The Wizard of Oz. I can't wait to see where it turns up next!).


This is a first sketch of Frog's outfit. The pants ended up being made from a striped thrift store sheet, and the actress portraying the frog stitched up her own vest from some other sheet fabric leftover from the Caterpillar's coat. Oh Rosalie! I wish I had a photo of you in your wonderful costume!


Caterpillar's fez, made of a buckram base I stitched together, then handed off to Lisa S-B, who did an amazing job covering it in felt and trim.


Caterpillar's coat, which the actor really liked. The volunteer who stitched this together for him, Miss Phoebe, hadn't previously tackled such a complicated pattern. I was SO PROUD though, of the way she stuck with it and eventually finished it. It turned out so beautifully, and really does credit to the character of the Caterpillar.


The actress to the left there is not Phoebe; it's actually the beautiful and talented Misty, trying on her costume for the Red Queen. Here's a better shot of her costume during a performance. The dress is one I thrifted, with a skirt I altered to Misty's preference. I also added a sash at the waist and a scarf/capelet thing to the back. Her felt hat was commissioned by the director from an artist whose name I'm afraid I don't know.


Here we have the wire frame for the Queen of Hearts' crown. I made it from twisted floral wire . . .


. . . then covered the wire with one layer of white, then several layers of red and yellow tissue paper soaked in Elmer's glue.


The result is an inexpensive (under $2) lightweight crown that catches light beautifully, though it may be considered a bit fragile for normal wear-and-tear. I admit I was led more by aesthetic and budget than practicality on this project; though it lasted the length of the show's run, the heart ornaments at the top required careful handling. Overworked wire has a tendency to break.


I think I might have shown these before; Phoebe made several pairs of ears for this production from a tutorial over at Threadbanger, and some furry felt (awesomely useful stuff we also used for the animal mitts and various other projects) These ears belonged to the March Hare.


And one of the Tweedle's hats, hand appliqued by Lisa. I loved the way these looked with the boys' striped shirts onstage.


Again, I'm so wishing I had better photographs! Though I'm currently retired from the theater, if I were ever to work another show I'd certainly take more photographs of everything.

Thanks again to the Volunteer Fabrication Department who helped put together a bunch of props and costumes. If you're the parent of one of the child actors from Alice and you'd be okay with me publishing a few photos from the production, please get in touch! And if you're a costumer or props person who'd like a little more info on how we fabricated some of this delightful stuff, I'd be more than happy to give you some info. Shoot me an e-mail or leave a comment below!


(p.s. you can make these photos bigger by clicking on them . . . but you probably knew that!)


Pin It