Showing posts with label gift. Show all posts

Saturday, June 14, 2014

potato print onesies (baby shower project)

Inspired by a similar project from Martha Stewart Living and the potato printing projects of my youth, these are a fun, fast, simple project for a baby shower. We made these at a shower I hosted for one of the moms from our preschool, expecting her second baby. 

Potatoes make good stamps for printing on paper or cloth. Cut them into simple shapes, use foam brushes to apply fabric paint (we used Kid Made Modern fabric paints from Target's selection of kids' art supplies), then stamp shapes to make pictures or scenes. After dry, heat set with an iron, and they're ready to wear!


Linking up to:
I Should Be Mopping the Floor

Saturday, May 17, 2014

fairy flower surprise gift (giant tissue paper flower)


These make a nifty way to present a tiny gift to someone special, whatever the occasion.  Extra large fairy flowers are an especially nice way to package costume jewelry for kids' birthdays; this one, for example, concealed a comically large metallic ring with a huge purple plastic gemstone for a girl who loves fairies.

I think these flowers make a nice gift in themselves, as well, or pretty awesome party favors. They're also versatile, easy to make, and use materials that are reasonably easy to find.


Start with six squares of tissue paper. To make the largest flower possible, use full-sized sheets of tissue with an end cut off to make a square. For smaller flowers, use smaller squares of paper. I used two sheets each of green, pink, and yellow, but you can alter the colors to match your theme.


Stack them up, and make one-inch wide accordion folds from one end of the stack to the other.


Use scissors to round the ends of the folded stack, then use a green pipe cleaner (aka chenille stem) to cinch the stack at the middle.


Carefully separate the layers of paper, gently pulling and shaping them up and towards the center to look like petals and leaves.


Use a length of 20 gauge steel wire to make a long stem, and use it to follow the green pipe cleaner around the center of the flower.


At the flower's base, twist the pipe cleaner and stem wire together, then wrap the entire stem with patterned washi tape or masking tape. The stem should be sturdy enough to hold the flower upright.


The center will be where you place the bundled present! Wrap your gift in layers of tissue paper and twist the top. Use two short lengths of pink chenille stems to twist around the top of the bundle, curling the ends.


Apply a rolled piece of the patterned masking tape or a piece of double-sided tape to the bottom of the bundle. (Hint: If you're planning on traveling very far or the jewelry is very expensive, I'd attach the bundle with hot glue instead of tape.)
 

Insert the bundle into the flower's center and press hard to secure it in place. Make sure to include a line in an attached card to let the recipient of the gift know to check the center of the flower for a hidden surprise!


If you plan to make a bunch of these as party favors, you can cut up to a dozen sheets of paper into squares at once to save time, and then build the flowers assembly-line style.


Thanks for reading!

Tuesday, April 22, 2014

subway tile baby shower quilt

A friend of ours from the preschool had a baby shower for her second kiddo, a girl, a couple of weeks back, and in celebration I made this quick little subway tile-style baby quilt.


The top is made of vintage textiles I've collected at thrift stores and estate sales (poppies + stripes), stuff from my stash (including a pair of Heather Ross prints and some cute owls), and a couple of my own prints from Spoonflower (the measuring tape and cupcake prints are both mine). The kicker is that I also used a crib sheet from the recipient's registry for some of the blocks as well as the quilt backing, which ties it in nicely to the nursery bedding.


The subway tile pattern is a pretty simple one to replicate. Just cut 48 rectangular blocks (mine are 4 inches x 10 inches) and stitch into rows of four, pressing seams flat when done.

Every other row, cut a 5-inch section off of one end, and attach it to another end. Then sew the rows together to make your quilt top twelve rows high. Press all seams down.


Instead of quilt batting, I used some organic cotton + organic bamboo sweatshirt fleece in between the layers. I had it on hand and it gives the quilt a nice weight and a sturdiness that will help it last a nice long time.

I stacked and pinned the layers just like I did for my sister's wedding quilt, only on a smaller (and quicker) scale. When quilting the layers together, I stitched along both sides of each horizontal seam and called it good, except for the corners. There, I stitched some simple designs: a fish, a bird, a leaf.


I used the quilt binding technique introduced to me by the Smile and Wave blog; it's taken all the mystery out of quilt binding for me, and lets me coordinate binding to my project, which I love. I'll link to it once her site's back up. Updated 6/7/13: Here's the link.


Basically, cut 3-inch strips, sew together at an angle to avoid bulky seams, then press flat. Fold almost in half along the length (favoring one side by about 1/4 inch), press, then fold edges to the center and press again. The wider side goes on the back of your quilt, so that when you run the quilt through your sewing machine the top and bottom are certain to both get caught in the stitches.


After that, the hand finishing is a cinch.


It was a big hit with the mama-to-be, and I was pretty happy with it, too! A couple of people asked if I sell my quilts; I don't at present, but I really like to give them as gifts.

Thanks for reading! If you make your own subway tile quilt, I'd love to see!

Linking up to:
My Repurposed Life

Thursday, March 20, 2014

doll cradle + bedding

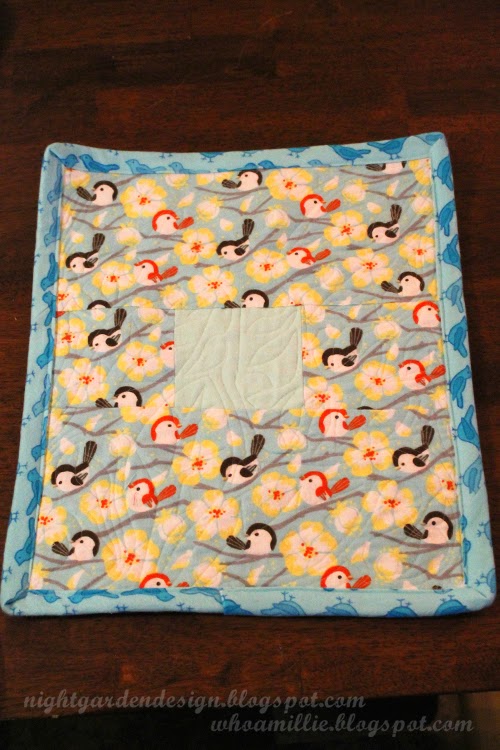
Donated to the silent auction at the kiddo's school:


 Birds & Branches flannel doll quilt


Tufted flannel mattress


Pillow and pillowcase


Refinished vintage cradle with leather insets


Yay! It sold!

You can see a previous vintage doll cradle project here. I might make this an annual thing. ;)

p.s. want to see some more detail? click a photo to see a larger version.

Wednesday, January 8, 2014

paul bunyan christmas boxes

You've already seen some of the things I packed into this year's Christmas boxes, including the Paul Bunyan Towel-endar . . .


. . . the saved mammoth sunflower seeds . . .


. . . and the woodsy snow globe ornaments.


So let's look at some of the other stuff that went in the boxes with these goodies. Here's some coconut candied peanuts. I packaged them in triangular treat bags and added gold ties and vintage-style labels. (I should have chosen tree nuts to stay on theme, but I had a momentary lapse)


And here are some bar coasters I printed with a log slice pattern (for fun, some also had a bark pattern on the backs).


These little Paul Bunyan books (Paul Bunyan Comes West, originally published 1928) were my favorite, though. I'll talk more about them in a future post, but here's a sneak peek at them after I bound  them but before they were wrapped and put into the boxes.


I packed everything into a treat box with a window on the top. You'll notice I also enclosed a box of packaged tea and a little parchment paper package of birch branch paper straws.


Then I added some colorful paper shreds I reused out of a Pijon Box delivery. They use a lot, so I had plenty for twelve boxes.


I tucked the Paul Bunyan towels in on top of everything . . .


. . . then sealed up the boxes (bought during last year's post-Christmas clearance) with the towel wrap showing through the window.


Finally, I used some recycled brown paper to print some wrapping paper using the same block I used for the coasters. I tied the packages shut with baker's twine and added more wood veneer tags on top. These ones say, "Paul Bunyan says, 'Merry X-Mas'" in gold pen.


Positive feedback from family and friends! I had a lot of fun, and some frustration, and a few late nights putting everything together this year. I even got boxes in the mail in time for Christmas for those I wouldn't be visiting. Now to start planning for next year . . .

p.s. make photos larger with a click!

Linking up to: