Showing posts with label flannel. Show all posts

Thursday, March 20, 2014

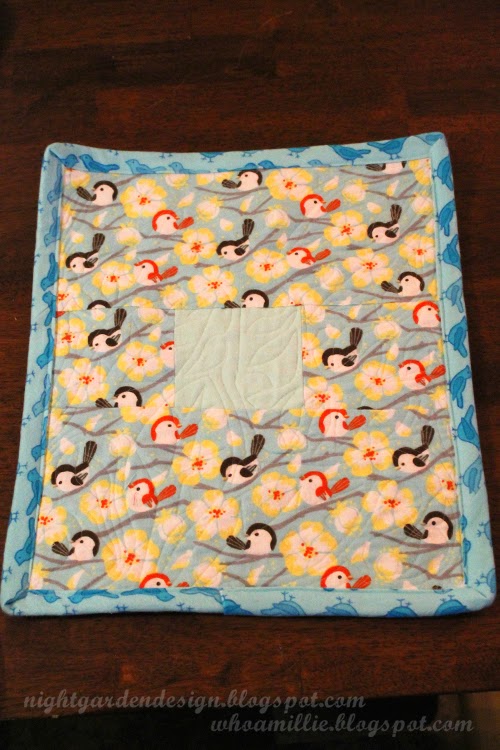
doll cradle + bedding

Donated to the silent auction at the kiddo's school:


 Birds & Branches flannel doll quilt


Tufted flannel mattress


Pillow and pillowcase


Refinished vintage cradle with leather insets


Yay! It sold!

You can see a previous vintage doll cradle project here. I might make this an annual thing. ;)

p.s. want to see some more detail? click a photo to see a larger version.

Friday, November 1, 2013

i'm gonna wreck it!

This is the premise of the video game, Fix-It Felix Jr.: 
Ralph owns some land. Citing Imminent Domain, the Nicelanders forcibly move Ralph from his land and into a garbage dump in order to build an apartment building. Ralph objects. He gets angry and vows to tear down the building, but everything he breaks, Fix-It Felix Jr. fixes with his dad's magic golden hammer.

Good guy?
So really, Wreck-It Ralph is the underdog. The premise of the movie, Wreck-It Ralph (upon which we designed our costumes this year) is that Ralph gets tired of not being appreciated for doing his job for thirty years. Felix gets all the medals and friendship; Ralph still lives friendless in the dump. So he ventures out into the hub to find a video game in which he can win a medal of his own . . . and the respect of the Nicelanders. 

The Mr. was Wreck-It Ralph this year, to go alongside the kiddo's Fix-It Felix.

We spiked his hair with some red Spirit Gel by Zach's Wax. It has really good hold, and doesn't smear if you hit it with a hair dryer before going out.


The shirt is a burnt orange polo shirt from Value Village ($3) with the collar removed and the cuffs torn to match the movie. I painted on the plaid pattern by blocking off horizontal stripes with masking tape and spraying with watered-down brick red acrylic paint (this worked a ton better than that crappy fabric spray I tried on my leggings awhile back).

Once those were dry, I drew in the blue lines using a Crayola fabric marker, then masked off the vertical stripes. I sprayed those with watered-down white acrylic paint, applied thinly enough that the other colors still show through where the colors overlap. We were all pretty pleased with how close it matched Ralph's "real" shirt.

I made the overalls using four yards of flannel and some white thread.


I used a pair of the Mr.'s jeans for a pattern for the bottom, adding a couple of inches to the side of each piece of fabric before cutting. Then I referred to a pair of my kiddo's overalls to determine the shape of the bibs, pockets, and straps and all the lines of stitching. 


Some metal overall hardware finished them off. Total cost of the overalls was $12.50 with fabric store coupons. 


I thought ahead and bought the orange flip-flops in August on clearance. Ralph usually goes barefoot, but Ralph's a cartoon. Real-world peeps wear shoes in October in the PNW.

We also bought a pair of Disney-licensed Wreck-It Ralph Wrecking Fists, but they were a little tight and hard to work in, so they got left behind on Halloween (although they did make an appearance at the preschool party). Don't worry; we bought them on clearance over the summer, so it wasn't as big a waste as if we'd paid what they're going for now on eBay.

I'm hoping to have a photo of the three of us to share soon; I actually finished my Vanellope costume in time, so I'll be going over that in a future post.

Happy November, everyone, and thanks for reading! I hope your Halloween was a smashing success. Pun intended.

(p.s. you can make these photos larger just by clicking on them, but you probably already knew that, clever you.)

Saturday, July 28, 2012

a doll cradle for a birthday girl

Aack. You'll have to forgive me; I neglected to take a before shot. I got this doll cradle home and started work on it that same evening, when the dark made it impossible to get decent photographs.

We discovered it at a resale store a couple of miles from our house, actually left it behind, and then returned and picked it up when I couldn't stop thinking about it. It was too sweet to leave behind.

Here's the cradle the kiddo and I found, after being scrubbed clean, rubbed with butcher block oil (food-safe, therefore baby-safe), and repaired, with new hardware in a couple of spots.


I also added on these little wooden bird cutouts (painted turquoise, then glued and nailed in place) to cover some places that needed covering.

The old screw eye holes didn't hold the hardware in place tightly enough, and the cradle basket scraped on the bottom support board, so I drilled new, lower holes and filled/covered the old ones. The bluebirds cover the places on the inside where the screw eyes had begun to poke through.


One end of the cradle, so you can see the side supports. U bolts on the side supports connect with screw eyes on the cradle basket to make the cradle rock; I replaced the nuts with cap nuts (also called "acorn nuts") to make them a little safer and prettier.


With the bluebird flannel mattress in place. I pulled sweet fabrics from my stash to make the bedding feminine but not overtly girly (no pink here!).


With the "Celebrations" fabric pillowcase covering the green pillow. (The fabric features butterflies, frogs in party hats, happy women and girls in birthday cake hats, etc. Click to zoom.)


The little doll quilt incorporates all three fabrics: celebrations on the front, green on the back, with bluebirds for binding.


The cradle and bedding set were given to my kiddo's little friend as a birthday gift this afternoon, and for such a simple gift, it was a big hit. Happy birthday, cutie! I hope every one is just as happy as this one.


p.s. you can make these photos larger just by clicking on them, but you probably already knew that.


Linking up to:

Simple Design's Thrift Haul
Mop it Up Mondays
Thrift Share Monday
So You Think You're Crafty's I'm Crafty party
My RePurposed Life's Catch as Catch Can

Friday, May 4, 2012

flannel projects - - part two : monkey crib sheet and pillowcase

Next up from this pile of fun flannel prints


is this little set of crib sheet + pillowcase made from a monkey/bicycle print flannel from Joann Fabrics.


I discovered about a year-and-a-half ago how easy it is to make fitted crib sheets. That was about the same time I discovered how hard it is to find flannel ones. Our house can be a little chilly in the winter, and at the time, my kiddo was too young to sleep with a blanket. Flannel crib sheets were at the top of my "must-have" list.

Basically, you take a two-yard long piece of 42" wide fabric and cut 8" squares off the corners. Then sew up the cut edges, hem, and add elastic. Go here for the illustrated tutorial from Michael Miller Fabrics that I used to make this one:


Pillowcases are pretty much a cinch, too.


My kiddo's too little to use a pillow in his crib yet, but eventually the crib will convert to a toddler bed and the pillow (and pillowcase) will see lots of good use.

In the meantime, I just keep busting out cute cases in preparation.


Here's the pillowcase tute from Film in the Fridge. It takes about a yard of 42" fabric to make a standard-size case.

Want to see more? Here's Flannel Projects -- Part One featuring the flannel pouf I made from a cute owl print.

(p.s. you can make these photos bigger by clicking on them . . . but you probably knew that!)

Monday, April 23, 2012

flannel projects - - part one : floor pouf

I always seem to have a few patterns of flannel laying around, partly because I bought a bunch when I was making cloth diapers before the kiddo was born, and partly because I bought some more when I figured out how to make flannel crib sheets (coming up in a future post).

This project, however, uses the owl print flannel that my aunt used to wrap up Little Owl Lost for the little guy's birthday this year. My aunt is a long-time recycler who often uses fabric to wrap gifts (and often gives books. Yay!).

All of the fabrics pictured in the first photo are from Joann Fabrics; I'm having difficulty finding the owl fabric on-line, though, so it might be a discontinued print. Really, you can use almost any fabric for this project, from flannel to upholstery fabric to suede, depending on what you have on-hand.


I decided to make a floor pouf after seeing Sherry over at Young House Love make one based on this tutorial from Living with Punks. And I have to say, it was just as quick and easy as it looked, including the piping!


Now, I should mention, I've had limited adventures with piping in the past. But having the how-to spelled out for me made it look kind of awesome, I think.


We skipped the handle since cotton flannel is kind of a thin fabric, prone to tearing when rough-handled. I'd rather the kiddo pick the whole thing up to move it, and the pouf is light enough that the lack of handle isn't an issue.


And there you have it! One cute owl pouf made from gift-wrap flannel. The kiddo likes to tackle it, but it also makes a great stool, pillow, and foot rest.

Takes about an hour and a half from start to finish, and since I made ours about 24 inches across and about twelve inches tall, it took about two yards of 42-inch flannel to make.

I'd love to see if you tackle this pouf project too! Link in the comments if you want to share photos.

(p.s. you can make these photos bigger by clicking on them . . . but you probably knew that!)


Thursday, December 15, 2011

pajama pants from old pajama pants

My husband picked up a cute set of Nick and Nora flannel pajamas for me at Christmastime a few years ago, featuring flamingos and Airstream trailers in the snow. Loved them. I wore them even when it wasn't Christmas, even when it was early summer.


But, as happens with flannel, they wore out, wore through (in some places), and basically started looking kinda trashy. Considering that I wore something featuring both flamingos and trailers, you can imagine how bad I let these get before finally making that call.

With plenty of soft places left that remained hole-free, I thought these probably needed a second life as a pair of (much smaller) pajama pants for the bebe.

Using a pair of his existing pants as a pattern, I cut the shape of one leg from a part of the old pants. I cut the new leg on the old side seam, so that I'd have a little less sewing to do; the old leg's side seam became the new leg's side seam. I did the same thing for the second leg.


Here's a shot of the new pajama leg unfolded and spread out.


The next step was to fold it back over (this time with the patterned surfaces together), then stitch along the inside leg seam. That's the part that runs from the crotch to the cuff.


I used an overcast stitch on the first pass, then did a straight stitch to reinforce. I turned one leg right-side out, then tucked it into the other leg with edges matched up. This became the center seam, also overcast then straight stitched.


At last, I turned the entire pair of pants inside out, hemmed the cuffs, created a casing for the elastic, and finished them off, just in time for bed! The bebe loves them, and they're holding up well so far! Here's hoping for a nice second life for these pj's!


(p.s. you can make these photos bigger by clicking on them . . . but you probably knew that!)


Pin It