Showing posts with label inexpensive. Show all posts

Thursday, October 10, 2013

c is for chasmosaurus

After last week's craft fail, it was nice to have a couple of craft successes. This is one!


This chasmosaurus shirt is part of our gift for an upcoming birthday party this weekend (second part to be featured here, soon!). Our little friend is a big-time dinosaur enthusiast.


Those of you without a Silhouette cutter will be happy to know that this was made without one. I used freezer paper and an X-Acto blade, after first designing the image in Adobe Illustrator. Free dinosaur graphics are everywhere on the internet, though, so it's possible to do this project with other dinosaurs, without Illustrator. Chasmosaurus fans can use this design for your own personal projects (not for sale!).

You can print directly on the freezer paper. Cut it to fit your printer and make sure you'll be printing on the textured "paper" side, not the slick plastic side.

To save ink, I turned the opacity down to 30% so that it would print a light gray instead of black. You could also just print the image in outline, but I like to have a filled-in figure for whatever reason.


After it's printed, cut it out with an extra-sharp X-acto blade on a self-healing mat or a surface you don't care too much about (like an old magazine or a drawing board). The sharpness of the blade is especially important for those tiny letters.

Then iron it on your shirt and paint using a short-bristled brush! As I've mentioned before, the beauty here is that kids can help with the painting part. My kiddo helped paint this for his friend, so the gift is really from his own two hands.


Here are some of my previous freezer paper stencil projects, in case you'd like some more ideas or a bit more step-by-step.

(1) flour sack towels
(2) viking t-shirt
(3) toddler art pretzel shirt

Thanks for reading!

p.s. you can make these images larger just by clicking on them . . . but you probably already knew that, clever you.

Wednesday, August 29, 2012

thrift store finds: book storage

As previously mentioned, we keep a lot of books around. Our collection of kids' books is especially large, since I've been collecting continuously since I was a kid myself. The seven years I spent in bookstores increased this collection exponentially, and now that there's an actual child in the house, the need for book storage has gotten critical.

There's a bright red magazine/book rack in the living room; this one (formerly a magazine rack, found at Goodwill on 1/2-price day for $3) will be indigo-colored soon.


Martha Stewart Living gave me the idea for this solution, a wooden cd crate we attached to the side of the changing table. Wooden cd and tape crates at the thrift stores run between $2 and $4, depending on condition. Single-bottle wine crates also work well for this.


Of course, since we moved the changing table out a couple of weeks back, the crate isn't currently in use, but I have a future home in mind for it.

In fact, I have a couple more ideas up my sleeve, so I'll be visiting this topic again. In the meantime, though, I have a pretty awesome recent thrifty find to share with you.


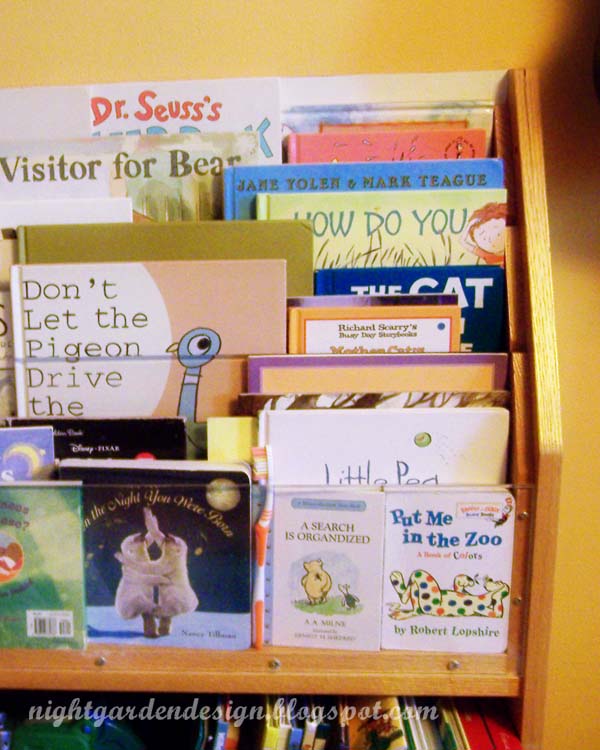
This book rack, formerly from a classroom or library, has the benefit of face-forward book display space, as well as a couple of traditional bottom shelves for more toys and books.


I also love the way it leans back to prevent tipping.


The kiddo and I picked it up for $30 at BRING, and then I measured and marked it for the Mister. He cut about eight inches off the bottom so that the height would be better for the chosen location.


I can't tell you how much I love it. We all do!

Hey, bonus thrifty finds: many of the books on the shelf are thrifted! Alice in Wonderland ran me $2.99 at the Village; Goodnight Moon and The Bremen Town Musicians were 49 cents each at Goodwill. There are tons more on the shelf that I picked up second-hand, but those three you can actually see in the above photos. Goodwill is a great source for us, as their kids' books are all 49 cents. That's less than I'd pay for late library book fines (I promise you, it's true).

Okay. There are a few of my thrifty book storage finds; you can check out some more over on my Book Storage Pinterest Board.

My thrift store obsessions are kids' books and storage; what are you always on the hunt for?

Thanks for reading!


p.s. You can make these photos larger just by clicking on them, but you probably already knew that.


Linking up to:

Simple Design's Thrift Haul
Cap Creations' Thrifty Love
Thrift Share Monday
I'm Crafty!
Mop it Up Mondays


Wednesday, June 6, 2012

cheap-o screen printing


A couple of friends I know through work recently asked me if I'd make them a Thermofax screen for some fundraising t-shirts they wanted to print up.*

I was out of Thermofax screens and I couldn't get more by the deadline (they have to be special ordered), so I realized I'd need to go a more traditional route.

Screen drawing fluid + screen filler + framed screen = approximately $45 at the local art supply store. Way out of my budget for a donated screen. I could have justified the expense if I'd been planning to clean and re-use the screen, but I wanted to give them one they could keep for future print runs. I needed something less expensive, but quick and on-hand.

Back in school, we experimented a lot with different media in surface design classes, so I knew there was more than one way to solve this problem. In fact, we played around with a bunch of screen printing methods, and somewhere, at the edge of memory, I knew that there were ways of hacking this particular DIY project.

On-line research (word to Pinterest!) turned up some Mod Podge screen printing tutorials, but regular Mod Podge isn't waterproof, and that's all I had access to. Since I knew my friends would be making a ton of prints, I didn't want to risk any gumminess or dissolution.

Back to the drawing board internets. Where I found an article recommending latex paint, which I have coming out of my ears (figuratively speaking. And only sometimes literally).

I chose to use a (zero VOC) latex primer because it fills gaps so well, but if you don't have any latex paint laying around, you can usually get mismatched quarts cheap at the home improvement or re-buildng store. They're only a buck at my local place! Add that to the 99-cent thrift store wooden embroidery hoop and the (free) mesh polyester curtain fabric (it came with my house, but you can thrift similar ones), and this particular screen + frame only cost a little over a dollar and a couple of hours of my time.

Here are a few photos of the screen I made (using their design).


As mentioned above, the logo is their work; I traced it from the artwork they provided and painted it on the back of the screen. You can see that it's possible to get pretty fine detail on the lettering which opens up a wide world of possibility using text-centered designs and other fine-line work.


Too much ink + too much pressure = a terrible practice print.


Subsequent trials were better.


Their finished shirts turned out A. Mazing. (The printing and photograph below are both the work of people other than me, used by permission.)


(You can visit the Homeless Empowerment Network's Facebook page here.)


And then I caught the screen-printing bug, so I made a helicopter screen for my kiddo. As a happy coincidence, the helicopter screen gave me the opportunity to take more photos in-process.

STEP-BY-STEP DIY

1) Image drawn in pencil on the front of a stretched-tight piece of curtain in a wooden embroidery hoop (hoop up, with mesh screen flat on surface, like it will be when you're printing).


2) Negative space (everything but the printed image) filled in with primer on the back of the screen. Dry very well, overnight if possible. Drying it with a hair dryer will also offer you the advantage of heat-setting the primer.


3) Old t-shirt ready to be printed, with newspaper inside to absorb any seeped paint.


4) Screen on top of t-shirt, with ordinary craft acrylic paint pushed through using light pressure and a plastic gift card in place of a squeegee (you can also use fabric paint or screen printing ink. I tend to go cheap).


5) I didn't rinse between colors and using the tiny make-shift squeegee meant several pulls across the screen, so these have a nice, variegated appearance I liked for this project.


6) This one, too, a piece of the t-shirt quilt planned for our room (when I get around to finishing it up).


7) The key to longevity with anything screen printed it HEAT SETTING! Use an iron with a cloth over your design, or run it through the dryer on hot, and you're good to go!


Thanks to R & E for inspiring my return to screen printing! I hope you guys try out some other projects, too!

* In case you're unfamiliar with the Thermofax screen printing process, here's a short summary. The 9x12" screens come pre-coated with a heat/light sensitive emulsion. This gets run through a vintage Thermofax copier coupled with a reversed, carbon-rich image. The result, in seconds, is a screen-printing screen burned with a near-perfect replica of your image.

Ha! I just got the June/July issue of Family Fun Magazine and they have an article on Mod Podge screen printing! It's a small world, after all.


(p.s. you can make these photographs larger just by clicking on them, but then, you probably already knew that.)


Linking up to:

Handy Man, Crafty Woman

Tip Me Tuesday at Tip Junkie

A Bowl Full of Lemons

Mommy by Day, Crafter by Night

Today's Creative Blog

DIY Show Off

Simple Design's Thrift Haul

The Stuff of Success


Tuesday, April 10, 2012

recycled crayon eggs

Hey all! I've got a little recycled crayon project redux for you.

A month back, I posted about the rupee crayon party favors we made for the kiddo's Zelda birthday party. Big success! But, I did have leftovers. Both leftover rupees, and some leftover old crayons. So I decided to take some of the leftovers and recycle them again, this time into a little treat for the kiddo's Easter basket. (Should we call it tri-cycling? Or re-recycling?)


Easter egg crayons are pretty simple to make, if you have one of these Jello egg molds. Mine is a few years old (so it looks different from the one I've linked to), and the eggs come out with a patterns instead of being smooth. And of course, you should plan on retiring your mold from food use after using it for crayon eggs. FYI.


The process is slightly different from making the rupee crayons, because that was an open mold, and this one is closed. I could still have pushed crayon bits into the hole, but it would have been harder to get the entire mold filled to the top.

So I improvised a double boiler for the microwave. You can see the glass jar in the background there.


I put the crayons (broken into pieces) into the jar, then placed the jar into a bowl of water about two inches deep. The whole thing went into the microwave. Note: I've had good success with this method and have never been injured, but microwaves can cause hot spots, fires and occasional water eruptions. Please proceed knowing these risks, and remember: the crayons might be for kids, but this project is not. (In fact, if you have a standard double boiler you can use exclusively for crafts or candles, I'd recommend that over the microwave method any day.)

Once the wax was melted completely, I carefully poured it from the jar into the molds (using a silicon hot mitt to hold the hot jar). After letting it cool for a couple of hours, the mold popped right open, and the crayon came right out.


You might need to babysit your project a little. Wax contracts a little as it cools, so you may need to fill in your mold a little more to prevent hollow spots.

Once the crayons are out of the mold, they'll have little stumps.


If you leave them intact, the eggs won't fit into an unmodified egg carton. Luckily, the stumps are easy to remove with a serrated knife and a gentle sawing motion. Then, you can smooth the cuts by rubbing on a hot piece of aluminum foil.

Done at last, you can package them in an egg carton and stick them in the Easter basket!


Like a lot of the projects I do, this one is very versatile. You can make crayon hearts for Valentine's Day (I've seen them all over Pinterest), crayon shamrocks for St. Patrick's Day. You can find a Lego figure mold and make party favors for a Lego party. Think outside the (crayon) box!

(p.s. you can make these photos bigger by clicking on them . . . but you probably knew that!)


Linking up to:


mop it up mondays

Visit thecsiproject.com