Monday, June 18, 2012

nostalgia, part two


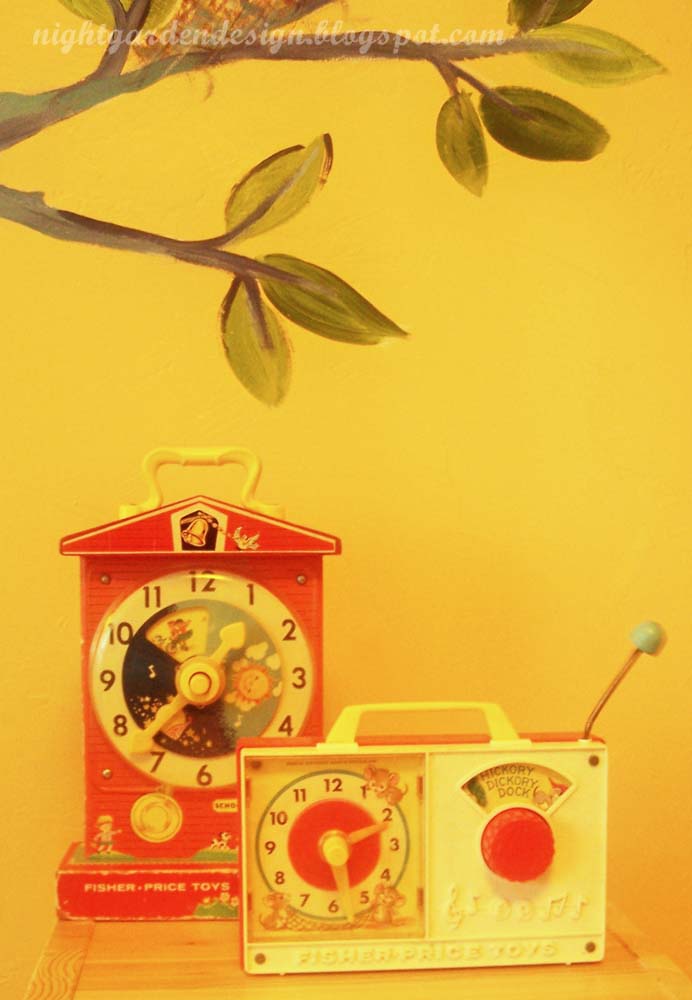
FOUND: a vintage Fisher-Price Hickory Dickory Clock Radio and a vintage Fisher-Price Teaching Clock.


Add these to the Chime Ball we found awhile back, and we have a neat little vintage Fisher Price collection going on, thanks to our local thrift stores. The kiddo's loving them almost as much as I do!


Linking up to:

Simple Design's Thrift Haul

Tuesday, June 12, 2012

sweet pea and pool blue lockers


I bought this busted up locker set for $20 at Borders when they went out of business last summer. And then it sat in my carport for about seven months, through the fall and winter. Looking like this.


I have this problem a lot. I buy something because it won't be available anymore when I'm actually ready for it, and then I have to find a place to store it until I'm ready. In the case of these lockers, they were meant to take over storage duties for the changing table in my kiddo's room. But we were still using the changing table, and the lockers were busted and rusted and needed some serious TLC.

Finally spring came along, and it was (kind of) spray painting weather again! First, taping off all the elements that wouldn't get painted, including the number plates and the strikers. I used standard masking tape.


And I reattached all the shelves and the side panel.


Next, I sanded down the rusty areas and applied some liquid de-glosser, then primed and spray painted the inside in sweet pea green. Over spray didn't matter at that point, because the outside would be painted over anyway.


After letting the paint cure for a week, I taped off the inside of each locker window and spray primed and painted the outside in pool blue.


After I let it cure another week, I removed the tape . . . and it looked kinda awesome!


And then I had to let it cure outside quite awhile longer . . . like a couple of months longer.

At first, the cool spring temperatures refused to let the paint cure and harden correctly. I could still press into it with my fingernail after a couple more weeks. Later, we were still having trouble kicking our changing-table habit, although the kiddo's legs were hanging way over the edge and he was constantly kicking things on the floor.

Finally, last Friday, I dragged the old changing table outside, and after some crazed re-arranging, finally fit the lockers into their new home!


Tips for replicating this project:

* Prep work, prep work, prep work. Take your time to clean, de-rust, de-gloss, and tape carefully! 90% of this project is in the preparation.

* Layer up the spray paint in light, barely-there layers to avoid drips, runs, and scabby places that take forever to cure.

* Keep it out of your kiddo's room until it doesn't stink anymore. Spray paint takes a while to cure completely in cook humid weather, and until it does, it'll be stinky.

* Attach tall furniture to the wall so it doesn't get pulled over. 'Kay thanks.

I think these lockers are going to be around for a nice long time in the bebe's space. Unlike the changing table and the crib, it's not baby-specific, so I can see him getting use out of it well into his teenage years, though I imagine we'll have to paint it to match his favorite sports team, if he goes that route, or flat black if he turns out to be moody ("if". Ha!).

What about you? Have you been altering anything with spray paint recently? Let's see some links in the comments below. Thanks for reading!


p.s. you can make these photos larger just by clicking on them, but you probably already knew that.


Linking up to:

Handy Man, Crafty Woman

Tip Me Tuesday at Tip Junkie

A Bowl Full of Lemons

Mommy by Day, Crafter by Night

Today's Creative Blog

DIY Show Off

The Stuff of Success

Monday, June 11, 2012

fancy old vintage frames


I've had these fancy old frames around for awhile, found at a flea market and a thrift store, respectively. I like them, but have never hung them up because the Mister isn't at all fond of them.


They are too fancy and old for his taste. Also too gold. But this one has awesome evidence of several layers of paint, built up over time. The mat is golden velvet. It's also a dimensional frame . . .


. . . the 45 degree angle of the molding strips make it 2.5 inches deep at the edges. The back of it is a lovely vintage green. Of course, if you hung it up, no one would ever see the back.


This one is more 1970s-style. I'm not convinced the ornamentation is wooden; it might be some sort of resin or gesso or something. It's hard to say!


It has a nice tone to the gold color, though, and if a person wanted too, she could probably mimic the old built-up-paint effect of the other frame.


The frame base is clearly wood, as you can see on the back, and its hanger is a pop tab! Such a clever use of recycled/reused materials. I saw someone use this trick on their blog awhile back; it's been around for awhile, as it turns out.

Anyway, if you like pretty gold vintage frames, you can hop over to my Etsy vintage shop (Night Garden Vintage), where these are now for sale.

Thanks for reading!


p.s. you can make these photos larger just by clicking on them, but you probably already knew that.

Linking up to:

Simple Design's Thrift Haul

Wednesday, June 6, 2012

cheap-o screen printing


A couple of friends I know through work recently asked me if I'd make them a Thermofax screen for some fundraising t-shirts they wanted to print up.*

I was out of Thermofax screens and I couldn't get more by the deadline (they have to be special ordered), so I realized I'd need to go a more traditional route.

Screen drawing fluid + screen filler + framed screen = approximately $45 at the local art supply store. Way out of my budget for a donated screen. I could have justified the expense if I'd been planning to clean and re-use the screen, but I wanted to give them one they could keep for future print runs. I needed something less expensive, but quick and on-hand.

Back in school, we experimented a lot with different media in surface design classes, so I knew there was more than one way to solve this problem. In fact, we played around with a bunch of screen printing methods, and somewhere, at the edge of memory, I knew that there were ways of hacking this particular DIY project.

On-line research (word to Pinterest!) turned up some Mod Podge screen printing tutorials, but regular Mod Podge isn't waterproof, and that's all I had access to. Since I knew my friends would be making a ton of prints, I didn't want to risk any gumminess or dissolution.

Back to the drawing board internets. Where I found an article recommending latex paint, which I have coming out of my ears (figuratively speaking. And only sometimes literally).

I chose to use a (zero VOC) latex primer because it fills gaps so well, but if you don't have any latex paint laying around, you can usually get mismatched quarts cheap at the home improvement or re-buildng store. They're only a buck at my local place! Add that to the 99-cent thrift store wooden embroidery hoop and the (free) mesh polyester curtain fabric (it came with my house, but you can thrift similar ones), and this particular screen + frame only cost a little over a dollar and a couple of hours of my time.

Here are a few photos of the screen I made (using their design).


As mentioned above, the logo is their work; I traced it from the artwork they provided and painted it on the back of the screen. You can see that it's possible to get pretty fine detail on the lettering which opens up a wide world of possibility using text-centered designs and other fine-line work.


Too much ink + too much pressure = a terrible practice print.


Subsequent trials were better.


Their finished shirts turned out A. Mazing. (The printing and photograph below are both the work of people other than me, used by permission.)


(You can visit the Homeless Empowerment Network's Facebook page here.)


And then I caught the screen-printing bug, so I made a helicopter screen for my kiddo. As a happy coincidence, the helicopter screen gave me the opportunity to take more photos in-process.

STEP-BY-STEP DIY

1) Image drawn in pencil on the front of a stretched-tight piece of curtain in a wooden embroidery hoop (hoop up, with mesh screen flat on surface, like it will be when you're printing).


2) Negative space (everything but the printed image) filled in with primer on the back of the screen. Dry very well, overnight if possible. Drying it with a hair dryer will also offer you the advantage of heat-setting the primer.


3) Old t-shirt ready to be printed, with newspaper inside to absorb any seeped paint.


4) Screen on top of t-shirt, with ordinary craft acrylic paint pushed through using light pressure and a plastic gift card in place of a squeegee (you can also use fabric paint or screen printing ink. I tend to go cheap).


5) I didn't rinse between colors and using the tiny make-shift squeegee meant several pulls across the screen, so these have a nice, variegated appearance I liked for this project.


6) This one, too, a piece of the t-shirt quilt planned for our room (when I get around to finishing it up).


7) The key to longevity with anything screen printed it HEAT SETTING! Use an iron with a cloth over your design, or run it through the dryer on hot, and you're good to go!


Thanks to R & E for inspiring my return to screen printing! I hope you guys try out some other projects, too!

* In case you're unfamiliar with the Thermofax screen printing process, here's a short summary. The 9x12" screens come pre-coated with a heat/light sensitive emulsion. This gets run through a vintage Thermofax copier coupled with a reversed, carbon-rich image. The result, in seconds, is a screen-printing screen burned with a near-perfect replica of your image.

Ha! I just got the June/July issue of Family Fun Magazine and they have an article on Mod Podge screen printing! It's a small world, after all.


(p.s. you can make these photographs larger just by clicking on them, but then, you probably already knew that.)


Linking up to:

Handy Man, Crafty Woman

Tip Me Tuesday at Tip Junkie

A Bowl Full of Lemons

Mommy by Day, Crafter by Night

Today's Creative Blog

DIY Show Off

Simple Design's Thrift Haul

The Stuff of Success


Tuesday, June 5, 2012

visiting my old life (cover design)

I recently finished a stint filling in at my old job. One of the authors I designed a cover for over the past few weeks was especially thrilled with my work, so I thought I'd share it here.

Front:


Back:


The design started out much worse than it ended up. I figured out pretty early on that the photograph I'd considered using wasn't going to cut it (pun intended), so nixed it after a couple of attempts to integrate it, and went all free-hand with the pen tool in illustrator working up layers . . .

The book is forthcoming this month from Wipf & Stock Publishers. You can also follow the blog of the author, Sarah Wells, just by clicking her name.

Thanks for reading! If you have any questions about book cover design, please put 'em in the comments below, and I'll do my best to answer them, using my (limited) knowledge. Chip Kidd I ain't.


(p.s. You can make the images on this page larger just by clicking on them, but you probably already knew that.)

Sunday, June 3, 2012

baby-safe "roman shades"

We had a homemade Roman shade in the kitchen (I made it when we first moved in six years ago), but considering the number of recalls of Roman-style shades in the past couple of years, I was never comfortable with it after my kiddo was born. Have I mentioned what a crazy climber he's become lately? I think he has mountain goat aspirations.

Anyway, it was time to nix the kitchen's strangulation hazard in favor of this simple faux Roman shade.


A lot of the tutorials you'll find for "faux roman shades" are actually valances that don't ever drop to cover the entire window. This one does.

It's in no way perfect, but it is inexpensive, easy, and functional. And by functional, I don't mean "easy to open due to an elaborate system of cords and pulleys", but "covers the window at several different heights, providing privacy without blocking too much light".

Again, no strangle-y bits here.

First, clear out your old window treatments.


Acquire three simple tension rods long enough to fit the width of your window, and a painter's canvas drop cloth. Your canvas drop cloth should be wide enough to accommodate a (pre-washed) single piece as wide as your window and twice as long (plus seam allowances and about three inches of length to make a pocket for the rod).


Loosen the screws, fit the tension rods to your windows, and tighten the screws.


Install two of the rods as shown, effectively splitting the window into equal thirds.


Hem your canvas panel along all sides and bottom, and create a pocket at the top that can accommodate the curtain rod. Hang it at the very top of your window.


Loop your shade behind the second (middle) rod, creating a deep fold.


Pull out the tail from the bottom, and repeat the loop-and-fold for the third (bottom) rod.


That's it! For us, because the window looks out into the less-than-scenic car port, it's not important that the shade open and close quickly and easily. When I want a breeze, I just pull and tuck and have this again:


Total time: about an hour (not counting the wash cycle). Total cost: $40 including three tension rods and one canvas drop cloth. You could cut the cost by using any fabric you have on hand, sheets, etc.

What's on your windows? I'd love to visit your (non-spam) links in the comments below!


(p.s. pictures can be enlarged by clicking on them, but you probably already knew that.)


Linking up to:
mop it up mondays

The Stuff of Success

Saturday, June 2, 2012

quick and easy seatbelt covers

The car seat we recently bought the kiddo (to replace the one in my car that tops out at a 40 lb. weight limit) included a couple of really handy little seatbelt covers. These are a definite bonus as his least favorite thing about riding in his car seats has been that the belts tend to cut into his neck when properly tightened.

He's been loving the new luxury seat. On the other hand, he's not been loving riding in my husband's car, whose seat does not have the accompanying seat belt covers. And on weekends and long road trips, that car is typically the one we travel in. It's been a little bit of an issue.

So okay; I decided I can either keep dressing the kiddo in hooded sweatshirts all summer (and pull the extra fabric up against his neck to protect it from the seatbelt) or I could just make a couple of seatbelt covers like the ones in the kiddo's other seat. Which is what I did.

Manufacturers typically recommend not adding accessories to car seats, but I felt this was an okay move for our family. After all, they also recommend against wearing excess clothing in a car seat, and the hooded sweatshirts were far more likely to interfere with car safety than two layers of thin cloth at one point on a seat belt. Also, because our other car seat had them as part of the stock package, I figured it was probably safer than other alternatives. You'll have to decide for yourself!

So, have I justified myself enough yet? :)

Here's what they'll end up looking like.


You can use any fabric for this project. I used pre-washed scraps of a cute gnome print by Michael Miller Fabrics, and some red felt. You'll also need thread and 3/4-inch sew-on hook-and-loop fastener (like velcro).

I also used the seatbelt covers from our other car seat as a pattern, but I took measurements for you: cut two pieces of patterned fabric and two pieces of felt measuring approximately 5.5 x 6.5 inches.

Round the corners, and stitch together one piece of felt and one piece of patterned fabric with right sides together. Leave about a quarter-inch seam allowance, and leave a couple of inches of one side open to turn inside out.

After turning inside out, press and top-stitch (stitch around the perimeter close to the edge) till it looks like this:


Cut four inches of hook-and-loop to fit along the long, straight sides.


Stitch the strips in place(right on the edge!), with the hook piece on one edge of the seat belt cover, and the loop piece on the other as pictured.


Trim loose threads and sharp corners of hook-and-loop. Fold in half. Complete!


Repeat for the second seat belt cover. Install in your car seat!


These take about twenty minutes, but you'll more than make up for any time spent the first time you ride in the car and no one feels like he's getting strangled in the back seat.

If you decide to make a set, I'd love to see how they turn out! Link in the comments below. Happy travels to you!


(p.s. you can make these pictures larger by clicking on them, but you probably already knew that!)


Linking up to:

mop it up mondays

The Stuff of Success