
Did I not promise you eyeball-melting cuteness? Bam!

Before starting, I tried valiantly to find the original source of this pin. I couldn't find it anywhere. But this is the image that started it all. From this, I interpreted, built, and eventually found a way to make a similar—but plusher—Kermie head. UPDATE: a commenter during the lead-up to Halloween 2014 found a link! http://www.pinterest.com/pin/190558627954115163/

Last year, when I made the Wild Thing head, it was big and round, and, to hear the mister tell it, uncomfortable to wear for very long. This year, I planned to make Kermit the Frog for the kiddo and Fozzie Bear for the mister. I didn't want them as large and unwieldy as the Wild Thing, but still cartoonishly large. I started with a wool baseball cap (brand new, found at Goodwill for 49 cents) and a sheet of 1-inch polyurethane foam from JoAnn Fabrics.
(Aside: having since read up on polyurethane foam, I would recommend instead using the polyester crib pads found in the section where the batting is kept. I'll write about my experience using those in a future post.)
I removed the brim from the cap, after first checking that the cap fit my kiddo, with only a little give.

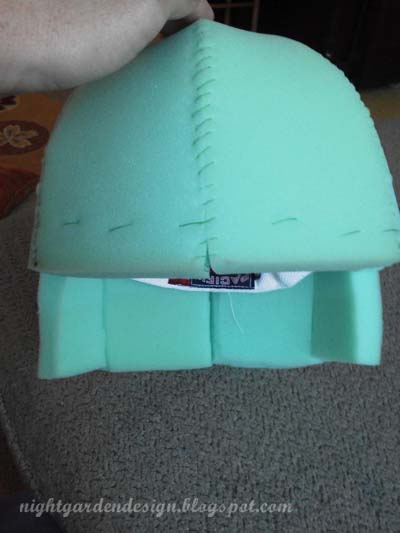
Using the cap as a pattern, I cut six sections from the foam: three matched the measurements of the hat sections (with about an extra half inch all around) and three with an extra four-inches on the bottom.

Two short sections at the front. Two long sections in the back. The third short and long sections I cut vertically down the center, and together they form the sides (you can kind of see what I mean in the photo below).

Everything is just whipstitched together; construction stitches don't have to be pretty since they'll be covered up later, luckily! The big running stitches along the bottom connect the foam to the hat base.
Two angled pieces make up the jaw; basically, two long rectangles with one end cut at a sharper angle. I attached this with pins while I test-fit everything.

Then I whip-stitched and test-fit again. He was ready to call it "done" at this point, but I didn't think it looked enough like Kermit. Or really, anything like Kermit. He thought he looked like a robot.

Clearly unnimpressed with my plans.

Non-pill fleece in Kermit green, cut to fit. Ish.

I machine-stitched it inside-out, then stretched it over the foam head.

I pinned along all the seams to get a better, tighter fit and to match the fleece seams to the foam seams so there'd be a single edge. Then I pulled the pinned fleece off the foam and stitched in on the machine.

Here it is, back on, right side out with the seams trimmed to avoid lumpiness.

The fleece was cut long enough to pull over the edge and attach to the cap on the inside.

I used a hidden stitch to attach the fleece to the cap. I know it doesn't look hidden here . . .

. . . but then I pulled it tight and the stitches pretty much disappeared. Voila!

Same deal for the jaw; I left one end of the jaw piece loose for velcro, so I cut the fabric a little longer to make a tab on that side.

I found a handball to use for the eyes. I used a kitchen knife to cut it in half along the seam.

I painted them white, too, then held them up to the head and realized they were way too small. Kermit needed bigger eyes.

I found a sack of foam baseballs at Goodwill and when cut in half, they made perfectly sized Kermie eyes.

I tried wrapping with felt and hot glue, but I didn't like the bunched up felt on the back, and the edges didn't come out smooth enough.

So I cut the felt smaller and stretched and pulled and ironed with a hot iron till I got nice, tight wrap, then hot glued in place. I ended up doing two layers per ball to cover bumps.

Ba-bam!

With felt pupils attached with craft glue.

The stressful part: planning proper placement, then actually cutting into that fleece. Once you commit, you commit. I used washable Crayola markers to mark the placement so that I wouldn't have pen marks all over my finished piece.

Then I just tucked the eyes inside and attached them to the foam with hot glue. Completed head!

I used this photo of Kermit as a guide along the way, including counting the points on his collar before cutting them out of felt and making a collar.


It's just a long, thin rectangle of felt cut to measure my kiddo's neck, plus an inch for the velcro tab. I cut out the triangles, then sandwiched them between the folded-over rectangle.

I wanted to go simple for the suit, so I picked up one size 6-8 t-shirt and one size 16-18 t-shirt from the boy's department at Target.

The larger shirt was used to make the pants. I used another of my kiddo's pairs of pants as a pattern.

Then I cut the pant legs from the large shirt's sleeves. Here's one tutorial on an easy way to do this, if you've never heard of it before.


But since I'd bought the extra fleece anyway, and since it gets cold here around Halloween time, and (ahem) since it would match better, I sewed him a little fleece suit to go over his t-shirt outfit. Perfect match!

To quote Miss Piggy, "Oh Kermie! Mwahh, mwahh, mwahh!" (those are kiss noises).

We taught him to say, "Hi ho! Kermit the Frog here!" like in the old Sesame Street News Flashes. So cute.
What have you been working on this Halloween?
Fozzie bear post coming soon, but in the meantime, thanks for reading!
p.s. you can make these photos larger just by clicking on them, but you probably already knew that.
Linking up to:
11 comments:
LOVE, LOVE, LOVE this. It's the eyes that do it for me. Kermit is all about those eyes and you nailed them! Adorable!
This is seriously awesome! Great job :)
Wow- you're a super-mama! The costume is adorable, and the construction is very impressive. What a lucky kid. :)
P.S. I'm Jessica, Shawn's co-worker.
Is + Was
www.isandwasblog.blogspot.com
well done! i'm super impressed...my kiddos are wearing store bought costumes. Might have to remedy that for next year!
Oh my goodness. You have some serious...serious talent. That is one adorable costume and little one too!
Are you already thinking of next year's costume?
I, for one, can't wait to see it.
This is amazing!! You are seriously talented :)
Adorable costume! Seriously amazing job. I can't wait to have kids that I can sew costumes for :) Though I'll have to brush up on my sewing skills first!
Adorable costume! Seriously amazing job. I can't wait to have kids that I can sew costumes for :) Though I'll have to brush up on my sewing skills first!
Thanks, everyone! Halloween costumes are definitely a labor of love around here.
Awesome job! That photo looks familiar- here are the links in case you're still curious: http://www.pinterest.com/pin/190558627954115163/
https://www.etsy.com/shop/JustZipity
Anyway, I didn't want to spend $40 on the mask, so I'm giving it a go on my own. Thanks for the excellent tutorial.
Holy cow! How adorable! :) Very impressed and thankful for your tutorial. Will try this for sure!
Post a Comment