Saturday, November 30, 2013

ducks' pond birthday cake

I started out with plans to make a bottle cap cake, but the kiddo started looking at the cake books and really wanted his dad's birthday cake to have ducks on it.


These were made using the directions in What's New Cupcake?  by Alan Richardson and Karen Tack. We used marshmallows instead of donut holes for the heads and mini chocolate chips for the eyes, but otherwise the ducks are pretty close to their predecessors. We chose the "melted frosting" approach to coating the ducks, which was a success.


The pond is colored buttercream through a star tip, and I used chocolate rocks and confetti sprinkles around the edge of the platter for the shore.


And yes, it looks more appropriate for a baby shower than a grown man, but the Mr. was a good sport about our kiddo's decision to add some ducks into his birthday celebration.


But sometime soon I'm going to try again to make the bottle cap cake I'd planned on. Unless my kiddo's agenda sounds more fun.

Are you working on any non-conventional food lately? Anybody else have kids who like to play art director?

Thanks for reading!

Sunday, November 24, 2013

just in time for the holidays: 7 diy gift tutorials from my blog


With the holidays coming up, I wanted to put together a quick post for you all featuring links to seven of my most popular DIY gifts! Here they are, in no particular order, so you can spend less time and money at the mall this year, and give gifts that mean a lot to family and friends who mean a lot to you.

1) The Inventor's Supply Kit


Originally made for my nephew, this has been popular on Pinterest this past year. Wanna put one together for someone special? Here's the link.


2) Rupee Crayons


These were party favors for my kiddo's second birthday party, but if you make a mold using the silicone kit I link to, you could make a set for every kid on your gift list. They look awesome, but are really inexpensive and fun. Find the tutorial here.


3) Faucet Handle Coat Rack


If you like upcycling and repurposing (and you have a second-hand building supply store in your area) these make really nice gifts, and they're something you can put together pretty quickly. You can find instructions here.


4) Monster Pillows


Made of scraps of faux fur and felt, these monster pillows are one of my favorite projects to make for a quick birthday or Christmas present. With a single yard of faux fur, you can make four to six 12-inch pillows (depending on the width of the bolt of fabric). Make a few this holiday season using my quick tutorial.


5) Measuring Tape Growth Chart


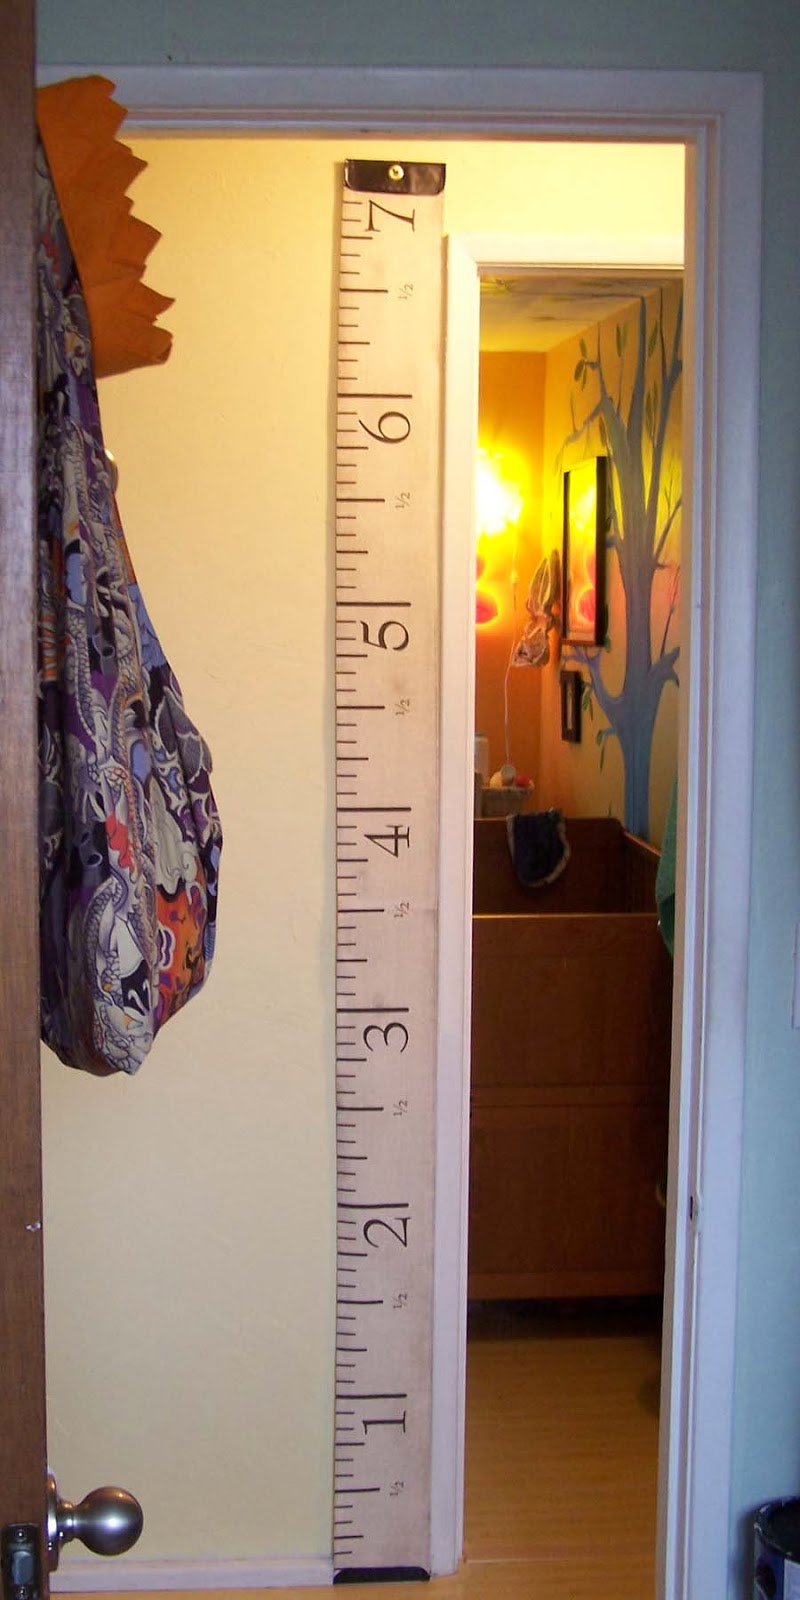
There's still time to order some measuring tape growth chart fabric to put together one of these wall-hangings for someone you love! Spoonflower is about ten days out on orders, but that should still give you a bit of time for assembly if you get your order in soon. (I sell the fabric and finished charts through my Etsy store, too, but my supply is low right now due to holiday orders). Click here for the assembly instructions. Oh, and I have a metric version available, too! (One yard will make 2 1/2 charts, or order single panels directly from me.)


6) Cheap-o Screen Printed T-shirts (or tea towels)


Custom screen printing with mesh fabric, embroidery hoops and latex paint? Yup. Make your own t-shirts this Christmas and knock a bunch of names of of your shopping list.


7) Freezer Paper Printed T-shirts (or tea towels)


This is a great project for one-off prints. In this post, I present a dinosaur t-shirt, and links to other places in my blog where I feature a pretzel shirt, viking t-shirt, and wood-grain flour sack tea towels. Infinitely customizable, without the time investment of making a silkscreen for each design. Find it here.

All right, readers! Go forth and craft like you've never crafted before! Let's do this!

Saturday, November 16, 2013

thrift store finds: vintage scales


The white "Family Scale" came from an estate sale and the brown postal scale came from a thrift store, both within the past few months. Both are in good working condition and measure accurately.


I think they'll make charming display pieces at weddings on the candy or favor tables.


I can also picture the scales being used as uniquely awesome cake stands (with the cardboard cake board attached to the scale's top with some adhesive tabs).


And I think the family scale would look extra cute on a baby shower table!


I always think it's curious how I find things in batches, like theses scales, or my hoosier boxes (of which I now have three), or pianos (I only have one, but I saw several at thrift stores in the months before and after purchasing mine. It must have been piano season).

Have you noticed that, too?

Thanks for reading!

Linking up to:
The Cottage Market 
Helene's Legacy

Friday, November 15, 2013

crayon casting -- planes edition, part two


Hi again! As mentioned in my last post, I went off-label on this project. By which I mean that the package for the crayon mold explicitly states, "For Use with Melt'n Mold Factory Only".

Have you seen the Crayola Melt'n Mold Factory? It looks pretty cool. It's kind of like an Easy Bake Oven for crayons: there's a heating element that melts old crayons down to liquid wax and guides it into a mold via a metal tray. And it's a kids' toy, marketed to kids age eight and up. I don't have one because I'm a grown-up who owns a stove, I have little excess storage space, and also, these run from $40 (Target) to $54 (Crayola) to $69 (Fred Meyer).

I love creative toys, but I'm also a fan of creative methodology. And recycling.

So, as it turns out, we're planning a bit ahead for a "Flying Things" birthday party after the new year, and coincidentally, I bumped into the Melt'n Mold booster packs in the art aisle at Target the other day. They had an airplane one, from the Disney movie Planes. Dusty Crophopper, for you fellow parents of preschoolers. It was in the $7 range.


I bought the mold under the assumption that a mold is a mold is a mold. If I can use it with the Factory kit, I should be able to use it without the Factory kit. I poked around on-line before opening the box to see if anyone else had used it that way, and turned up nothing. Luckily, it works just as any other mold works.

 I will say, this kit comes with twelve crayons and claims to make four planes. Coupled with the size of the images on the box, I believed this meant the mold inside would make crayons approximately three crayons large.


But no. The mold makes planes that are a little over an inch in wingspan, and each uses about one crayon's worth of wax. The other two crayons worth of wax must be considered waste wax or something. I got twelve planes using the materials in the box (and then a few dozen with my own materials). Here's how.

First, I got out the crayons. I had a largish box of salvaged thrift store crayons leftover from the last two crayon casting projects (here and here), so I sorted them into groups by color family.


Here's a little glass jam jar with a few varied-color broken crayon pieces in it, heating in a pot of simmering water . If you don't stir or shake the jar and let it simmer over medium-low heat, you can maintain some color separation necessary for that neat marbled effect.


Here's the mold, filled. I used a paper towel to pick up the jar, then gently poured the hot wax into the propped-up mold until it was filled to the line. You'll note a lot of excess at the top of the mold, which can later be broken off and re-melted.


I say to prop it because I discovered the best way to fill the tiny tail fins completely is to rest the mold against something at an angle.


Once each plane crayon cooled, I pressed the center together with my fingers while prying the mold carefully apart. When the bottom half of the mold was off, I turned over the mold and popped the plane out onto a soft paper towel cushion. It mostly worked like a charm, except for the occasional broken propeller or tail fin when breaking off the excess wax.


I tried to use up a lot of my crayon stash and to make some nice swirls; some were more successful than others, but all will make nice party favors. I would recommend that if you want to make a lot of these, having two molds will make the work go faster. It takes about ten minutes for the wax to melt and ten minutes for the castings to cool, so I had the stove on for the better part of a day.


Still, not bad for a $7 investment!

Remember: using art and craft materials against their intended use can be dangerous, so please take precautions to protect yourself! Heating crayon wax in simmering water is not child-safe, and neither is handling melted crayon wax. Grown-ups only! Careful grown-ups only! Safety glasses! Aprons! Gloves! Etc!!!!

That said, I really liked the way the mold worked for this project.

Thanks for reading!

Sunday, November 10, 2013

crayon casting -- planes edition, part one

We're keeping pretty busy around here, keeping up with Esty orders and getting Christmas gifts started. I hit the ground running after Halloween, and still managed to eke out another preschool birthday present.

And then, of course, because I sometimes get simultaneously ahead of and behind myself, I started casting some crayon party favors for the kiddo's birthday party . . . which won't happen until after the new year. I'm determined to go low key this year, in keeping more with his personality.

I'll be back with a tutorial soon (I went against label when using this mold, and want to share my experience) but I didn't want to leave you hanging while I get photos taken and edited. So here's what we'll be making when I see you next:


Edited to add: the second part is available now! Click here to see how to make your own.

Monday, November 4, 2013

hometown tourist: pre's rock

I've been searching for Pre's rock since I moved to town. Not heavy-searching, mind you, but every now and then I'll get a wild hare and set off on a drive, and sometimes I end up in the hills.

Driving through the south hills, the sign points you up a curvy mountainous road lined with pretty houses with steep driveways. This is where Steve Prefontaine was driving the night he lost control of his MGB.

And invariably, seeing no further signs along the way, I have always continued straight (the left fork) up the hill when driving. Pre's Rock is on the right fork.


A former high school runner in the PNW can't escape the mythology of Oregon's runners. It was here, after all, that Nikes were invented, here where the Olympic Track and Field trials have been held five times, and here where Pre won 78% of races he ever ran. Looking at just his college races, that percentage leaps to 100% at the UO. Our coaches would wax poetic about what might have been, and what could be for us.


We found it in the rain one day when out for a drive and pulled over quickly to take a couple of photos with my phone. It's a bit of a shrine, really, which I was prepared for. Runners leave shoes, race numbers, singlets, flowers. Lovely how new generations of young athletes keep his memory alive.


Thanks for reading.

Friday, November 1, 2013

i'm gonna wreck it!

This is the premise of the video game, Fix-It Felix Jr.: 
Ralph owns some land. Citing Imminent Domain, the Nicelanders forcibly move Ralph from his land and into a garbage dump in order to build an apartment building. Ralph objects. He gets angry and vows to tear down the building, but everything he breaks, Fix-It Felix Jr. fixes with his dad's magic golden hammer.

Good guy?
So really, Wreck-It Ralph is the underdog. The premise of the movie, Wreck-It Ralph (upon which we designed our costumes this year) is that Ralph gets tired of not being appreciated for doing his job for thirty years. Felix gets all the medals and friendship; Ralph still lives friendless in the dump. So he ventures out into the hub to find a video game in which he can win a medal of his own . . . and the respect of the Nicelanders. 

The Mr. was Wreck-It Ralph this year, to go alongside the kiddo's Fix-It Felix.

We spiked his hair with some red Spirit Gel by Zach's Wax. It has really good hold, and doesn't smear if you hit it with a hair dryer before going out.


The shirt is a burnt orange polo shirt from Value Village ($3) with the collar removed and the cuffs torn to match the movie. I painted on the plaid pattern by blocking off horizontal stripes with masking tape and spraying with watered-down brick red acrylic paint (this worked a ton better than that crappy fabric spray I tried on my leggings awhile back).

Once those were dry, I drew in the blue lines using a Crayola fabric marker, then masked off the vertical stripes. I sprayed those with watered-down white acrylic paint, applied thinly enough that the other colors still show through where the colors overlap. We were all pretty pleased with how close it matched Ralph's "real" shirt.

I made the overalls using four yards of flannel and some white thread.


I used a pair of the Mr.'s jeans for a pattern for the bottom, adding a couple of inches to the side of each piece of fabric before cutting. Then I referred to a pair of my kiddo's overalls to determine the shape of the bibs, pockets, and straps and all the lines of stitching. 


Some metal overall hardware finished them off. Total cost of the overalls was $12.50 with fabric store coupons. 


I thought ahead and bought the orange flip-flops in August on clearance. Ralph usually goes barefoot, but Ralph's a cartoon. Real-world peeps wear shoes in October in the PNW.

We also bought a pair of Disney-licensed Wreck-It Ralph Wrecking Fists, but they were a little tight and hard to work in, so they got left behind on Halloween (although they did make an appearance at the preschool party). Don't worry; we bought them on clearance over the summer, so it wasn't as big a waste as if we'd paid what they're going for now on eBay.

I'm hoping to have a photo of the three of us to share soon; I actually finished my Vanellope costume in time, so I'll be going over that in a future post.

Happy November, everyone, and thanks for reading! I hope your Halloween was a smashing success. Pun intended.

(p.s. you can make these photos larger just by clicking on them, but you probably already knew that, clever you.)

Thursday, October 31, 2013

homegrown jack o'lanterns

This is the sum total of our pumpkin crop from this year. The large one is about preschooler-head-sized, for size reference. The third from the left rotted out before we got the chance to carve it, so we had a total of three home-grown to carve this year.


The guys are working on the big one as I type, but here are the two little ones! Happy Halloween!


Friday, October 25, 2013

found: good news / bad news

Found at the school playground last weekend, in separate locations. (Click to enlarge.)


Tuesday, October 22, 2013

rubber eraser wrapping paper printing

For the dinosaur-themed birthday presents I mentioned back in the chasmosaurus t-shirt post, we wanted a little dino-themed paper for wrapping.


Among the many craft supplies I had laying about were some Pink Pearl erasers and some accounting-style graph paper from the Goodwill. Combined, they made some Jurass-tastic gift wrap!

I used an X-acto knife to cut one side of the eraser to look like a brachiosaurus . . .


. . . and cut a prehistoric palm tree onto the other.


Then the kiddo and I got out the washable stamp pads and stamped blue dinosaurs and green trees all over the graph paper. I guided his hand a bit to keep a pattern going, but a couple of randomly printed sheets turned out pretty nice too.


I accented with some pens and wrapped up the gifts (a t-shirt, as previously mentioned, and a hat I'll be blogging about soon). I also drew some little tags to go with each gift. One of these days I'll remember to photograph every part of a process; that day is not today.


And there you have it! Some fancy wrapping paper you can whip up for any occasion with stuff you probably already have. 

Thanks for reading!


Sunday, October 20, 2013

thrift store finds: raspberry patch

I can't tell you much about Grace Paull, except that she was an extremely prolific children's author and illustrator. I found this book (Raspberry Patch) downtown at the Assistance League Thrift Shop for $1. 


The copyright date is 1941, and the illustrations alternate between b&w and color lithographs.


It tells the story of a bright, curious little girl and her mother who go to pick raspberries one July day, and discover various creatures (daddy long-legs, bee, butterfly, grasshopper, etc.) hiding in the bushes. 


I like it for a lot of reasons. The storytelling is sweet and nostalgic, all of the illustrations are nicely composed, and the limited color palette in the color lithographs is all about summer and light and discovery.


Copies are available reasonably priced on Alibris if you'd like a copy of your own. I'm hanging on to this one for now; it feels like a treasure so it must be one, a bit like the leaves and fir cones my kid keeps collecting.

Thanks for reading!

p.s. you can make these photos larger just by clicking on them, but you probably already knew that, clever you!

Linking up to:

Saturday, October 19, 2013

finishing up the fix-it felix tool belt + boots + jeans


If you're following along with the Fix-It Felix costume tutorials, you can find the golden hammer tutorial here, the cap here, the shirt/name patch tutorials here, and the glove tutorial here. Here on in, I'm going to cover the boots, pants, and the tool belt.


We lucked out and found a pair of pre-schooler-sized work boots in my kiddo's size at a thrift store for a couple of bucks. Maybe it's because we live in the Northwest; there were three similar pairs in different sizes on the shelf the day we found these. I highly recommend checking thrift stores for these before you buy something new, especially if the work boots are going to be semi-retired after Halloween.


The laces were shredded, so I replaced them. A new pair cost around $2 from Target. I know tons of other stores carry them for a similar price. Also, to help you pick the right shoelace length, count how many pair of holes your boot have. There'll be a guide on the rack or the back of the package to tell you the correct length. Handy, right?

The jeans are just as easy. If you don't already own a pair, these are super-easy to thrift. Go for straight legs in a dark finish to most closely resemble the movie. Then, just roll the cuffs for a perfect match.

The Tool belt

On to the tool belt!


I'll save you the trouble of my silly repetition and link you here to the Two Little Hooligans toddler tool belt tutorial. I used her measurements but made some changes to build my kiddo's tool belt. To start, I used a piece of painter's tarp to make mine.


I made my hammer first, then I measured around it and added four inches to determine the size of the hammer loop. This seemed to me to be the very best way to make sure the hammer would later fit inside the hammer loop.


I simplified the pockets by leaving off the second tool loop and attaching the pockets directly to the belt instead of using the sliders Christina recommends on her blog.


I decided it would be a good idea to dye the tool belt before attaching a buckle so that the dryer wouldn't do what the dryer does when heavy metal buckles go in. 

I used the same combo of Dylon's Sunflower and Terra Cotta dyes that I used on the first pair of cotton gloves in yesterday's glove tutorial. If I had this to do over:I'd have dyed the fabric first, and sewn the tool belt second. I really liked the structure of the belt better before it went through the wash.


The Hooligans tutorial uses a plastic buckle, I wanted to use a metal buckle. I saved some money and got a sweet looking buckle by buying an old leather belt at St. Vinnie's.


If you decide to use a recycled belt buckle, check the back of the belt; some use snaps so you won't even have to cut into the leather.


After checking my kiddo's waist measurement, I stitched the buckle onto the belt, punched a hole, and done!


And that's it, all done! Thanks for hanging in there for all of the many posts. Good luck and happy Halloween!